Building Quizzes or Tests
A key feature of Summations is its ability to create and administer quizzes and tests. These assessments are essential for evaluating student understanding while providing instructors with valuable insights to track progress and adapt their teaching methods.
There are two ways to build a quiz or test in Summations: directly from a selected unit or within the Quiz tab.
Building a Quiz or Test from a Selected Unit
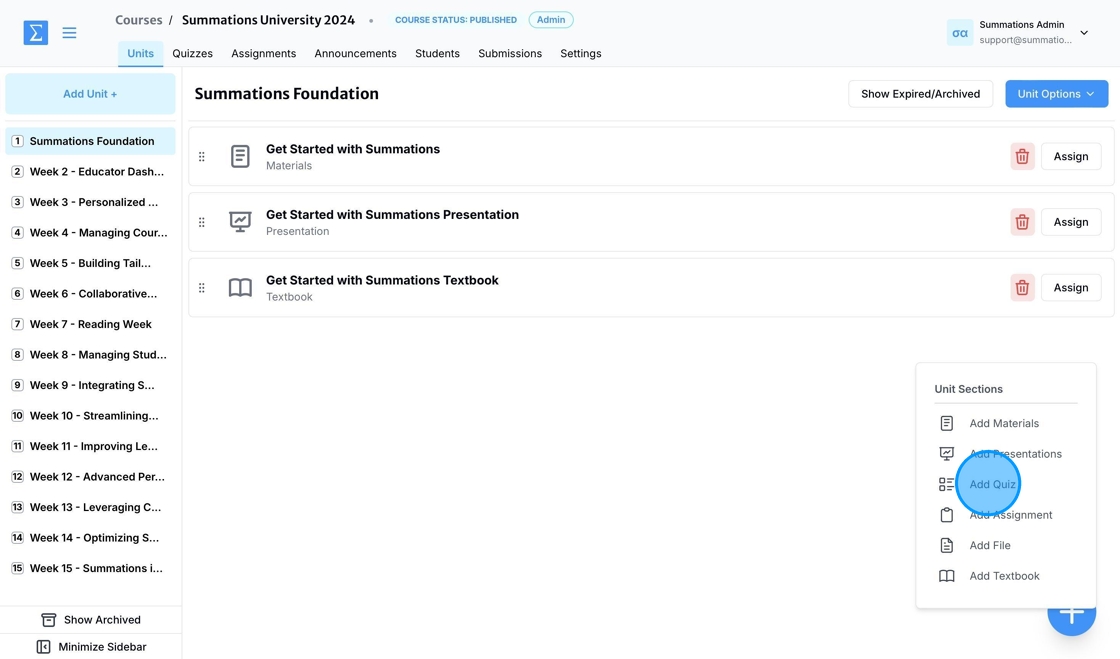
Under the selected unit (Refer to the article "Add Units" for detailed guidance on creating units), click the '+' button located in the lower right corner and select 'Add Quiz'.
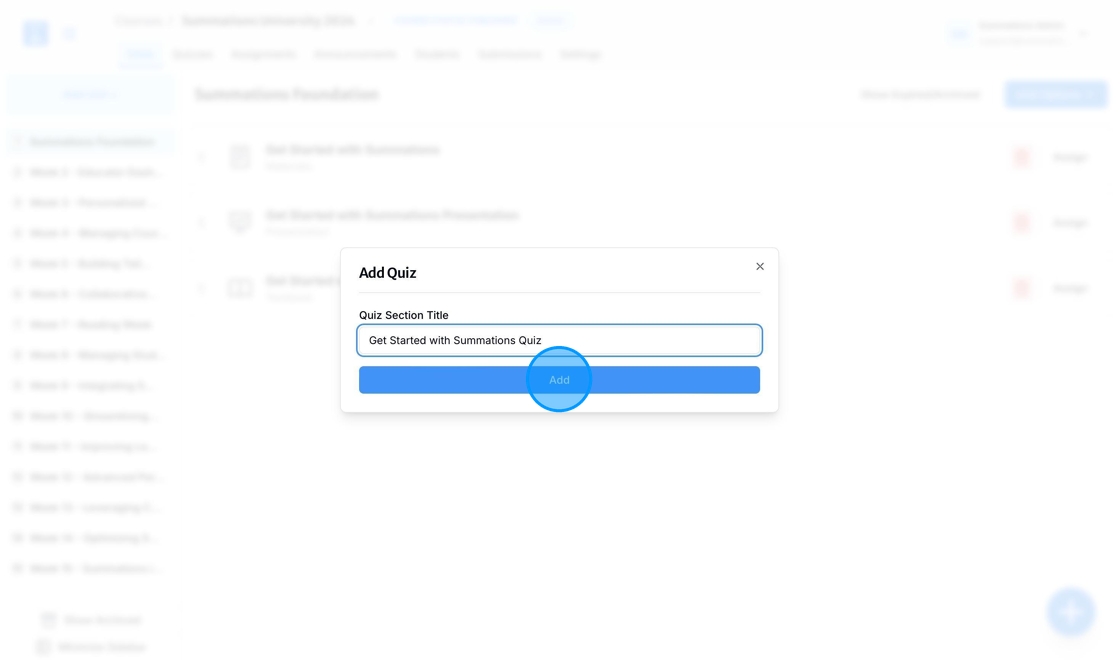
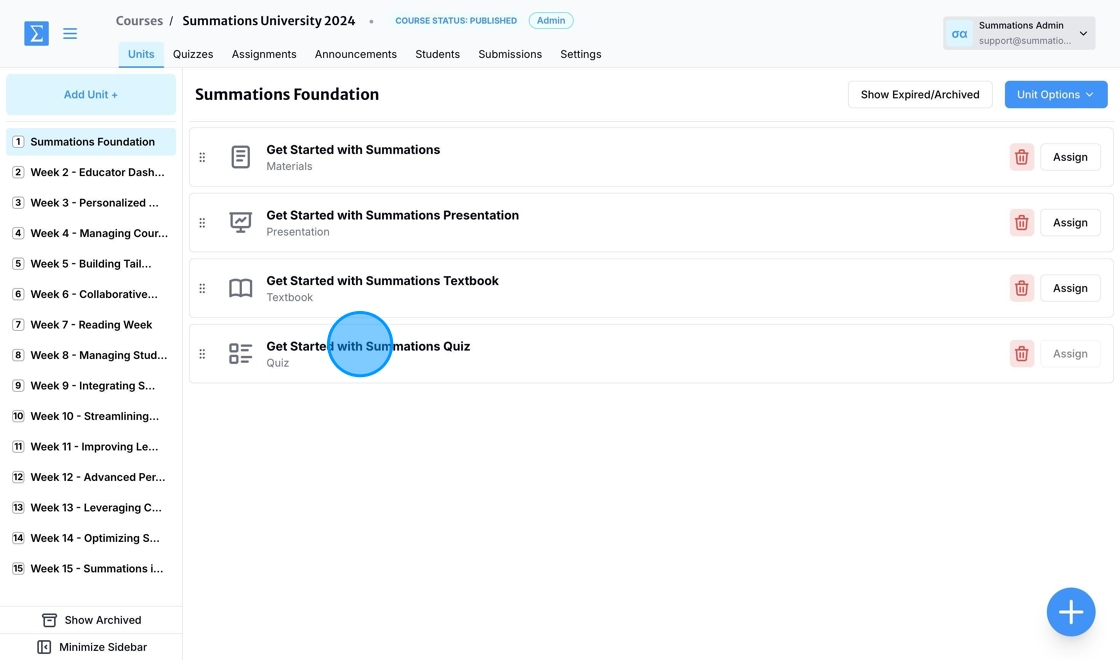
Enter the title of your quiz, then click 'Add.'
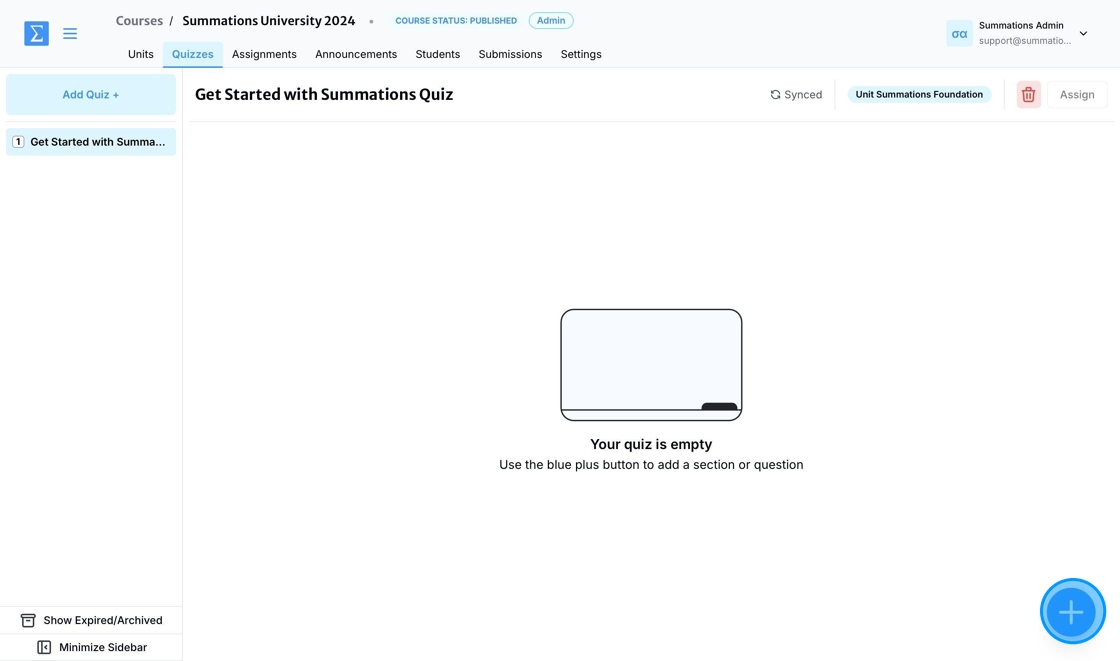
With the Quiz section now created, you can begin building your quiz. To add questions, click on the quiz section to enter and start editing.
Click the '+' button in the lower-right corner.
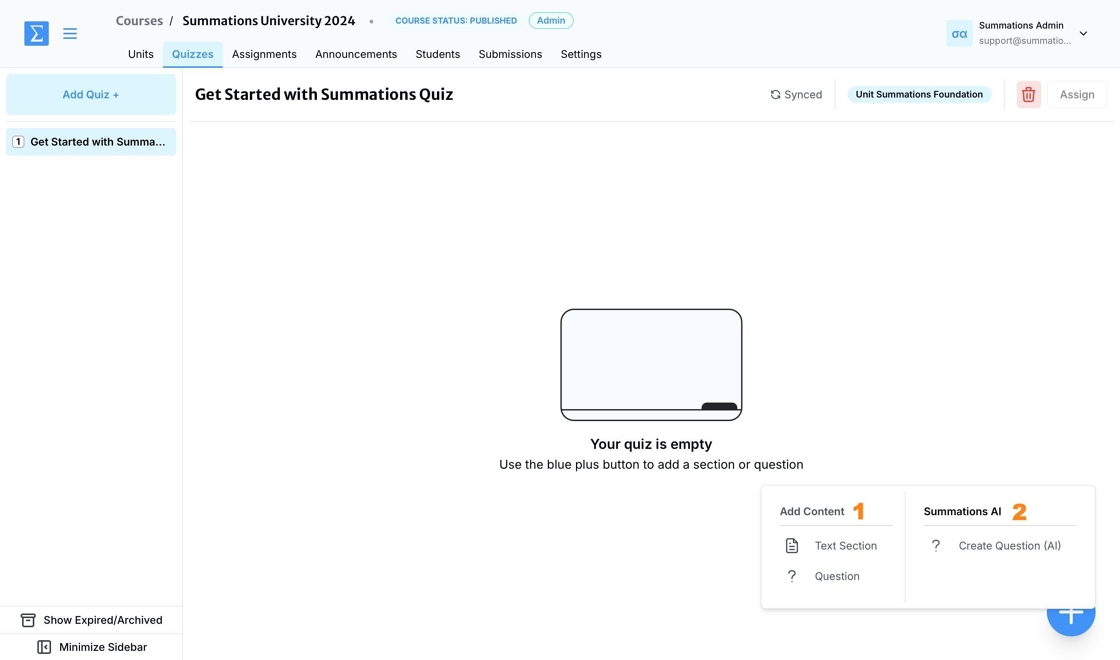
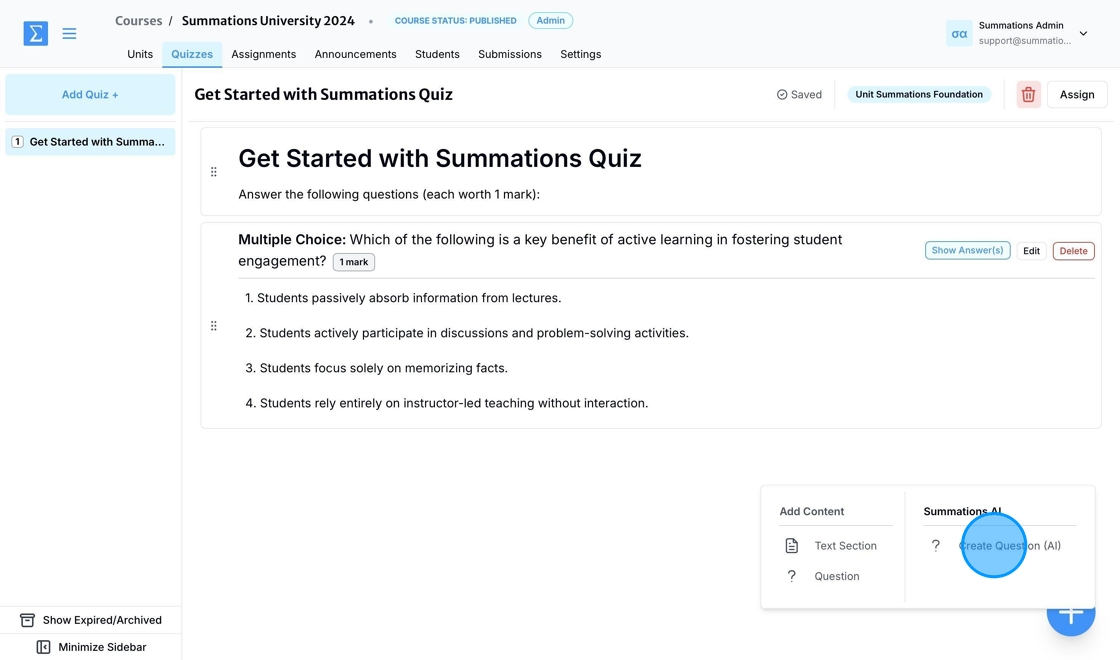
When you click the '+' button, you’ll see several options to design and organize engaging quizzes:
1. Add Content
Text Section: Write and format text to provide instructions or additional context for the quiz.
Question: Manually create and add various question types, such as multiple-choice, true/false, short answer, or long answer, to test student understanding.
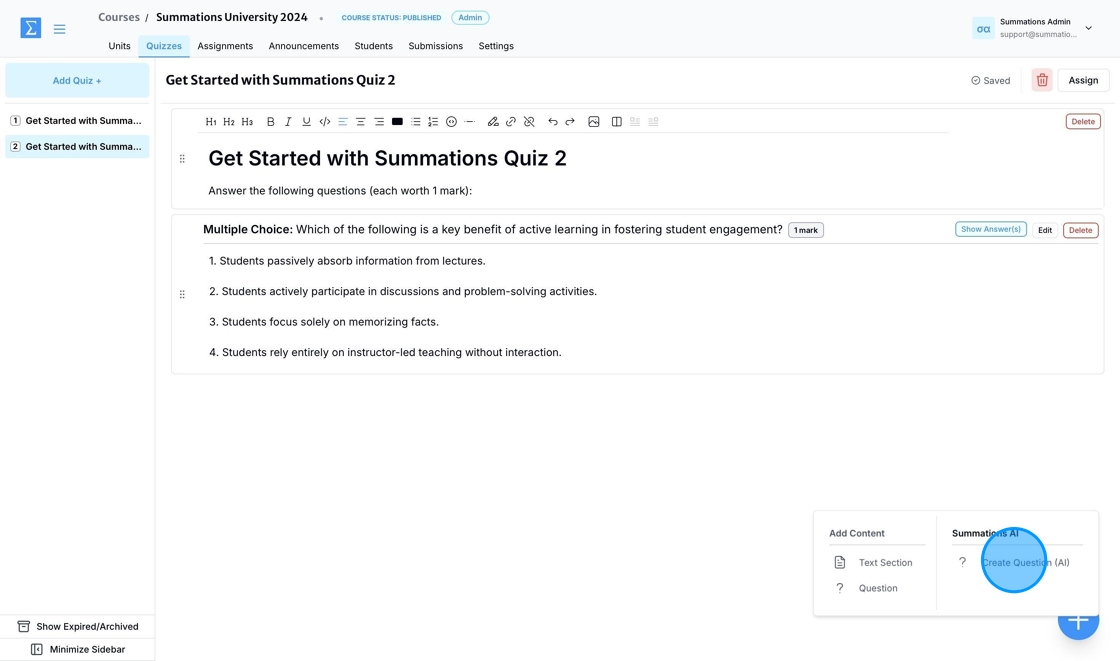
2. Summations AI
Create Question (AI): Use AI to generate quiz or discussion questions based on your course content. This feature saves time by automating the creation of questions tailored to your material.
Add Quiz Instructions or Provide Additional Context Using Text Section
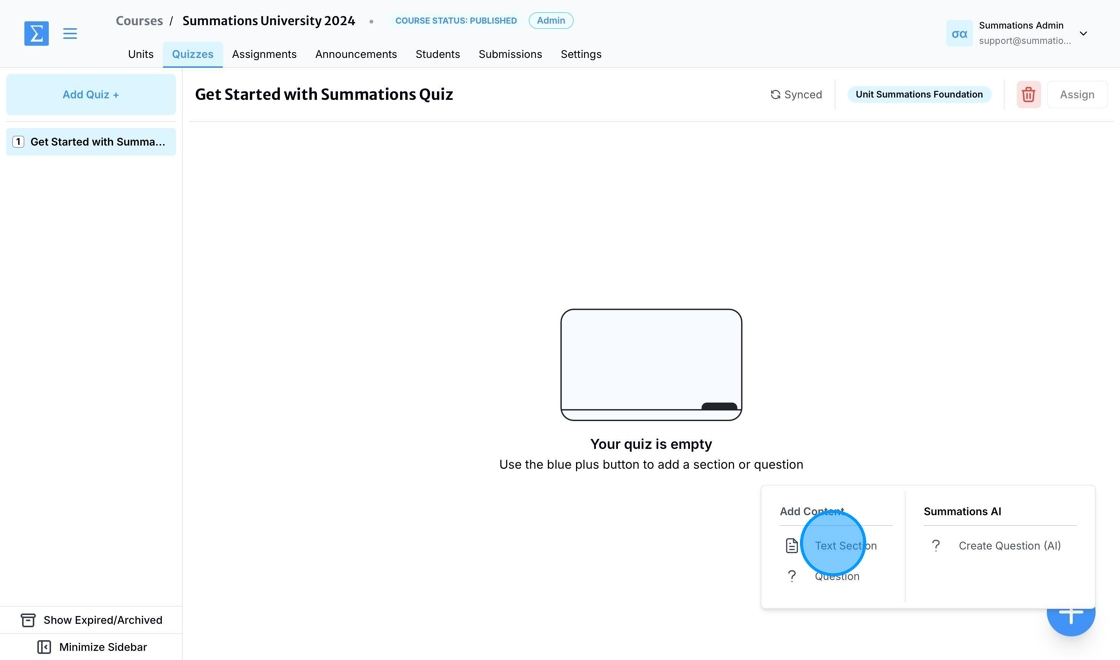
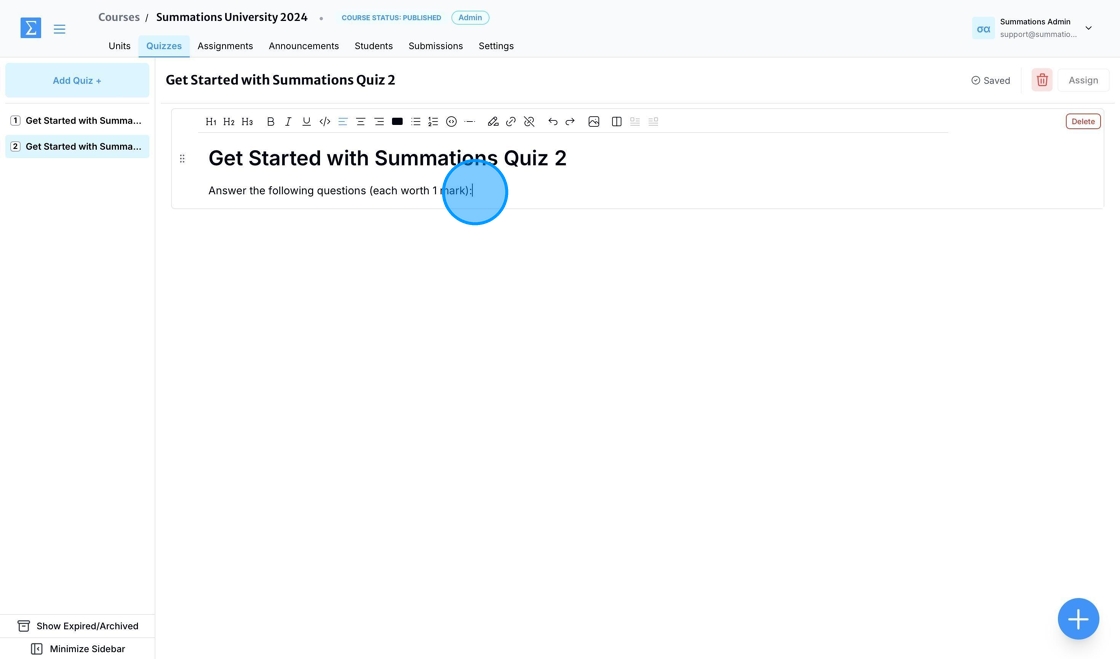
You can add text, such as an introduction or instructions for your students, by clicking 'Text Section.'
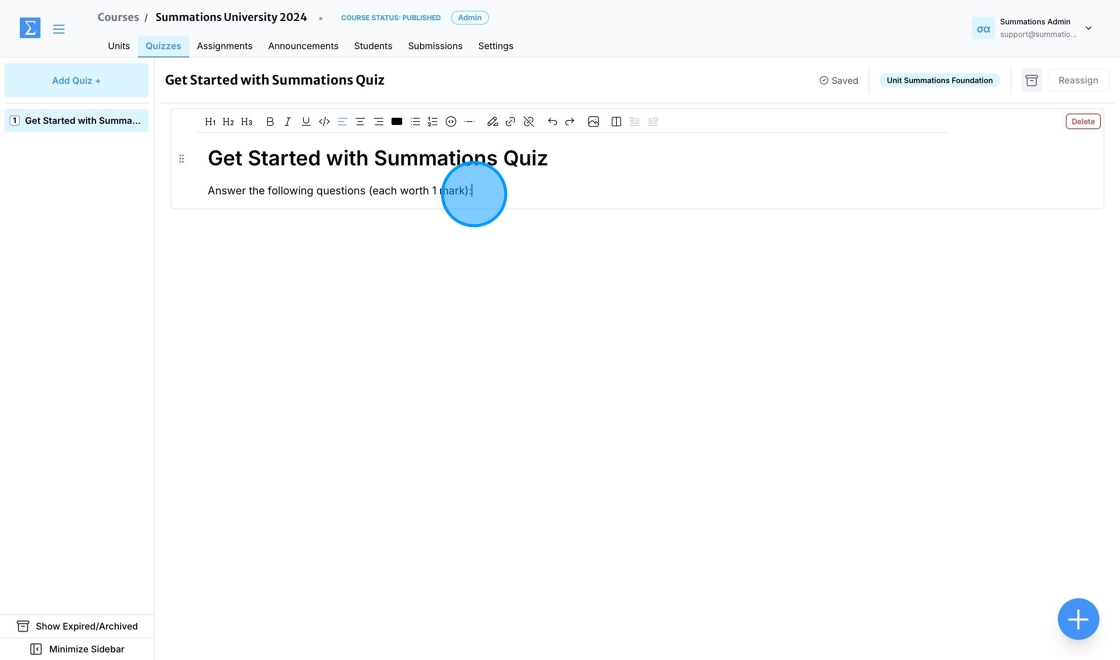
This will open a text editor where you can input, format, and structure your content. The text editor allows you to:
Use headings and subheadings to organize the material.
Add bullet points or numbered lists for clarity.
Apply text formatting options, such as bold, italics, or underline, to emphasize key concepts.
Insert hyperlinks to direct students to additional resources or references.
Include media resources such as images and videos.
Any content added under the Quiz section is automatically saved and synced to the cloud. You can view the saving status in the top-right corner.
Manually Add Quiz Questions
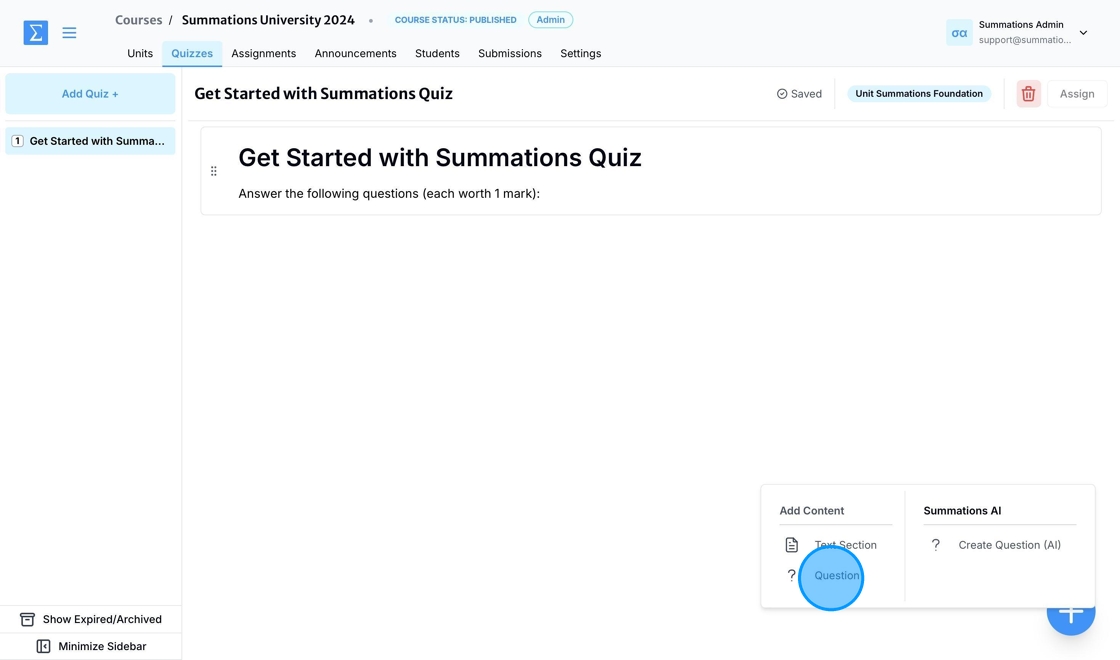
To manually add a question to your quiz, click the '+' button and select 'Question.'
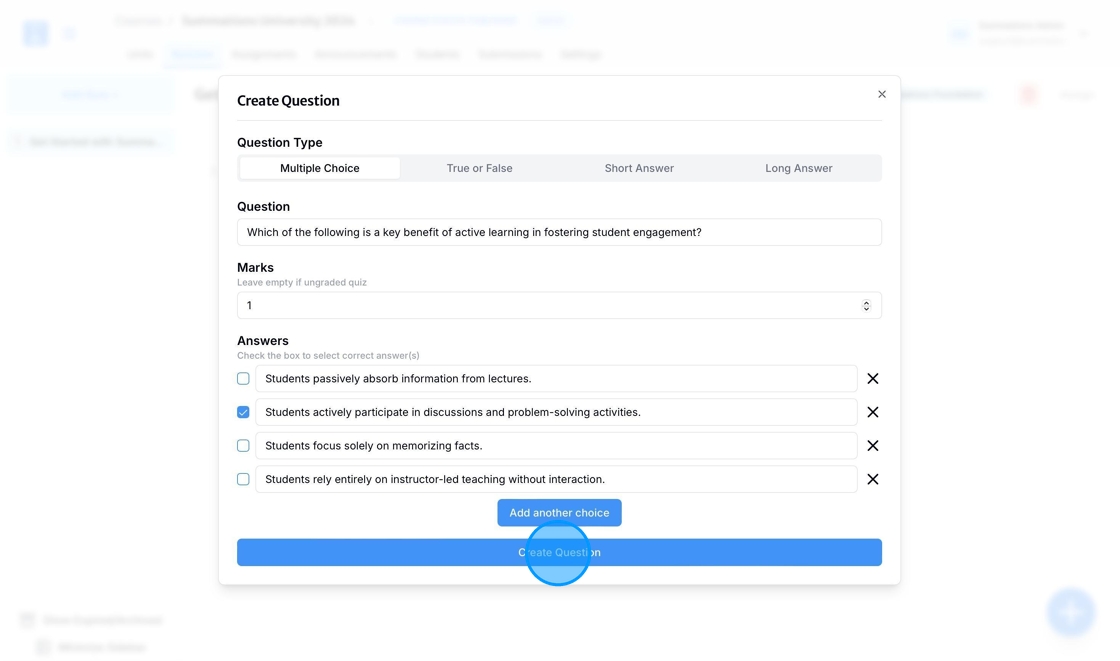
There are four types of questions you can choose from: Multiple Choice, True or False, Short Answer, and Long Answer.
After entering the question and answer, deciding whether to assign a grade (if you do not wish to assign a grade for this quiz, leave the 'Marks' field blank), and selecting the correct answer (for multiple-choice and true/false questions, use the checkbox next to the choices), click 'Create Question'.
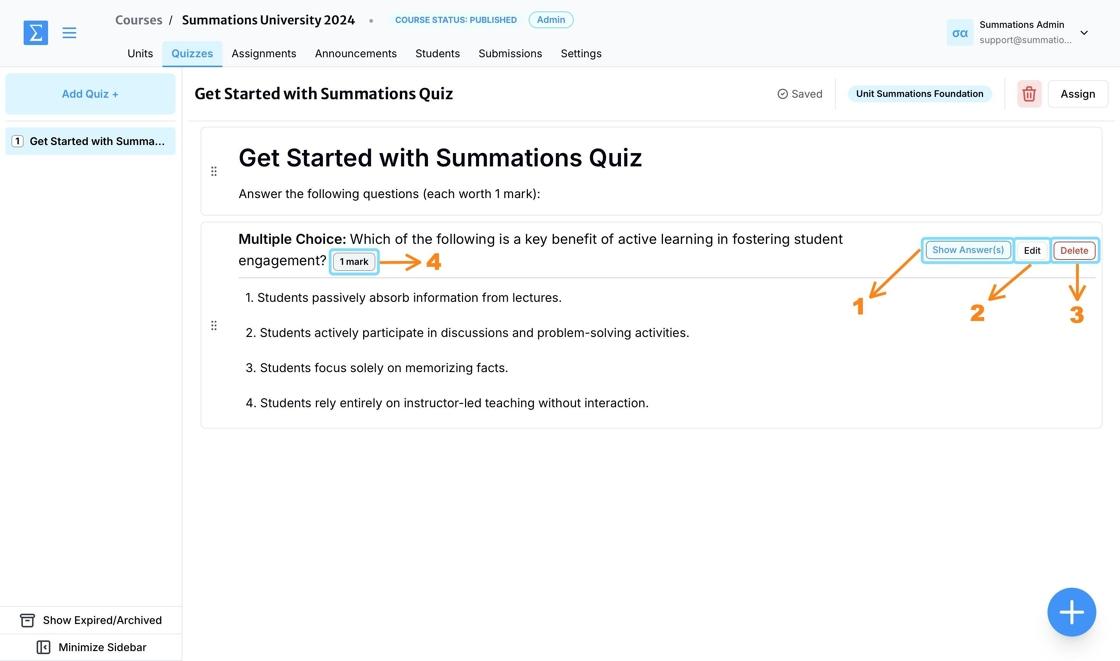
Once the question is created, you can take the following actions to ensure it is ready to be assigned to students:
Show/Hide Answer(s): Use this option to view the correct answer selected for the question. Indicating the correct answer is crucial for the autograding system to accurately grade student submissions. As an instructor, you can assign questions as either graded or non-graded assignments and control whether students can see the correct answer after submitting their responses.
Edit: Make changes to the question, update the correct answer, or adjust the assigned marks if needed.
Delete: Remove the question if it is not suitable for your students.
Mark: Indicate the point value assigned to the question to determine its weight in the overall quiz grade. Adjust the marks based on the question's difficulty or importance within the quiz. This feature provides flexibility in grading and ensures the quiz aligns with the learning objectives. After assigning marks, confirm that the total points for the quiz match your course grading criteria.
Generate Quiz Questions Using Summations AI
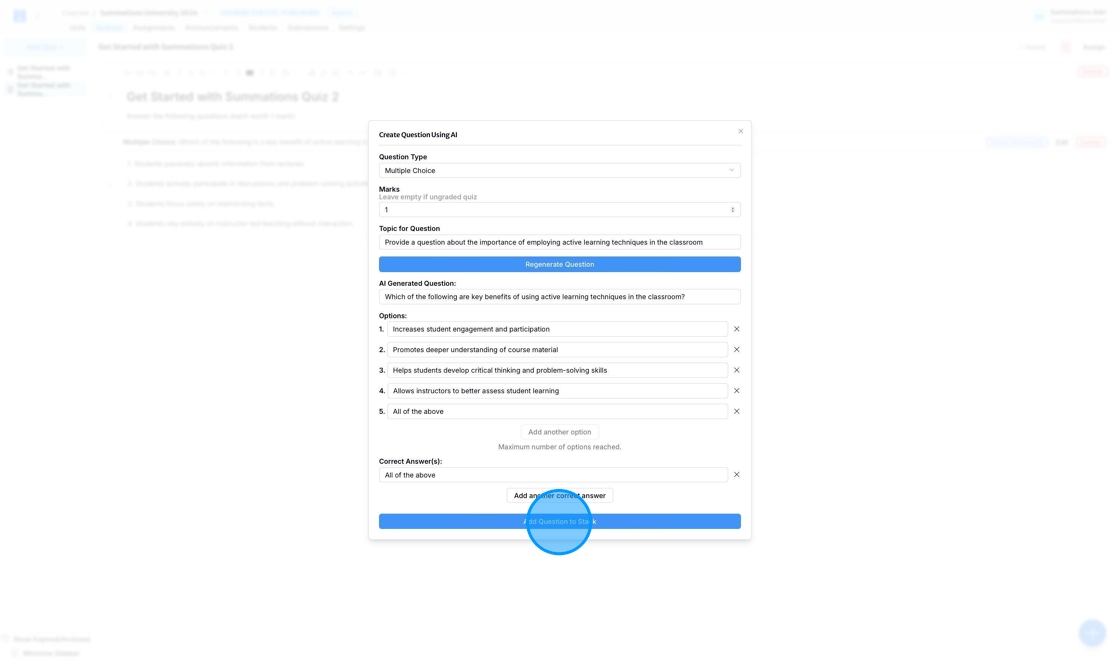
To use AI to generate a question based on the content you’ve created for the rest of the unit, click the '+' button and select 'Create Question (AI).'
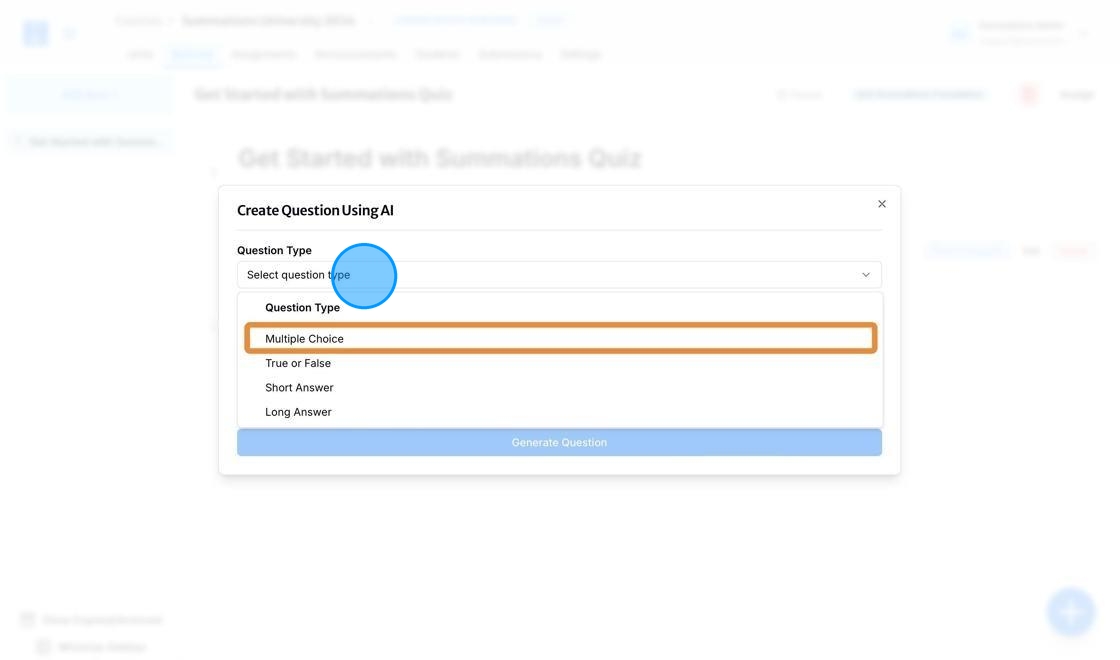
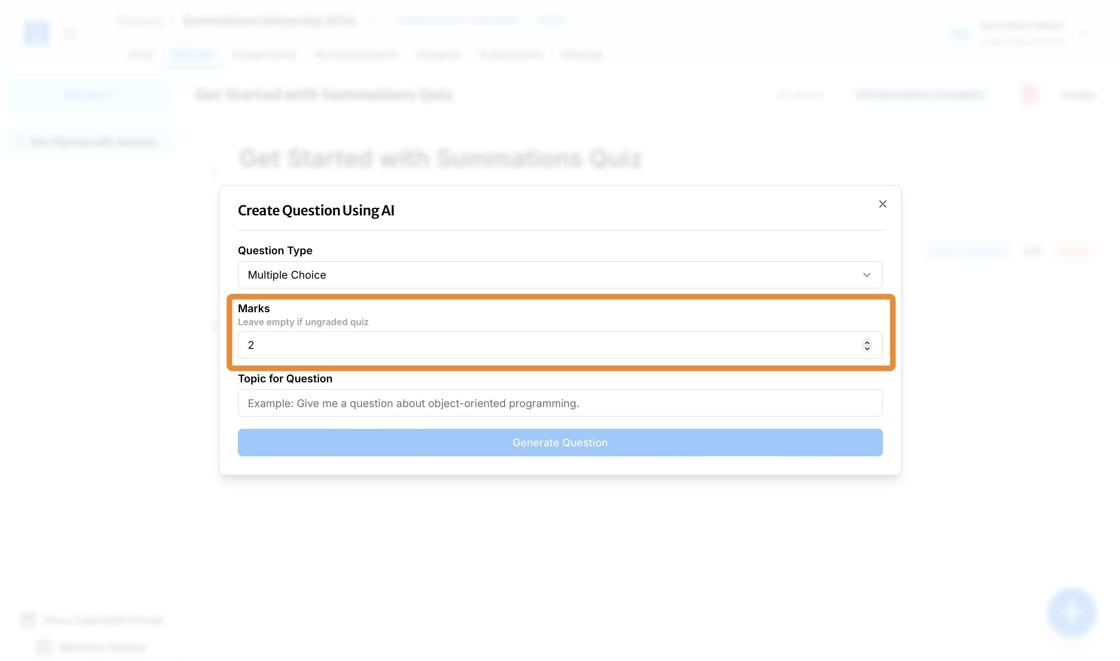
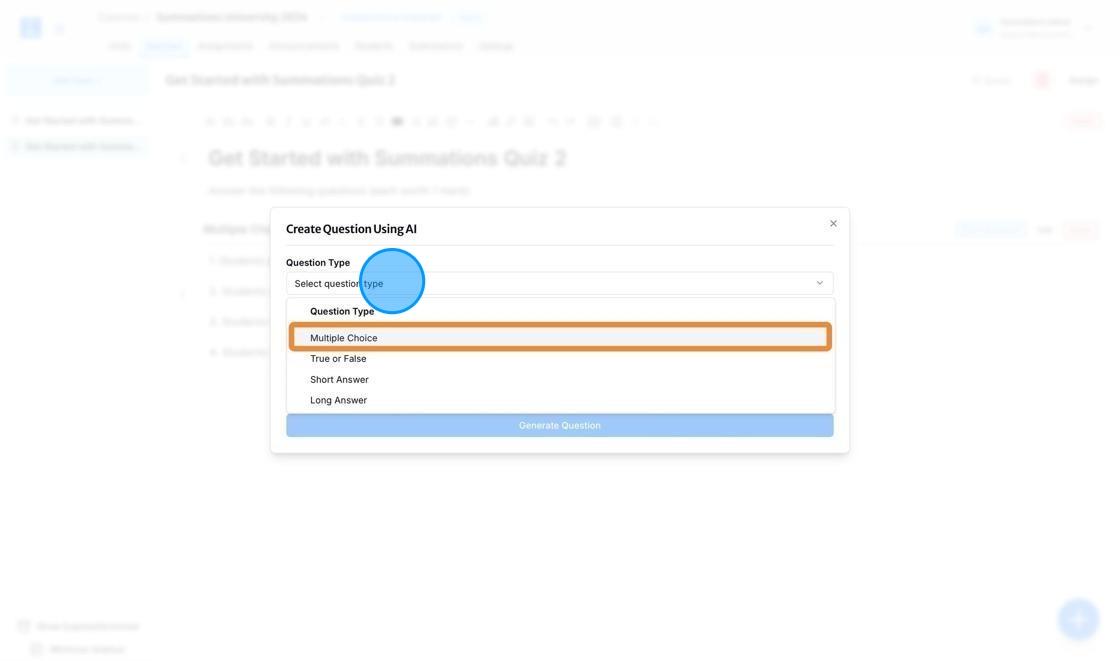
AI can help you generate four types of questions: Multiple Choice, True or False, Short Answer, and Long Answer. Choose the type that best suits your students' needs. For this demonstration, we will select Multiple Choice.
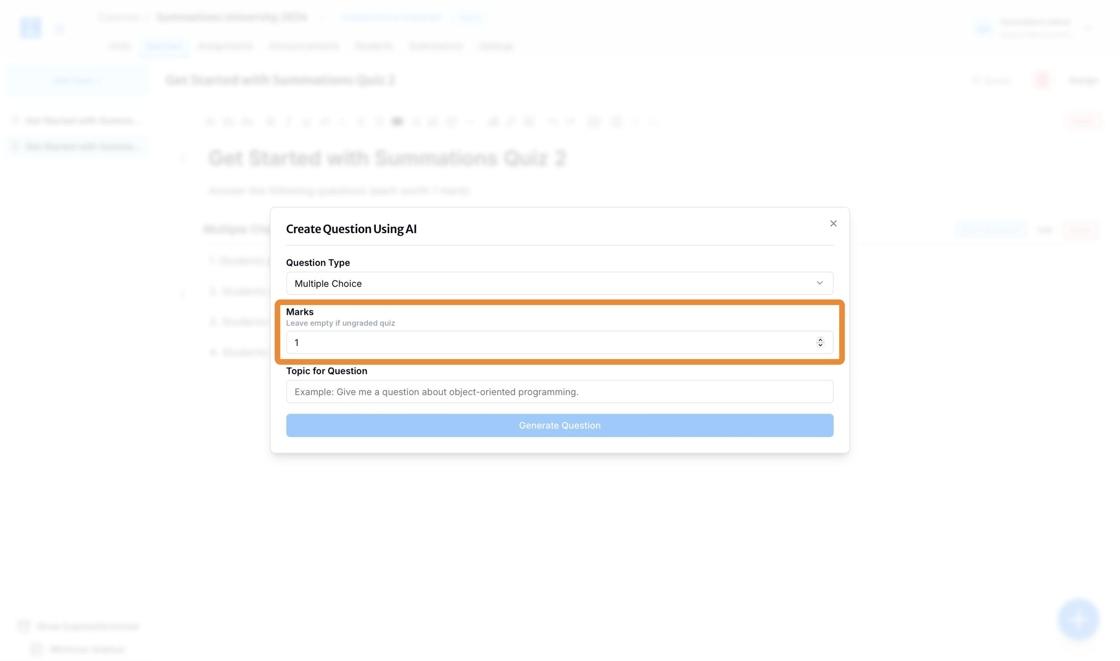
Click on the 'Marks' field to assign points for the question. If the quiz is ungraded, leave this field blank. For this demonstration, we will assign 2 points to each question.
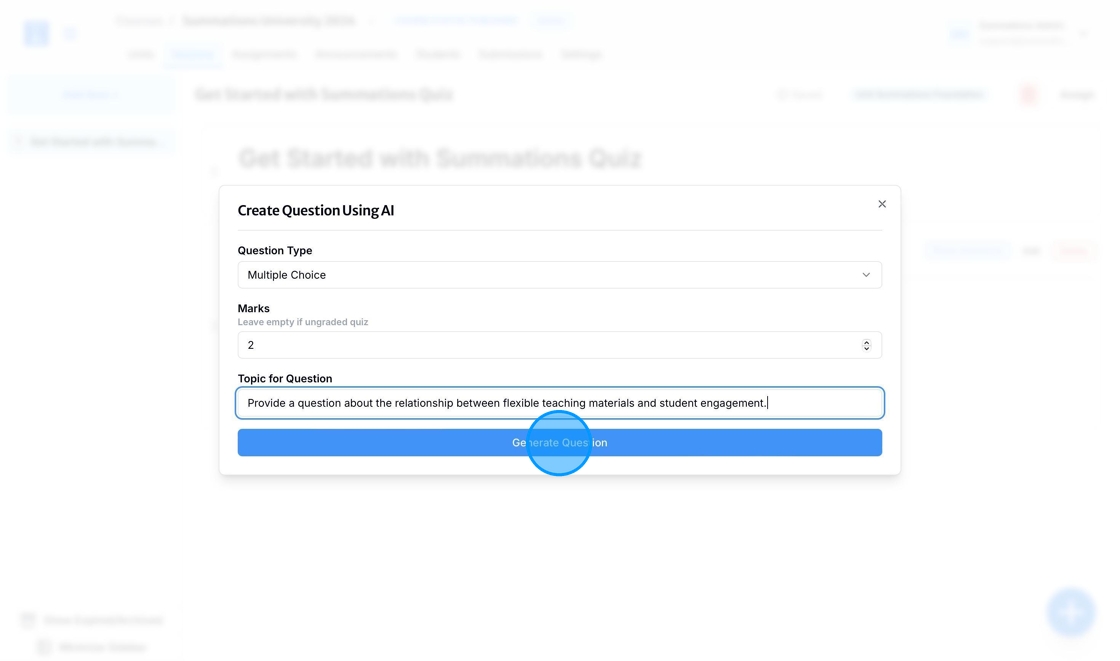
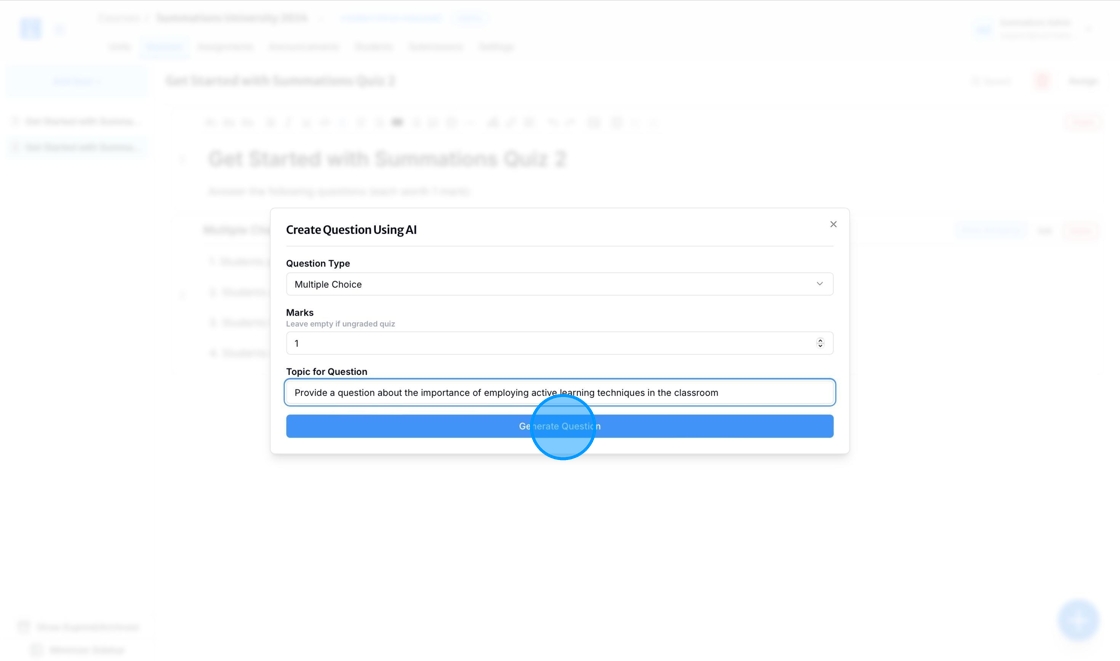
Enter the topic for this question and click 'Generate Question.' Please note that any AI-generated material on Summations takes into account all existing content in this unit, as long as it is relevant to the prompt you provide. In the 'Topic for Question' section, you can instruct the AI to generate a question on a specific learning topic covered in this unit or any other topic you want to quiz your students on.
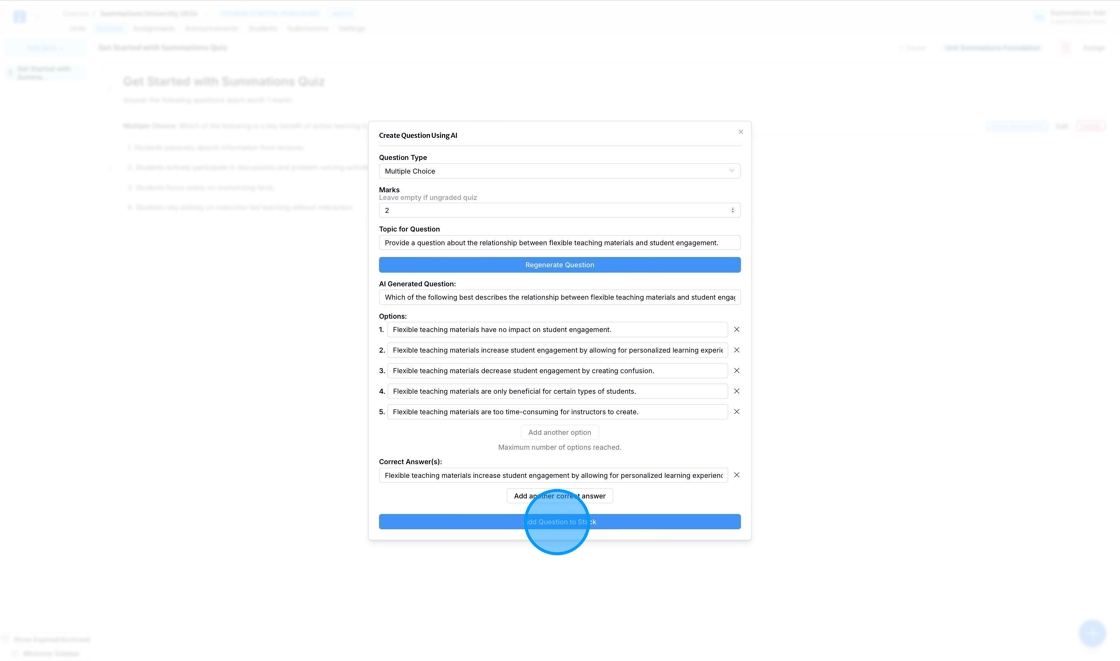
After the AI generates the question, you can edit the question, update the correct answer, or request the AI to regenerate it. Once you have finalized the content, click 'Add to Stack' to include the question in the material.
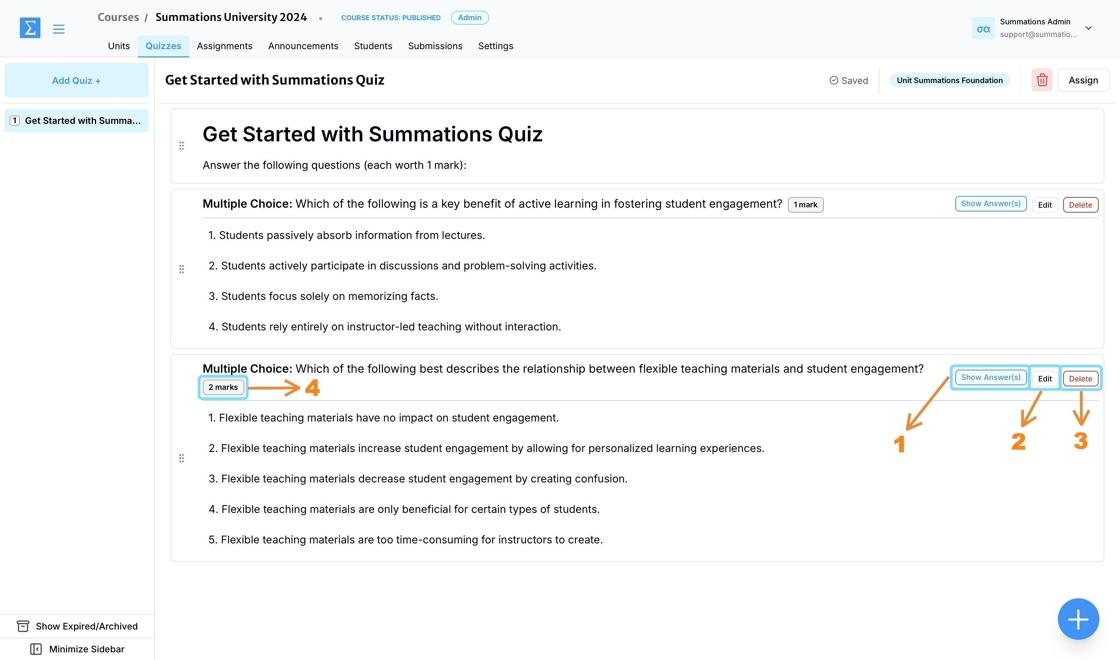
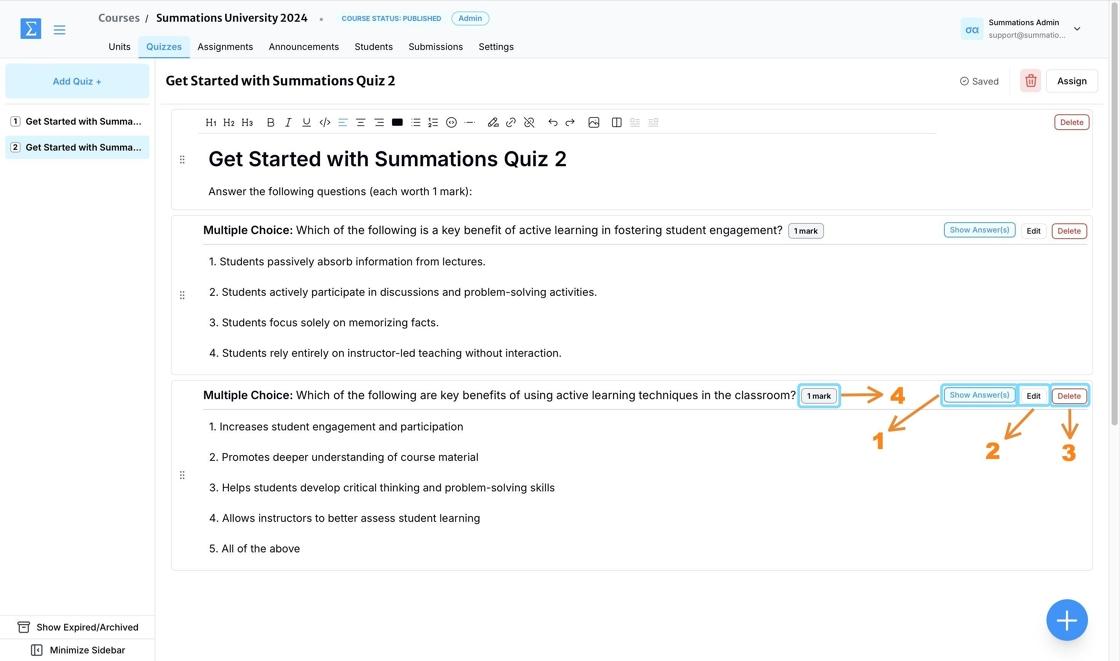
Once the question is added, you can take the following actions to ensure it is ready to be assigned to students:
Show/Hide Answer(s): Use this option to view the correct answer selected for the question. Indicating the correct answer is crucial for the autograding system to accurately grade student submissions. As an instructor, you can assign questions as either graded or non-graded assignments and control whether students can see the correct answer after submitting their responses.
Edit: Make changes to the question, update the correct answer, or adjust the assigned marks if needed.
Delete: Remove the question if it is not suitable for your students.
Mark: Indicate the point value assigned to the question to determine its weight in the overall quiz grade. Adjust the marks based on the question's difficulty or importance within the quiz. This feature provides flexibility in grading and ensures the quiz aligns with the learning objectives. After assigning marks, confirm that the total points for the quiz match your course grading criteria.
Assign Quiz
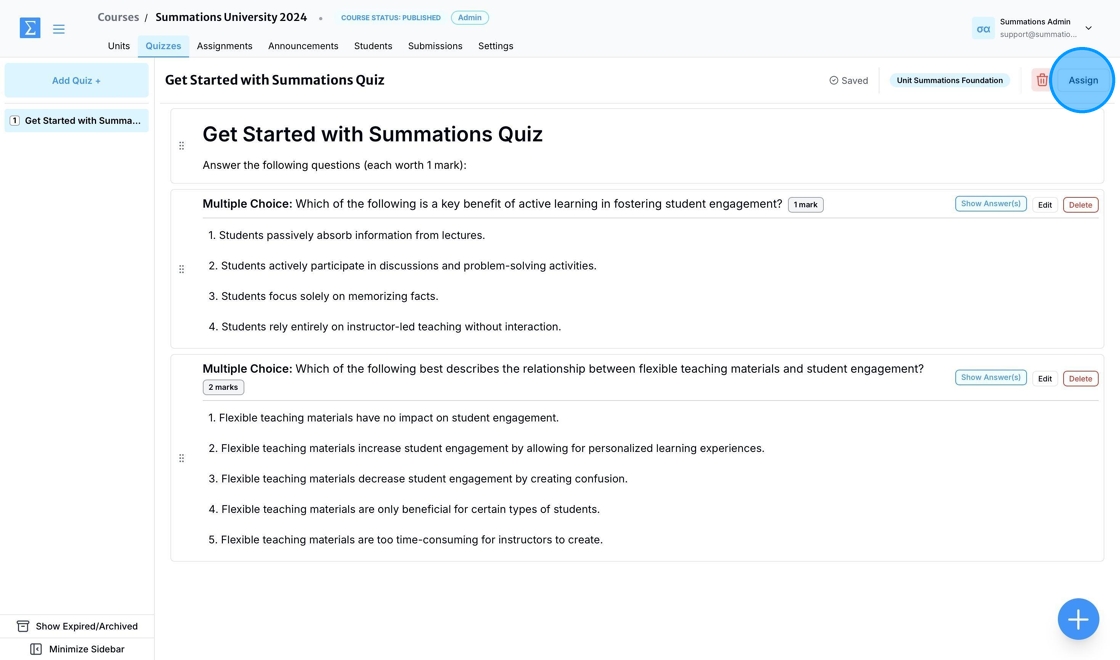
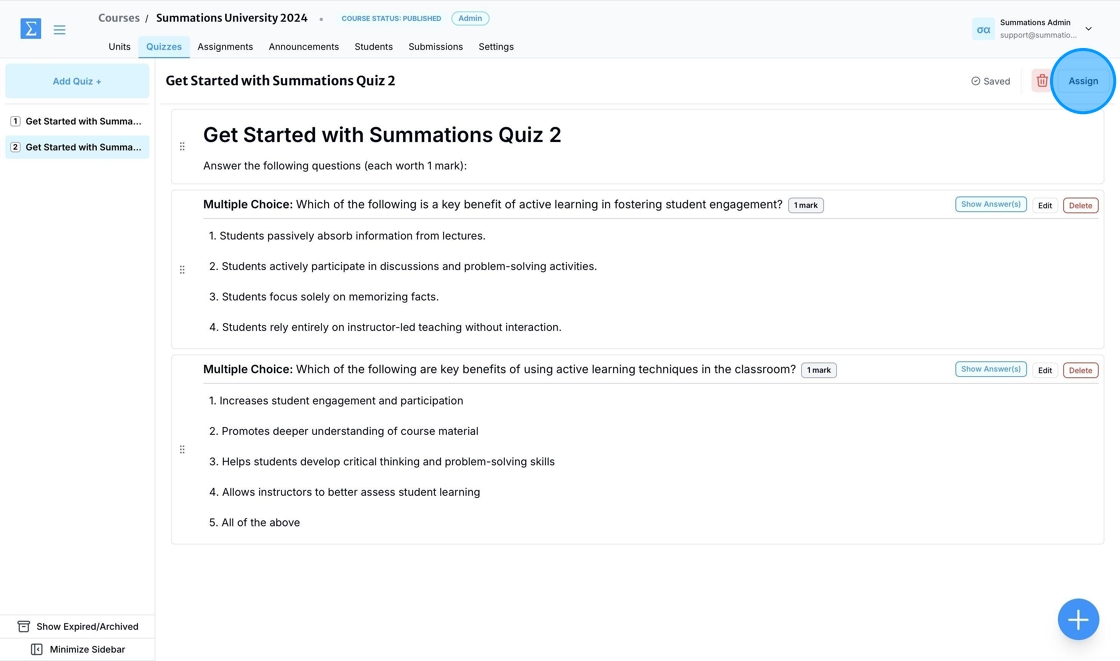
Once you have finished building your quiz and it is ready for students to access, click 'Assign.'
Assign as a Non-Graded or Practice Quiz/Test
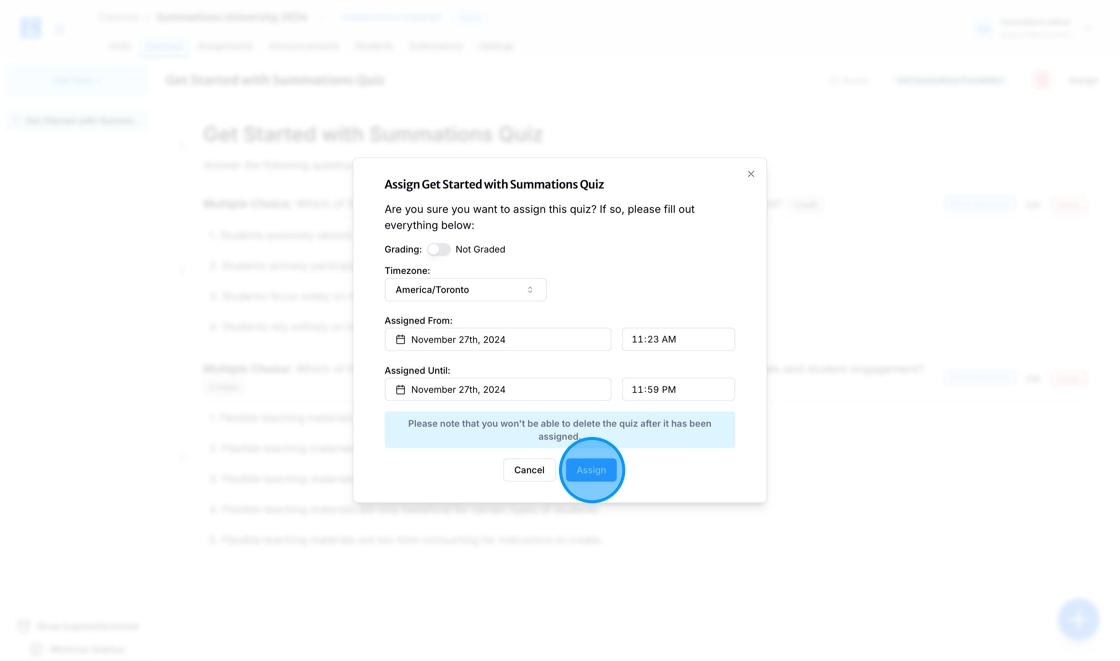
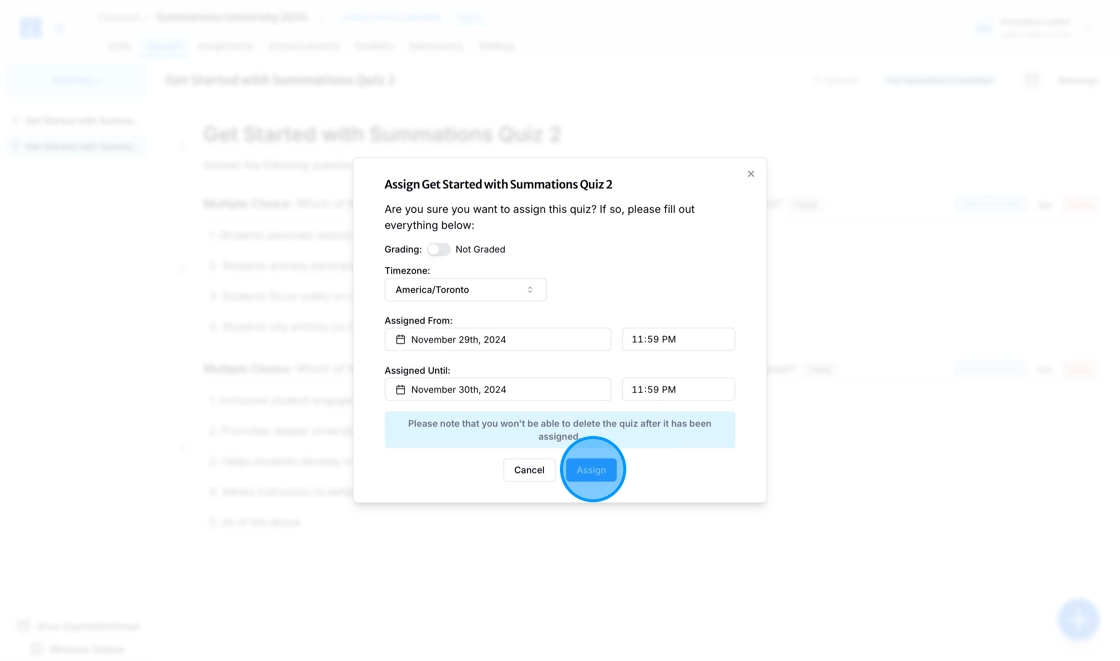
To assign your quiz or test as non-graded, ensure the grading toggle switch remains turned off. Then, complete the following steps:
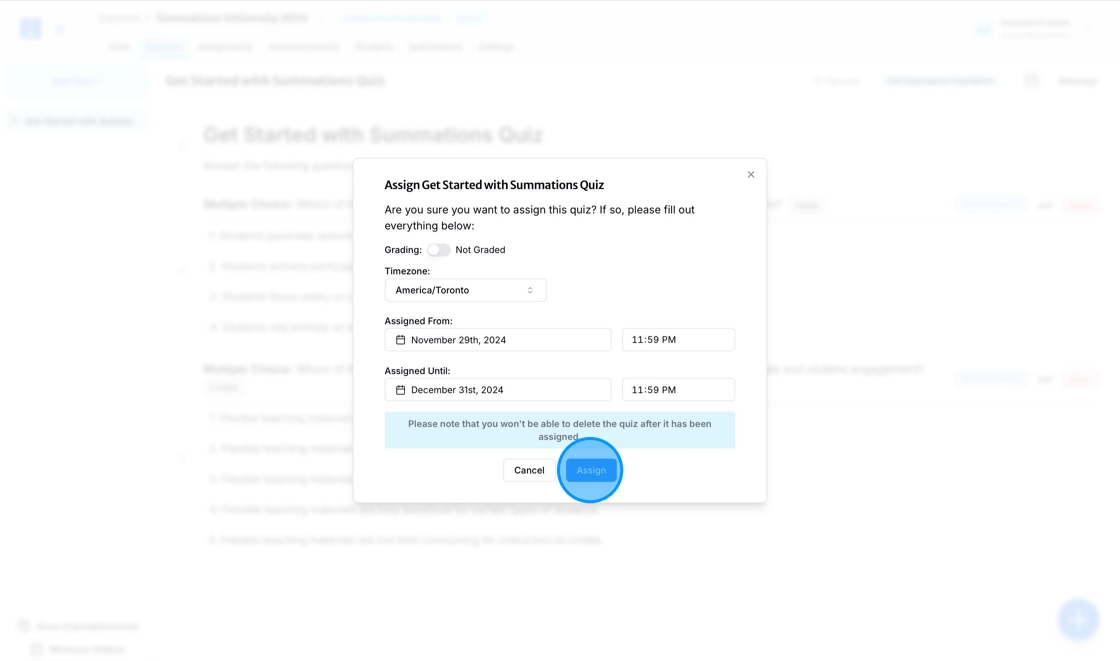
Timezone: The timezone will default to your current timezone based on your computer settings. If you and your students are in different timezones and you want the quiz to align with your students' timezone, click the timezone field and select an alternative from the list.
Assigned From: To assign the quiz immediately, leave the 'Assigned From' field unchanged, as it defaults to the current time, as shown in the demonstration. If you want to schedule the quiz for a later time, click on the date and time field, select an alternative date from the calendar, and adjust the time accordingly.
Assigned Until: Set the deadline for when the quiz will close by selecting the appropriate date and time.
Once all fields are completed, click 'Assign' to finalize the process.
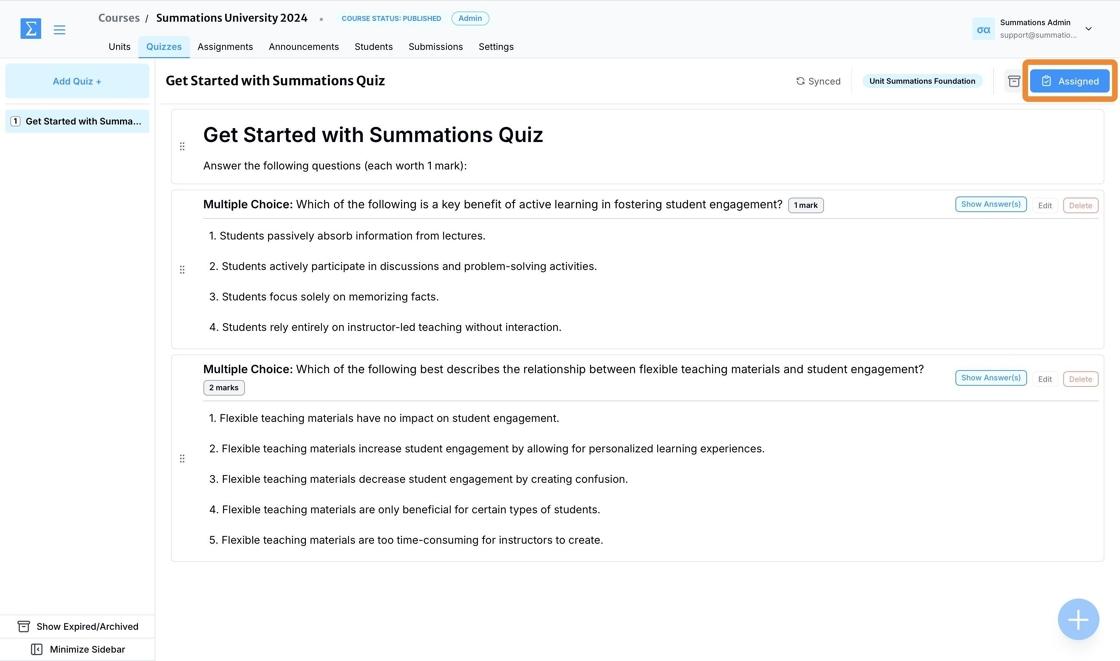
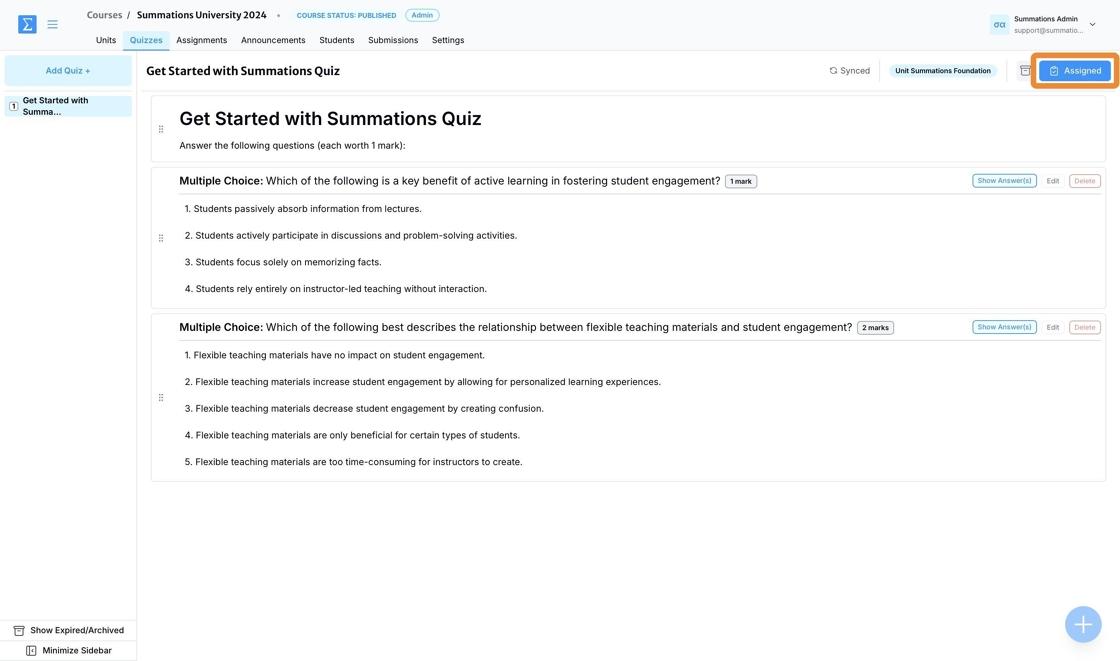
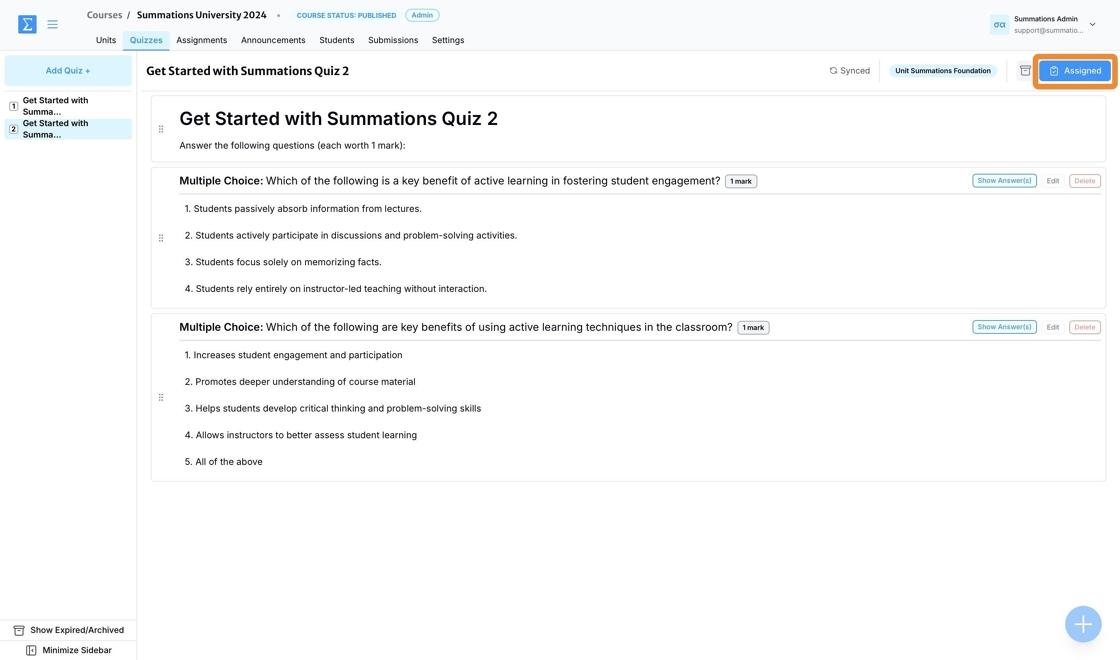
Once the quiz is assigned and becomes visible to your students, the 'Assign' button in the top-right corner of the quiz will change to 'Assigned.'
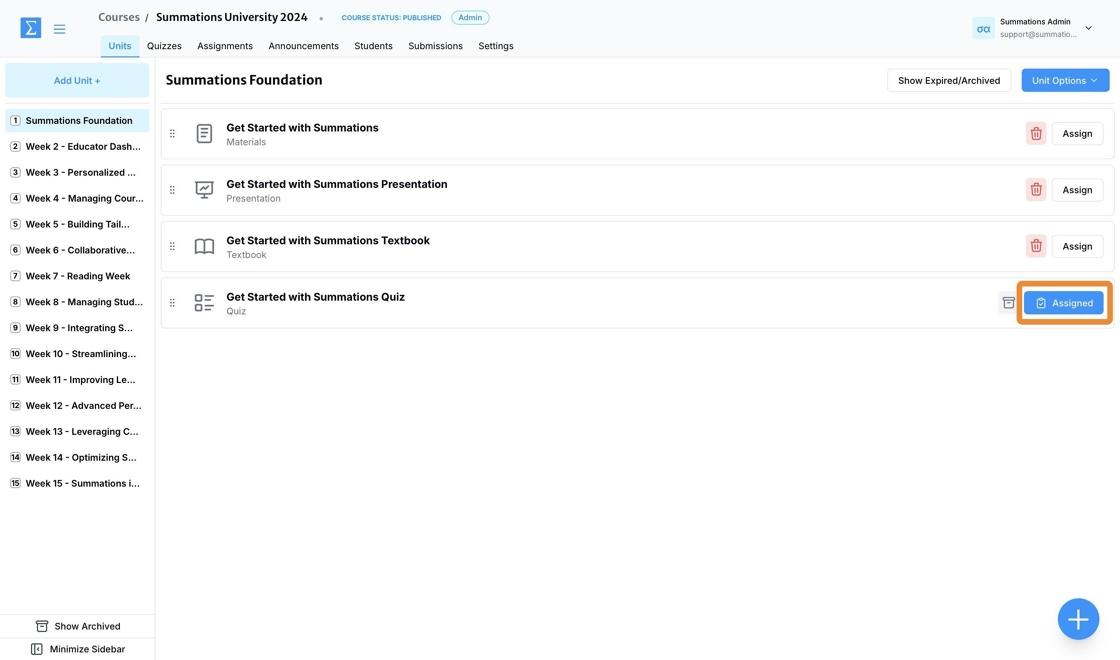
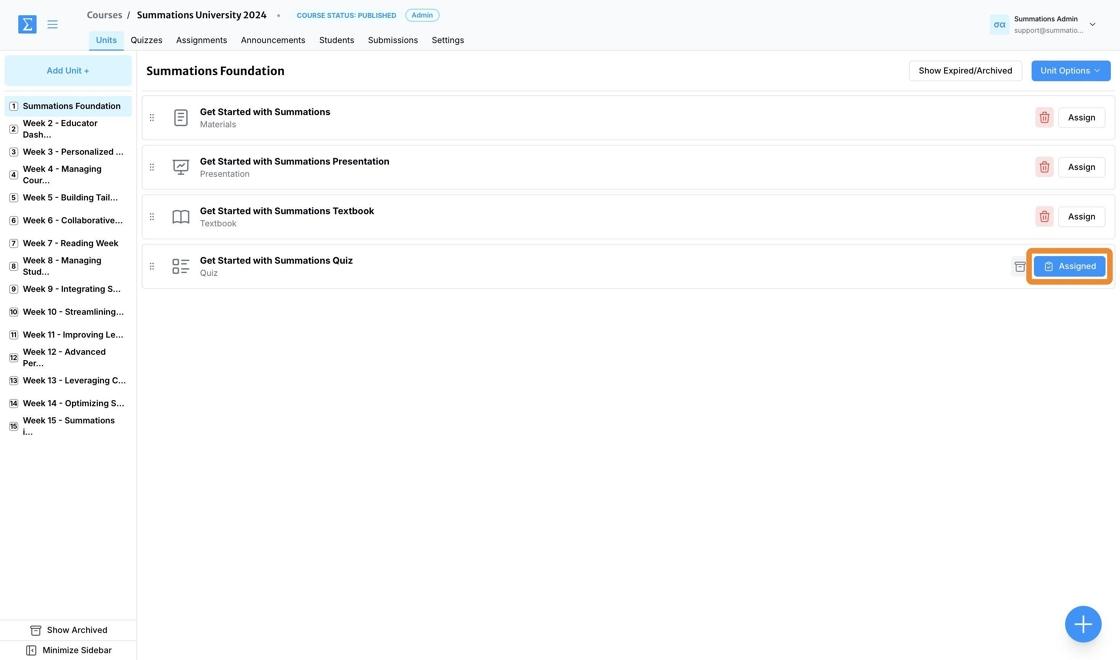
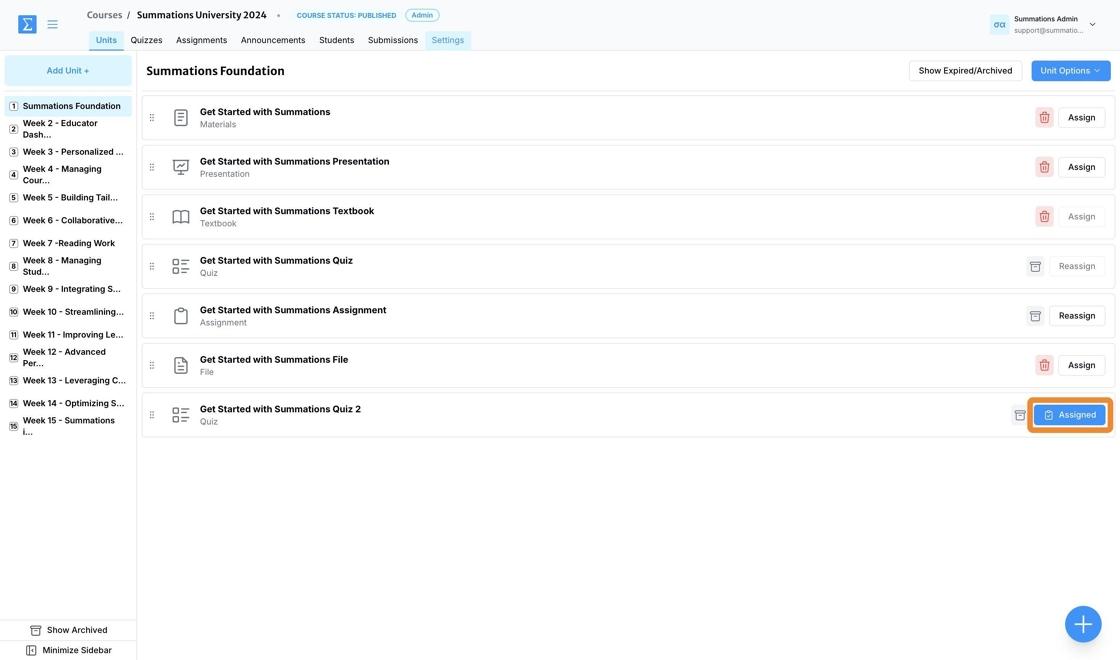
The quiz section within the unit will also update from 'Assign' to 'Assigned' to reflect the change.
To schedule the quiz for a later time, click the date and time field, select a different date from the calendar, and adjust the time as needed.
Once all fields have been updated, click 'Assign' to finalize the process.
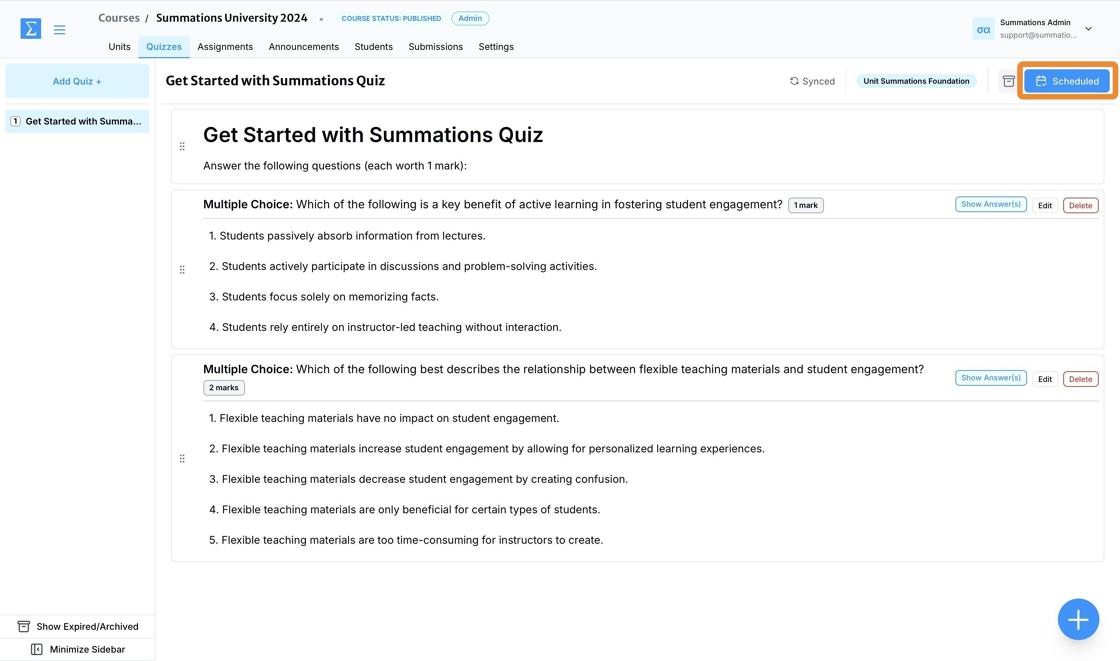
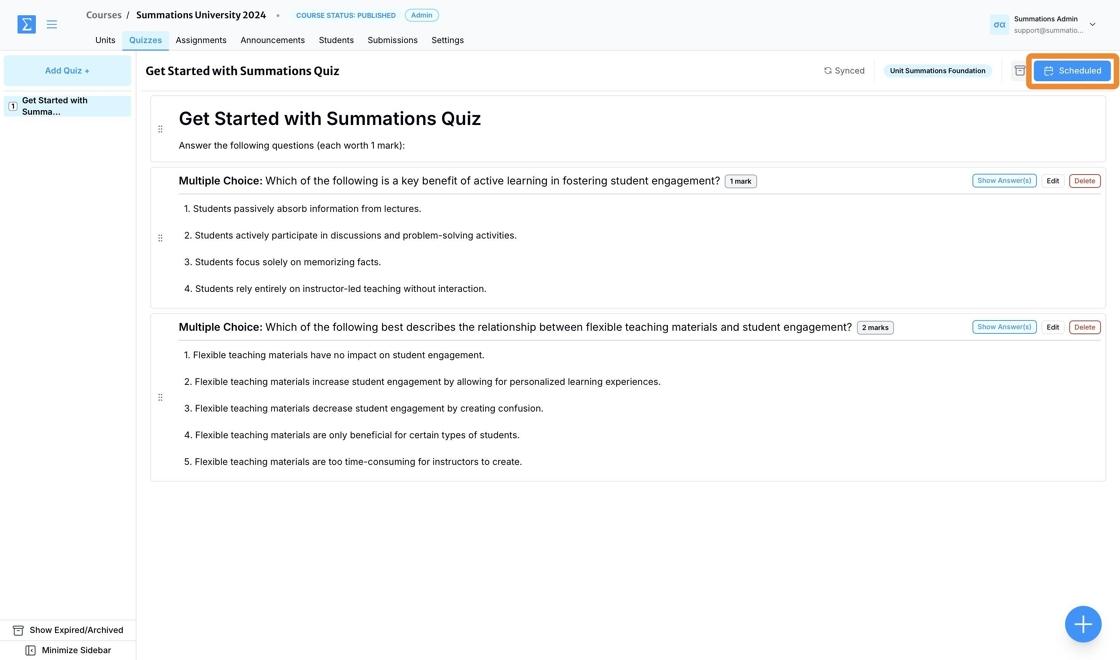
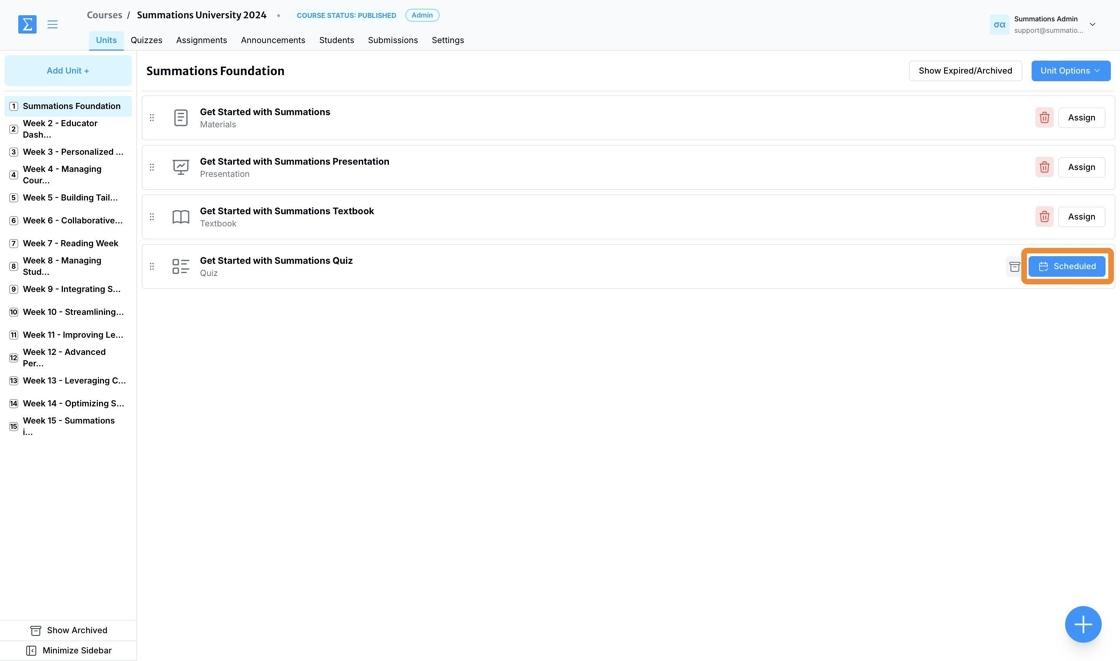
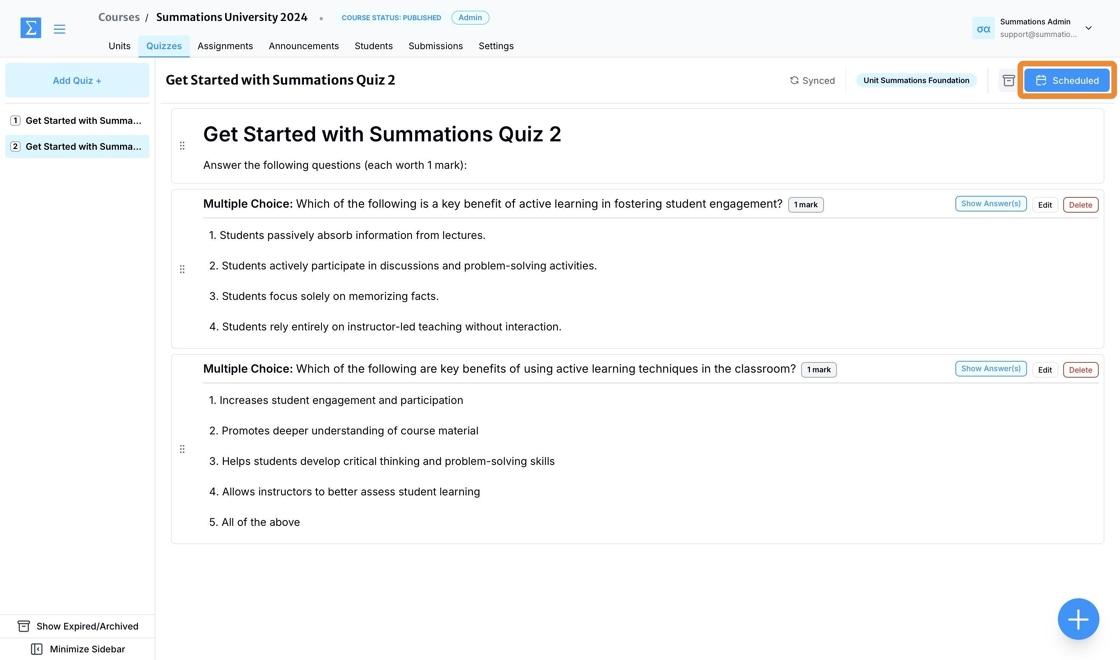
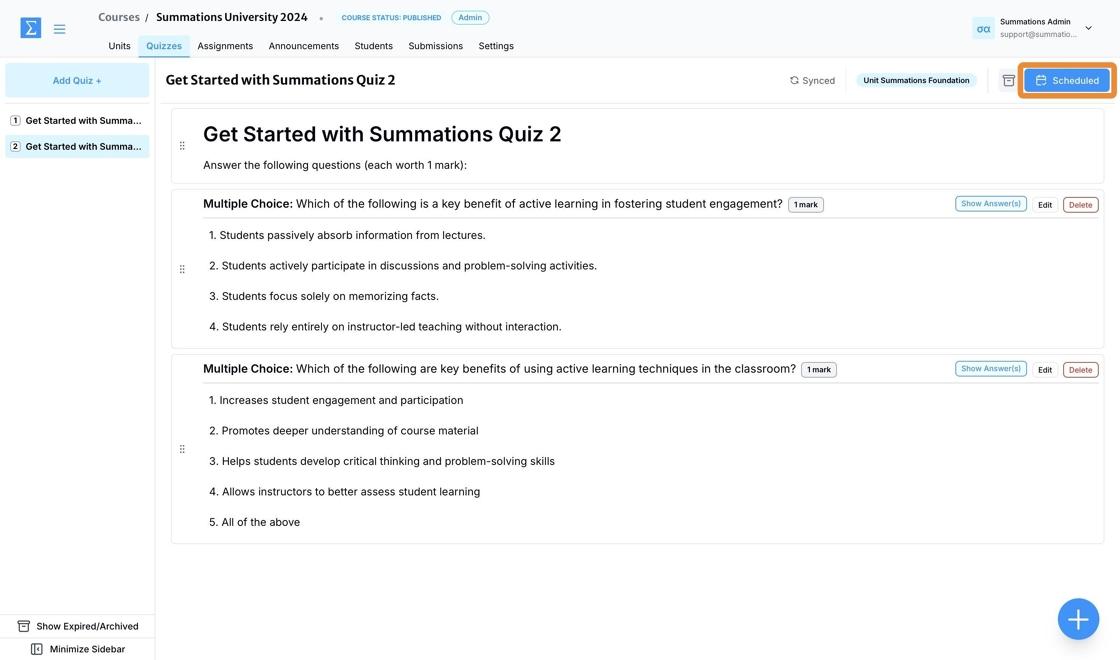
Once the quiz is scheduled for assignment, the 'Assign' button in the top-right corner of the quiz will change to 'Scheduled.' When the 'Assigned From' time arrives, the button will automatically update to 'Assigned.'
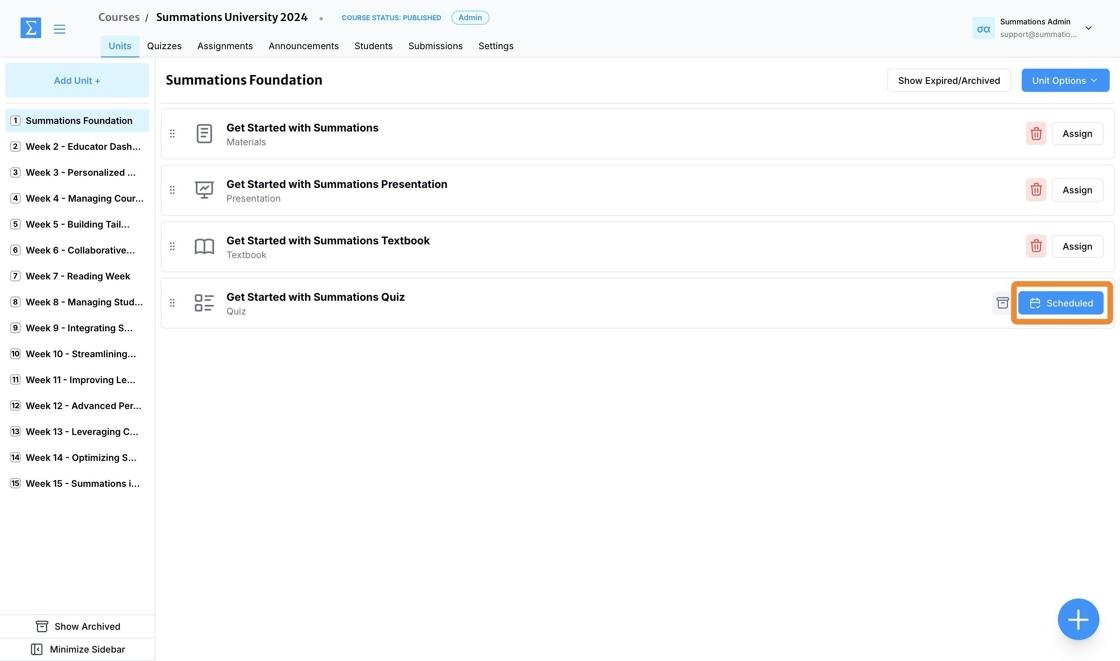
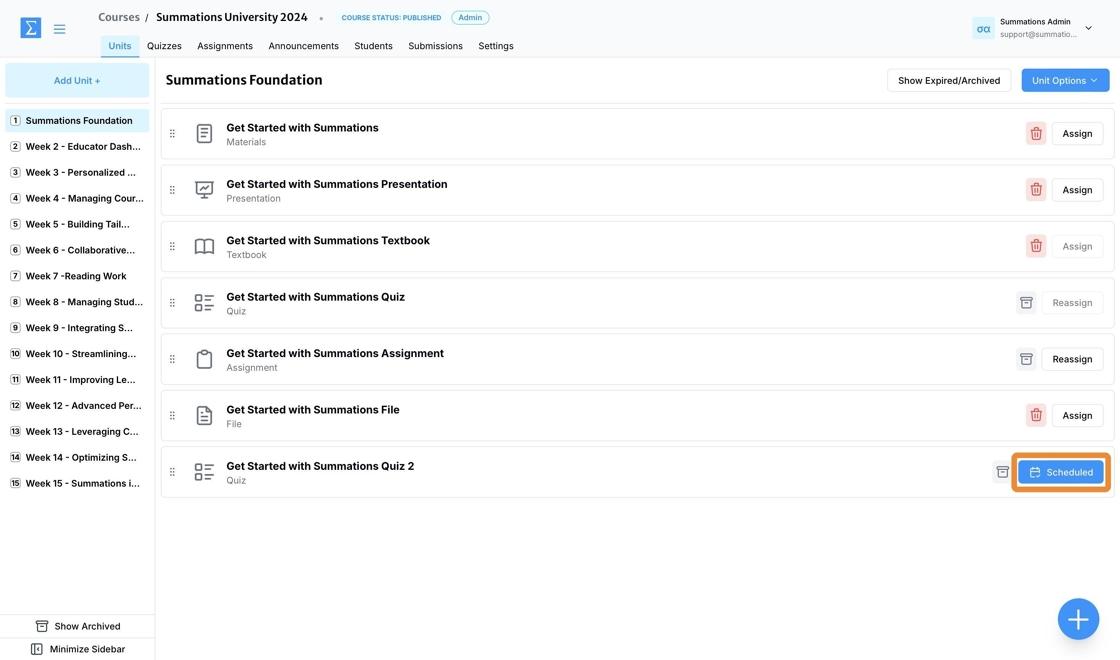
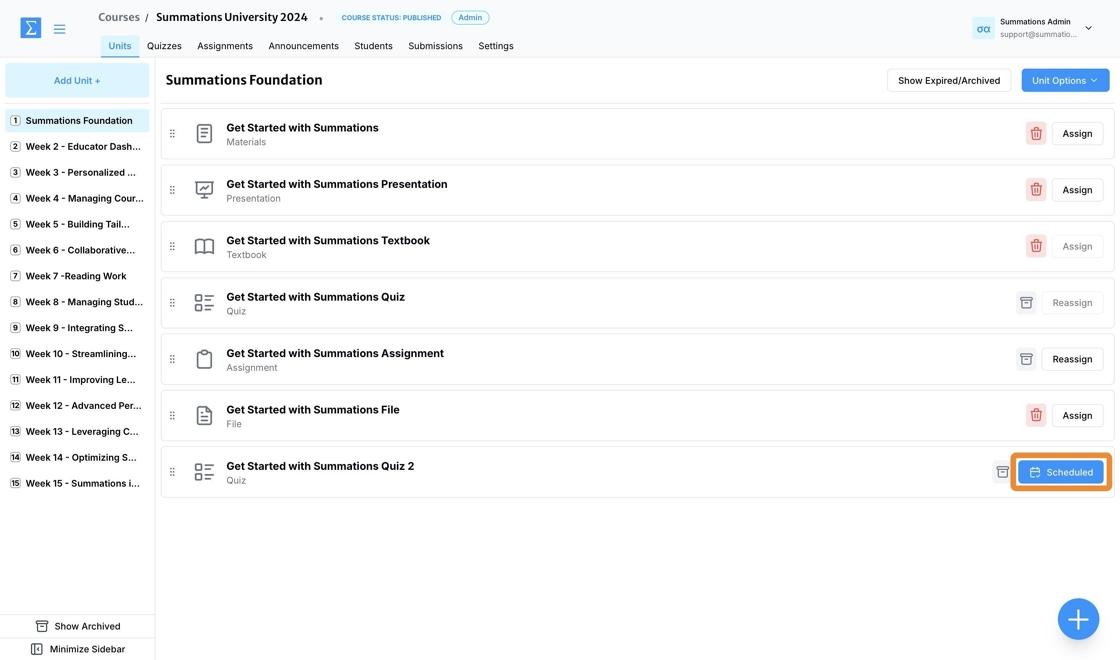
The quiz section within the unit will also update from 'Assign' to 'Scheduled' to reflect the change. When the 'Assigned From' time arrives, the button will automatically update to 'Assigned.'
Assign as a Graded Quiz or Test
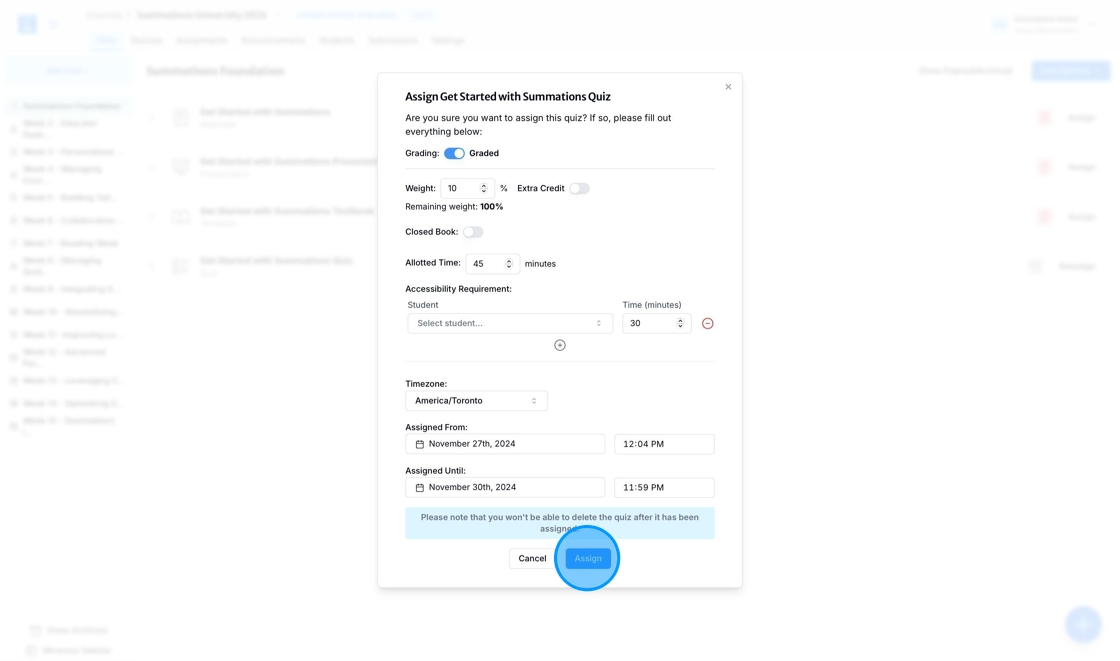
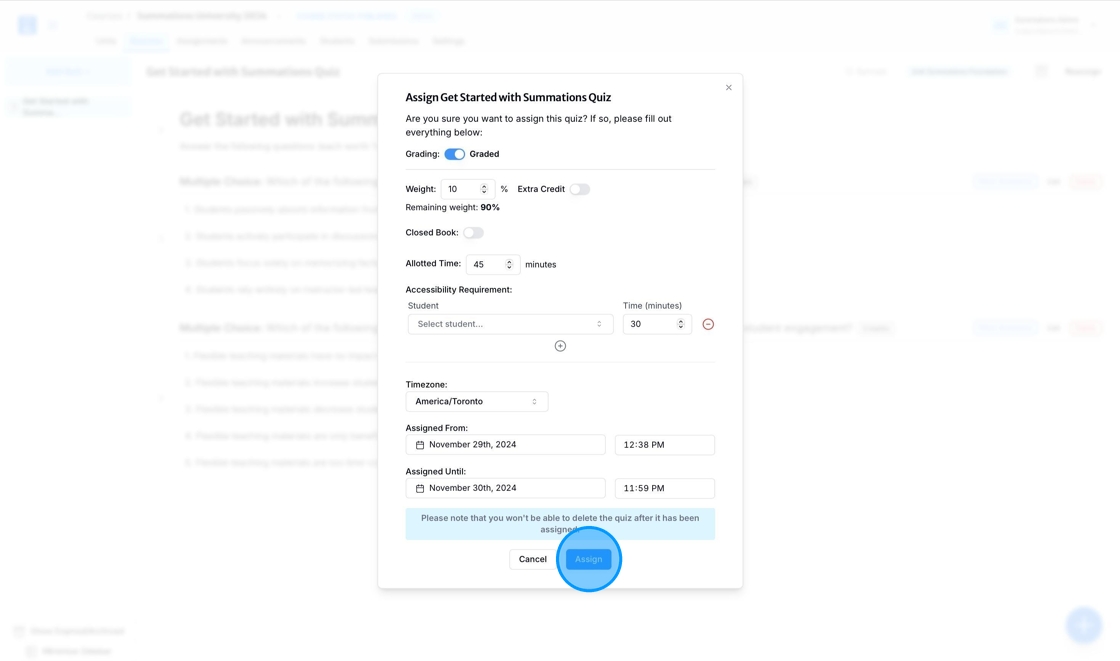
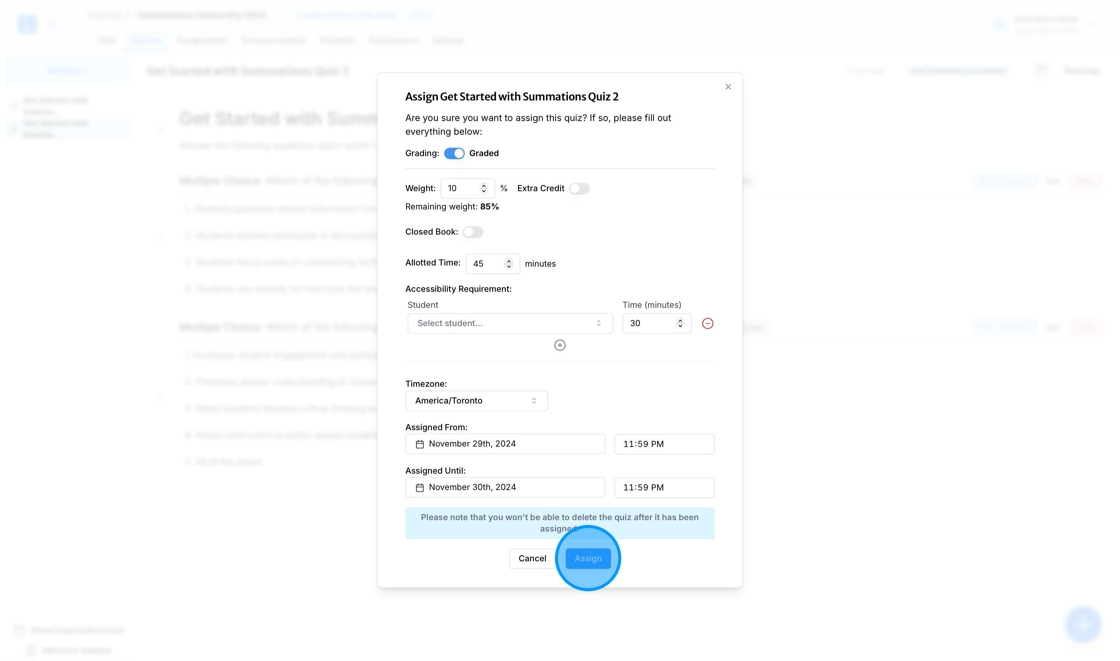
To assign your quiz or test as a graded assignment, make sure the grading toggle switch is turned on. Then, follow these steps:
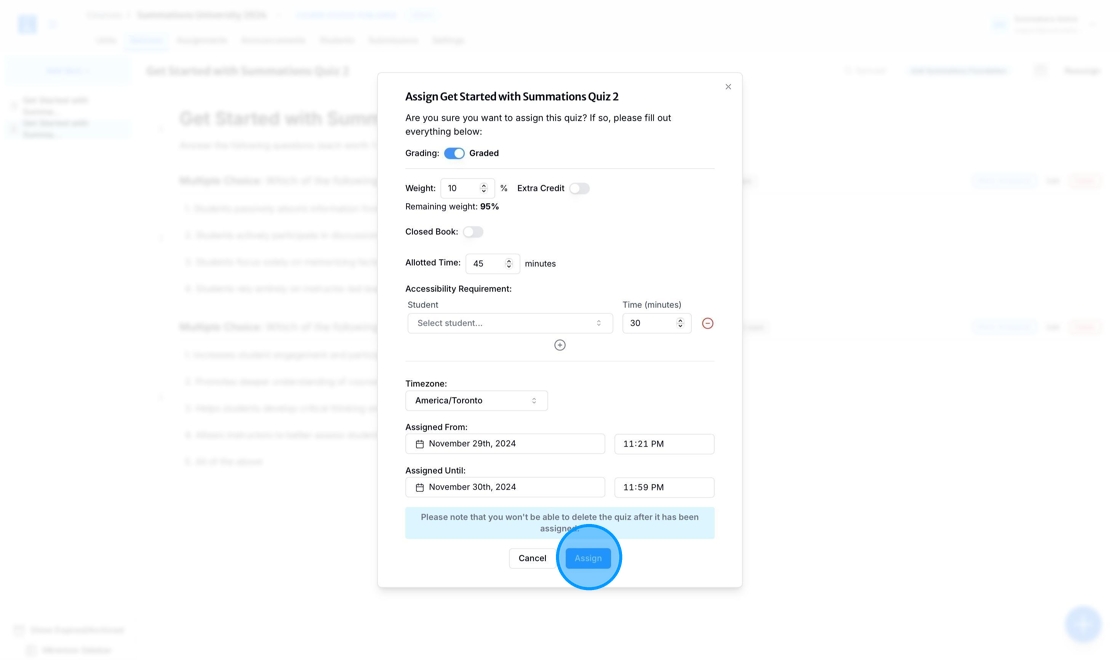
Weight: Specify the weight of the quiz in relation to the overall course grade. This determines how much the quiz contributes to the final grade and ensures alignment with your course grading policy. Adjust the weight percentage as needed to reflect the quiz's importance relative to other assignments or assessments in the course.
Extra credit: Indicate whether the quiz should be assigned as extra credit. If selected, the points earned from the quiz will contribute to the student's overall grade without impacting the total possible points for the course. This option allows you to offer additional learning opportunities and incentives for students to engage with the material.
Closed Book: Turn on the Closed Book toggle switch to activate the test proctoring system. This feature locks the student’s device screen while they complete the test or quiz and provides a log of their activity during the quiz for the instructor. This ensures the integrity of the submitted assignment. For more information about the test proctoring system, please refer to this article "Using the Test Proctoring System".
Allotted Time: Specify the amount of time students are allowed to complete the quiz or test. This helps ensure consistency and fairness, particularly for timed assessments.
Accessibility Requirements: This feature allows you to provide specific students with additional time to complete the quiz or test as part of their accommodations. To use this feature, select the student's name and specify the extended time they require. For instance, if the quiz is set to 30 minutes for the entire class, but a student has an accommodation allowing twice the time, select the student's name and set their allotted time to 60 minutes.
Timezone: The timezone will default to your current timezone based on your computer settings. If you and your students are in different timezones and you want the quiz to align with your students' timezone, click the timezone field and select an alternative from the list.
Assigned From: To assign the quiz immediately, leave the 'Assigned From' field unchanged, as it defaults to the current time, as shown in the demonstration. If you want to schedule the quiz for a later time, click on the date and time field, select an alternative date from the calendar, and adjust the time accordingly.
Assigned Until: Set the deadline for when the quiz will close by selecting the appropriate date and time.
Once all fields are completed, click 'Assign' to finalize the process.
Once the quiz is assigned and becomes visible to your students, the 'Assign' button in the top-right corner of the quiz will change to 'Assigned.'
The quiz section within the unit will also update from 'Assign' to 'Assigned' to reflect the change.
To schedule the quiz for a later time, click the date and time field, select a different date from the calendar, and adjust the time as needed.
Once all fields have been updated, click 'Assign' to finalize the process.
Once the quiz is scheduled for assignment, the 'Assign' button in the top-right corner of the quiz will change to 'Scheduled.' When the 'Assigned From' time arrives, the button will automatically update to 'Assigned.'
The quiz section within the unit will also update from 'Assign' to 'Scheduled' to reflect the change. When the 'Assigned From' time arrives, the button will automatically update to 'Assigned.'
Updating Quiz Details
As an instructor, you can update specific details of a quiz, such as the deadline, grade value, or assigned availability, without needing to unassign it. These updates are reflected in real-time for students, ensuring they have access to the most accurate and up-to-date information. To make changes, navigate to the 'Assigned' or 'Scheduled' button in the top-right corner, select 'Edit,' make the necessary adjustments, and save your updates.
This flexibility allows you to adapt the quiz to evolving course requirements or accommodate individual student needs while maintaining the integrity of the assessment. For significant edits to quiz questions or structure, refer to the guide below on how to unassign and reassign the quiz to avoid any potential confusion.
Unassigning a Quiz
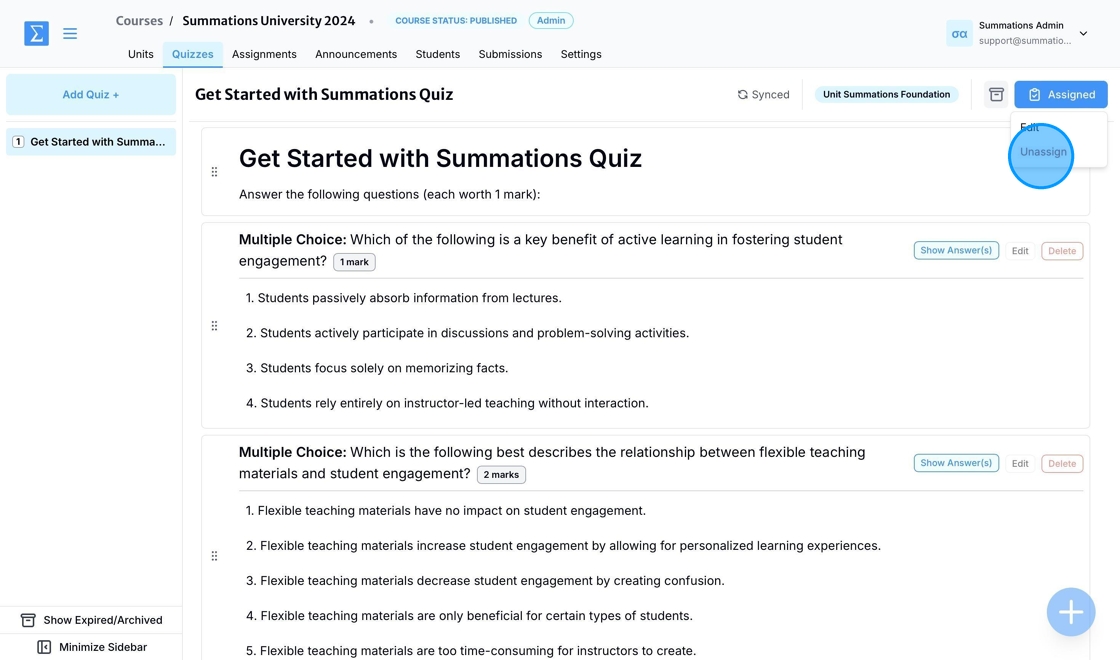
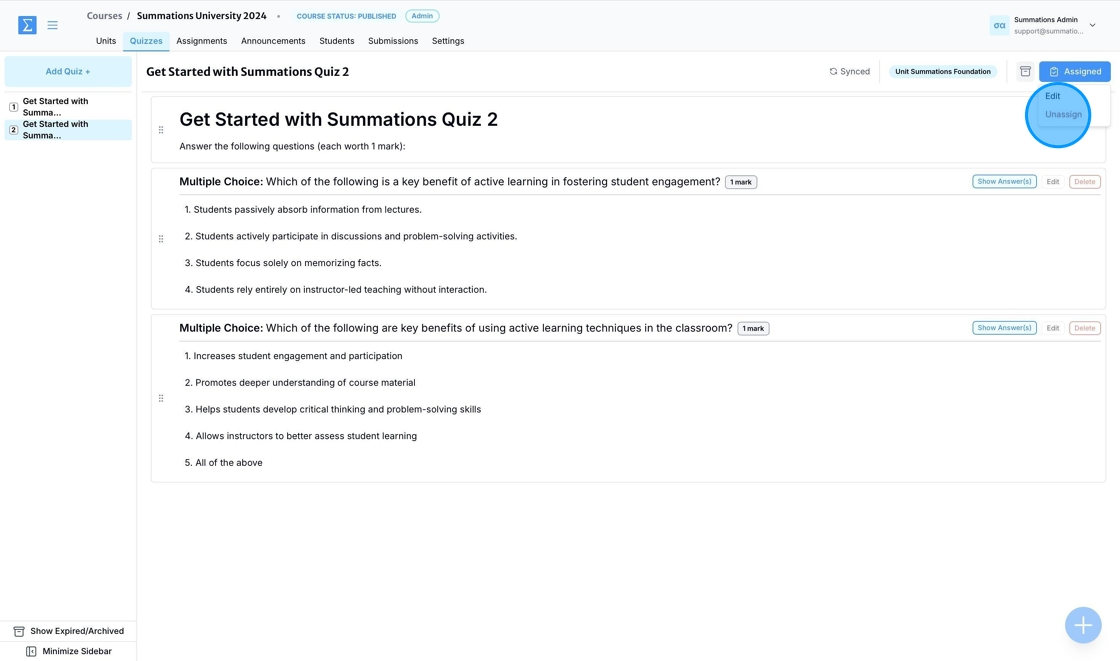
To unassign a quiz or test, click the 'Assigned' or 'Scheduled' button in the top-right corner and select 'Unassign.' This action revokes student access to the quiz and makes it invisible to them.
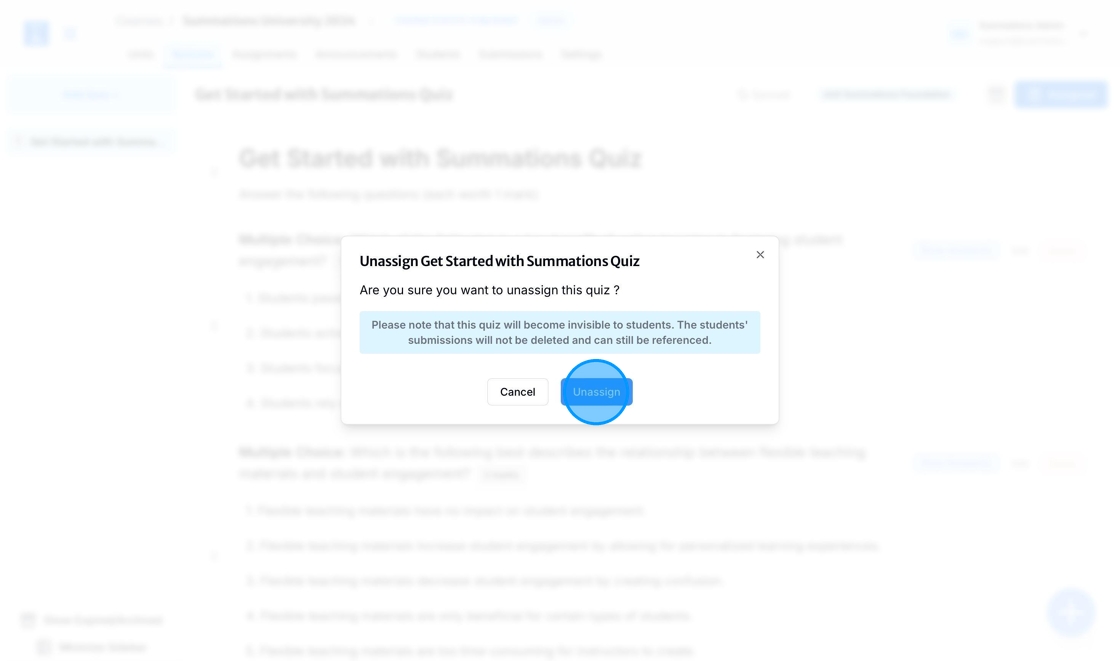
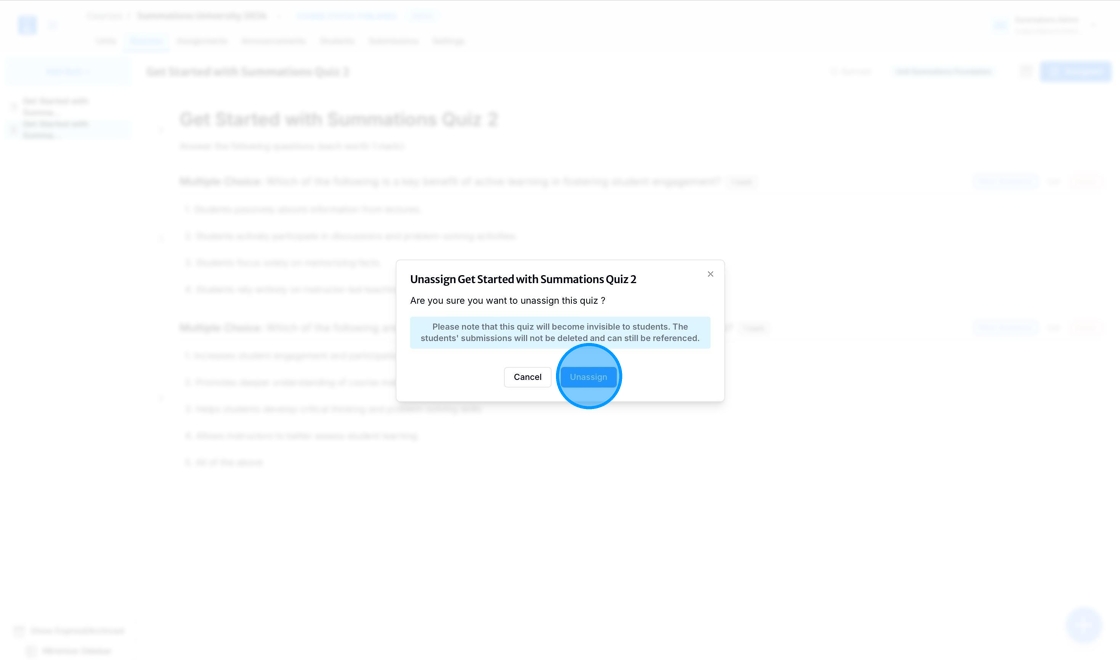
A confirmation pop-up will appear to prevent accidental unassigning of the quiz. Select 'Unassign' if you are certain you want to proceed.
Editing an Assigned Quiz
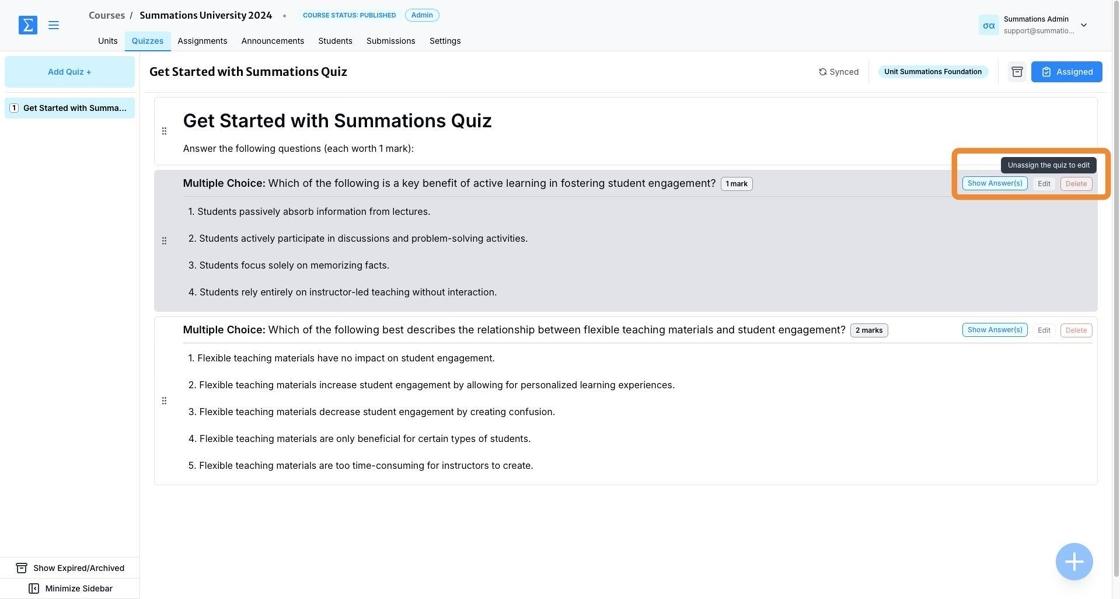
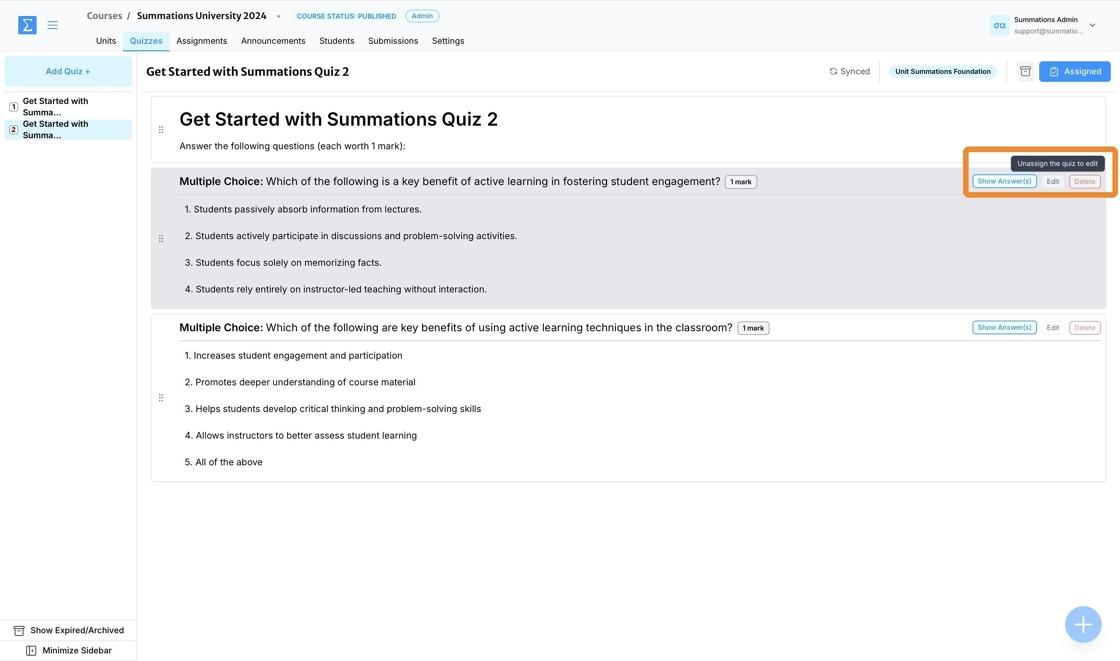
Once a quiz or test is assigned or scheduled, it cannot be edited, and questions cannot be deleted without first unassigning the quiz. This ensures the integrity of the assessment and prevents changes that could affect students who have already started or completed the quiz.
To make changes, follow these steps:
Unassign the Quiz: Navigate to the assigned or scheduled quiz, and click 'Unassign.' This action will temporarily revoke student access to the quiz.
Edit the Quiz: After unassigning, you can modify the questions, answers, or other quiz details as needed.
Reassign the Quiz: Once all edits are complete, reassign the quiz to the appropriate students or groups. Be sure to communicate any changes to your students to avoid confusion.
Note: Unassigning a quiz will not delete student progress or submissions for those who have already completed it, but it will pause access for those who have not yet started.
Reassigning a Quiz
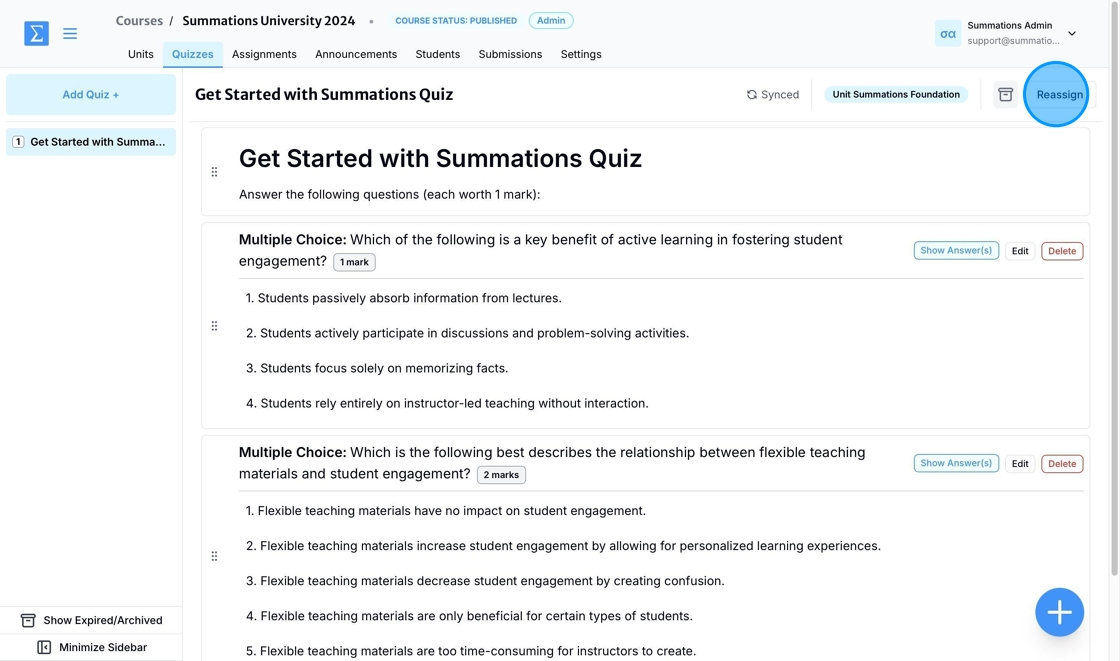
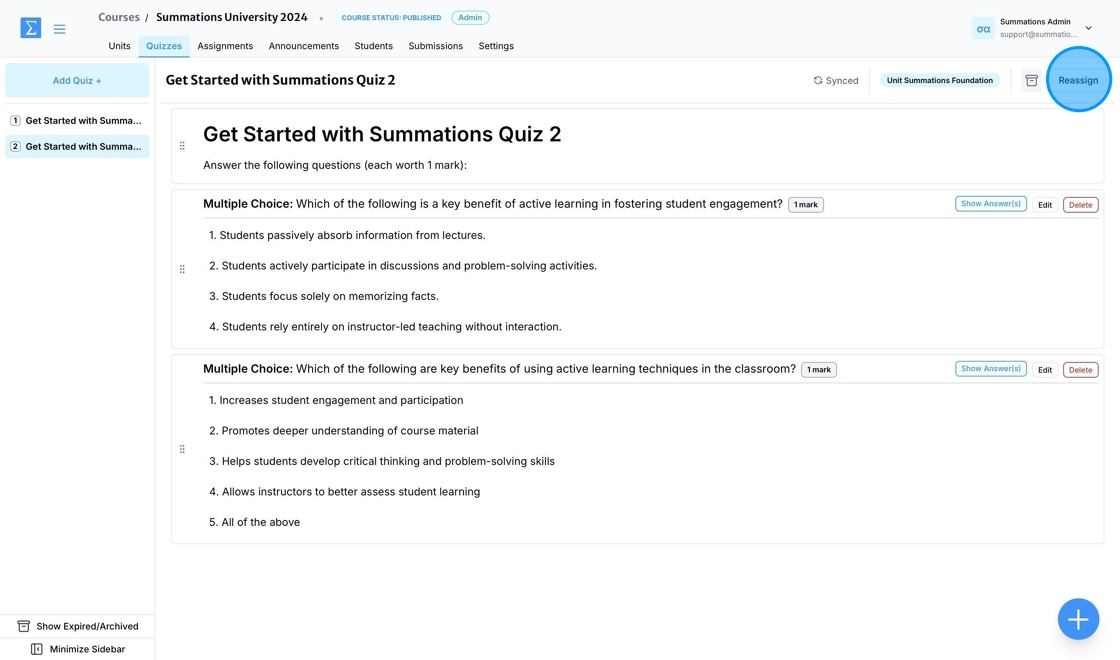
If you have unassigned a quiz for editing and now wish to reassign it to your students, click the 'Reassign' button in the top-right corner. Review and edit all details as needed, then click 'Assign' to finalize and make the quiz available to your students.
Building a Quiz or Test from the Quiz Tab
The Quizzes Tab serves as a dedicated space for both students and educators to manage and access all quizzes related to their courses. Educators can create, view, and organize quizzes by course module, topic, or due date, streamlining course management. Students can access their assigned quizzes, track upcoming deadlines, and review their results and feedback for completed quizzes. The tab also includes filtering options, allowing users to sort quizzes by date, subject, or status (completed, in-progress).
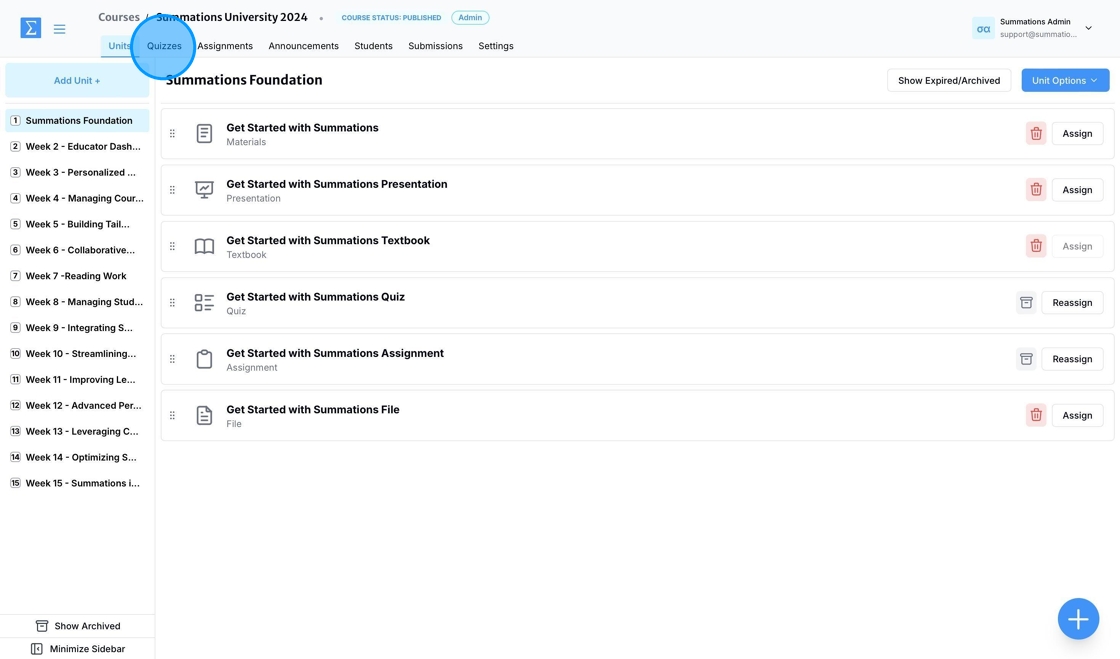
In a selected course, navigate to the 'Quizzes' tab.
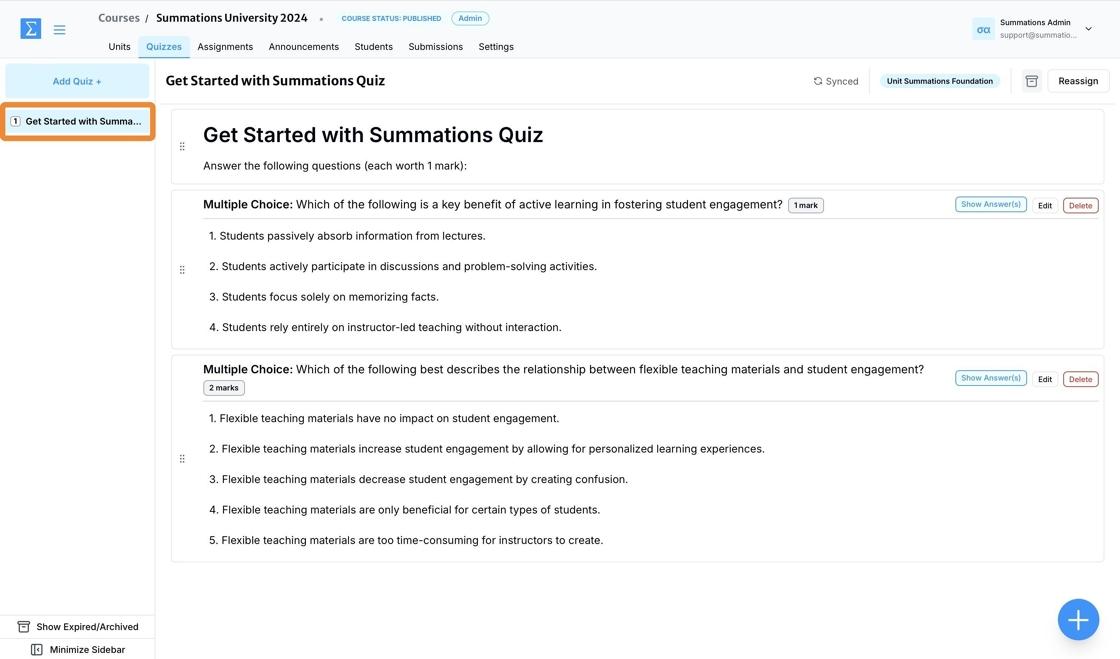
All the quizzes you have created will be displayed on the screen and can be navigated by clicking through the sidebar.
As an instructor, you can create quizzes directly from the Quizzes Tab, enabling seamless integration with your course materials and simplifying the management of assessments.
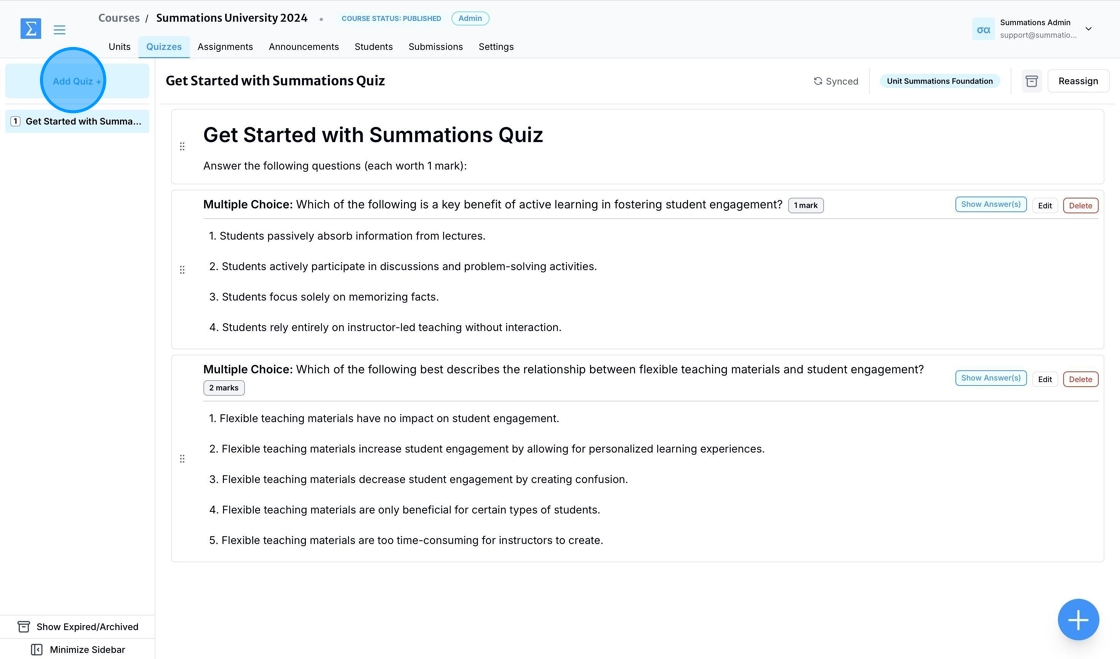
To create a quiz from the Quizzes Tab, click the 'Add Quiz +' button.
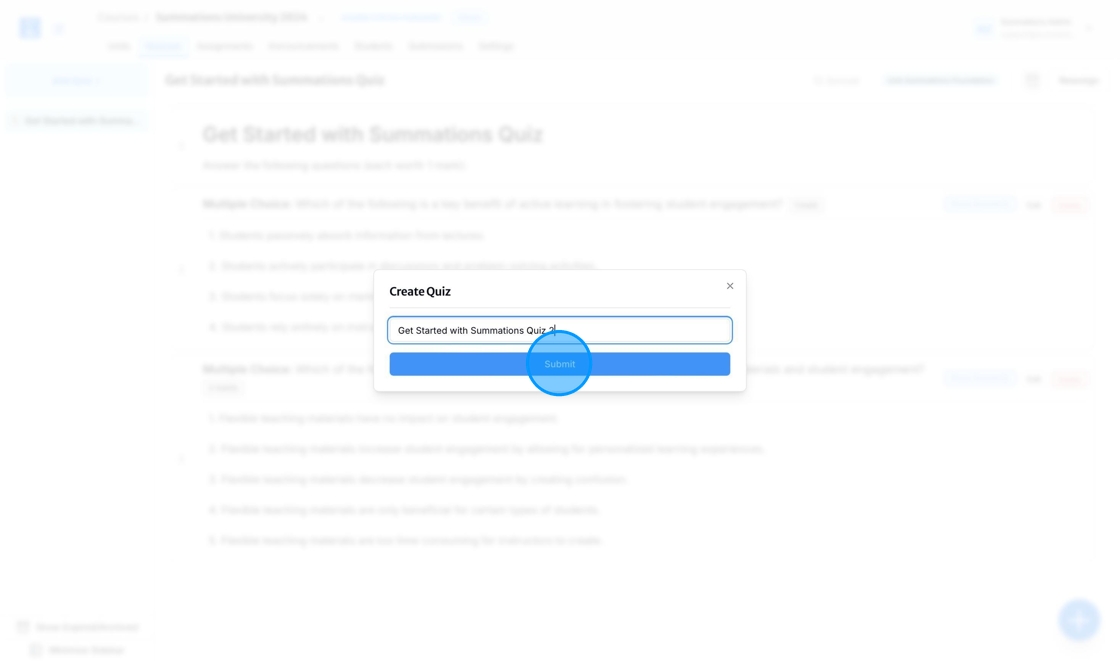
Enter the title of your quiz, then click 'Submit.'
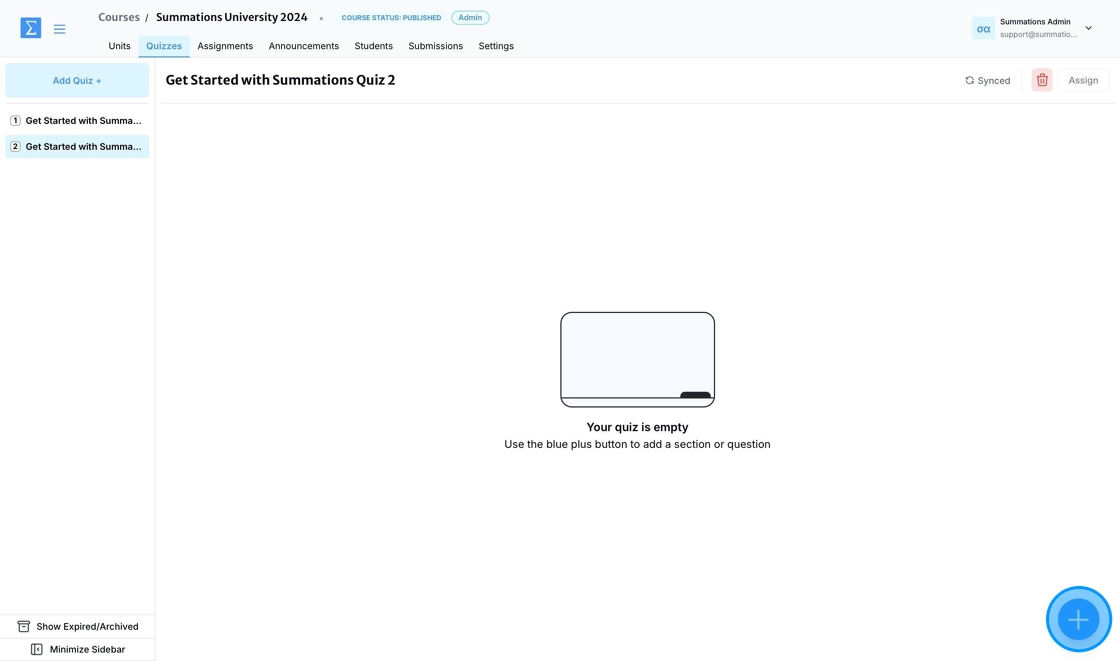
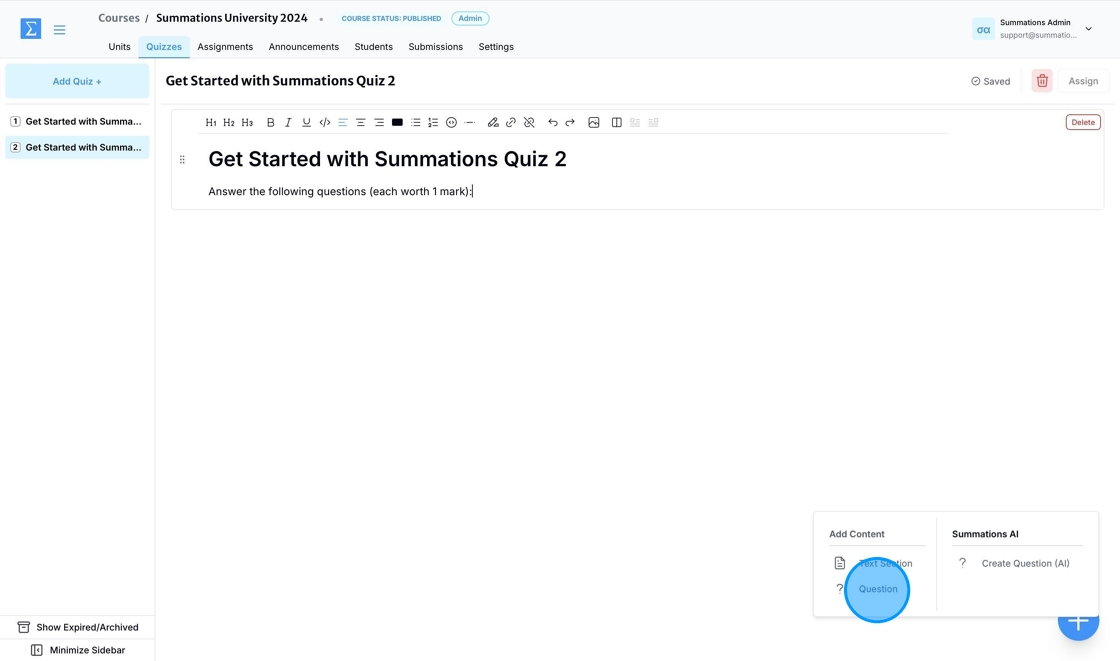
To start building your newly created quiz, click the '+' button in the bottom-right corner.
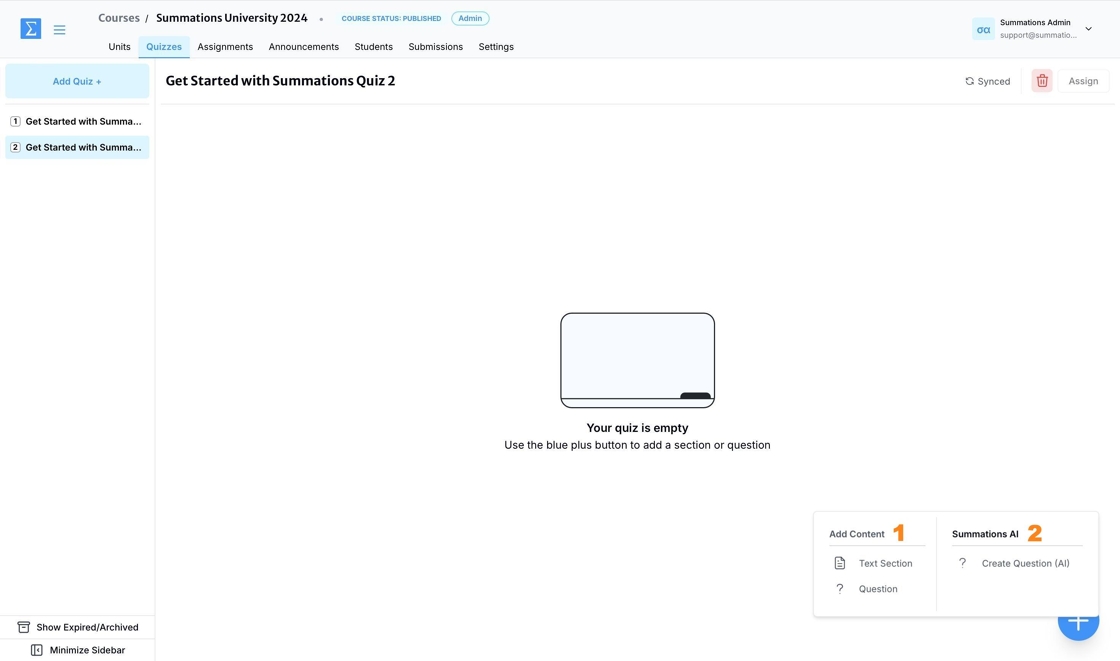
When you click the '+' button, you’ll see several options to design and organize engaging quizzes:
1. Add Content
Text Section: Write and format text to provide instructions or additional context for the quiz.
Question: Manually create and add various question types, such as multiple-choice, true/false, short answer, or long answer, to test student understanding.
2. Summations AI
Create Question (AI): Use AI to generate quiz or discussion questions based on your course content. This feature saves time by automating the creation of questions tailored to your material.
Add Quiz Instructions or Provide Additional Context Using Text Section
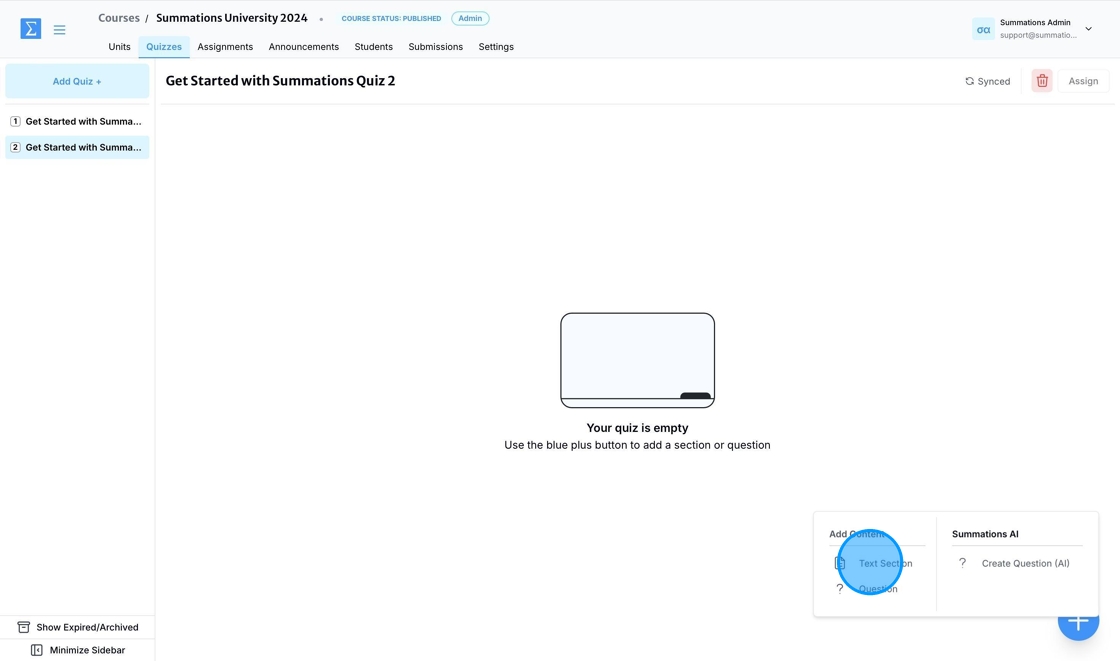
You can add text, such as an introduction or instructions for your students, by clicking 'Text Section.'
This will open a text editor where you can input, format, and structure your content. The text editor allows you to:
Use headings and subheadings to organize the material.
Add bullet points or numbered lists for clarity.
Apply text formatting options, such as bold, italics, or underline, to emphasize key concepts.
Insert hyperlinks to direct students to additional resources or references.
Include media resources such as images and videos.
Any content added under the Quiz section is automatically saved and synced to the cloud. You can view the saving status in the top-right corner.
Manually Add Quiz Questions
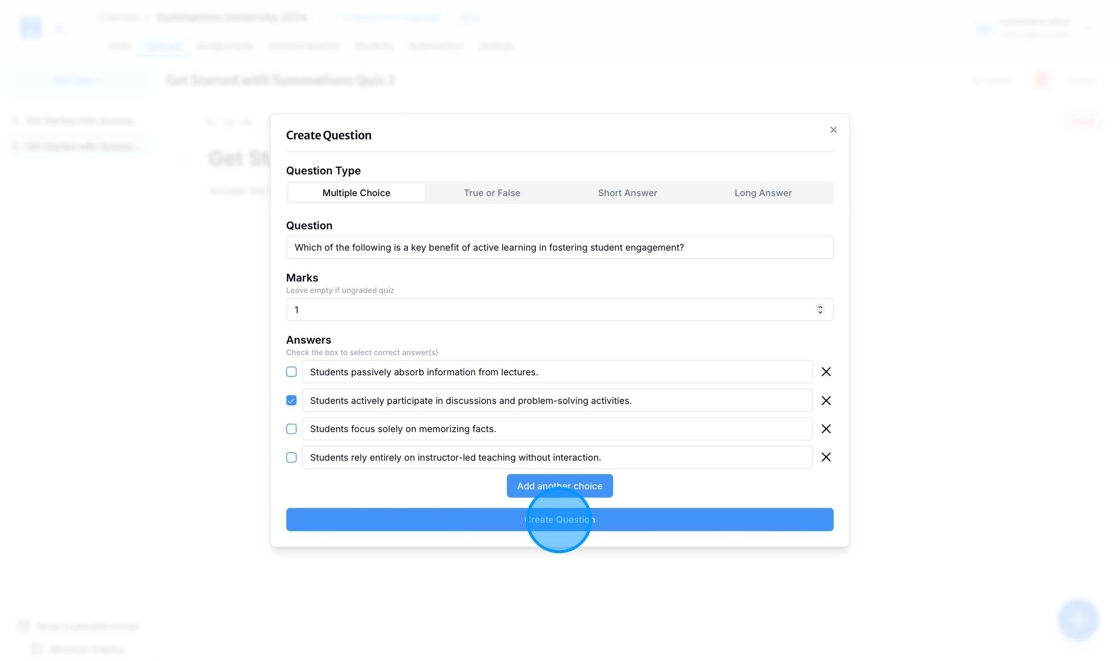
To manually add a question to your quiz, click the '+' button and select 'Question.'
There are four types of questions you can choose from: Multiple Choice, True or False, Short Answer, and Long Answer.
After entering the question and answer, deciding whether to assign a grade (if you do not wish to assign a grade for this quiz, leave the 'Marks' field blank), and selecting the correct answer (for multiple-choice and true/false questions, use the checkbox next to the choices), click 'Create Question'.
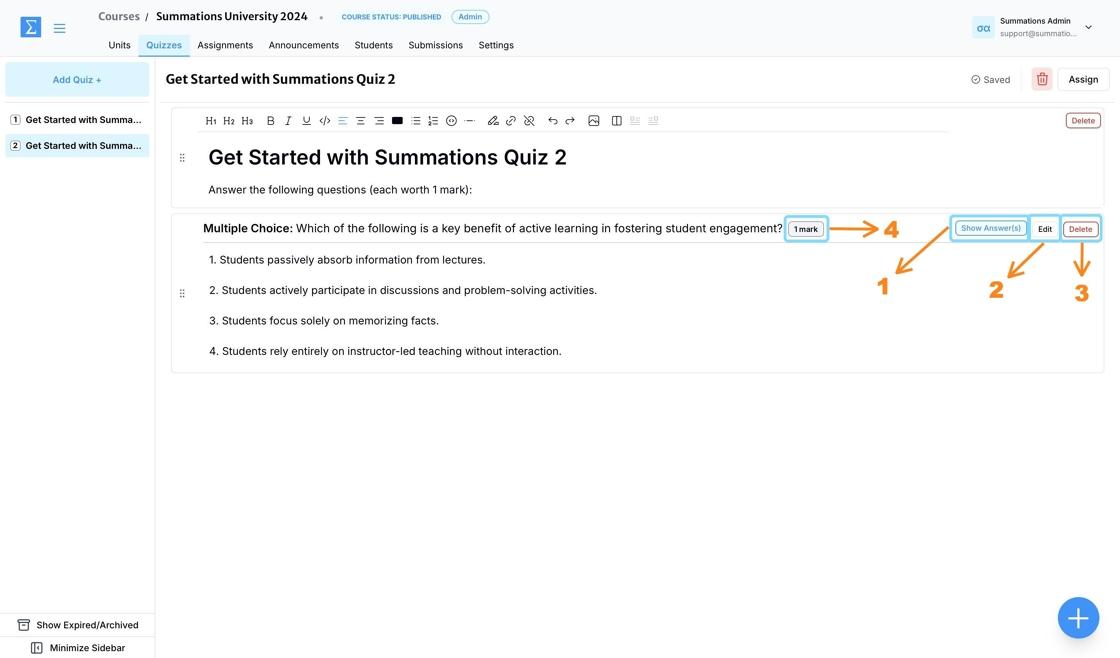
Once the question is created, you can take the following actions to ensure it is ready to be assigned to students:
Show/Hide Answer(s): Use this option to view the correct answer selected for the question. Indicating the correct answer is crucial for the autograding system to accurately grade student submissions. As an instructor, you can assign questions as either graded or non-graded assignments and control whether students can see the correct answer after submitting their responses.
Edit: Make changes to the question, update the correct answer, or adjust the assigned marks if needed.
Delete: Remove the question if it is not suitable for your students.
Mark: Indicate the point value assigned to the question to determine its weight in the overall quiz grade. Adjust the marks based on the question's difficulty or importance within the quiz. This feature provides flexibility in grading and ensures the quiz aligns with the learning objectives. After assigning marks, confirm that the total points for the quiz match your course grading criteria.
Generate Quiz Questions Using Summations AI
To use AI to generate a question based on the content you’ve created for the rest of the unit, click the '+' button and select 'Create Question (AI).'
AI can help you generate four types of questions: Multiple Choice, True or False, Short Answer, and Long Answer. Choose the type that best suits your students' needs. For this demonstration, we will select Multiple Choice.
Click on the 'Marks' field to assign points for the question. If the quiz is ungraded, leave this field blank. For this demonstration, we will assign 2 points to each question.
Enter the topic for this question and click 'Generate Question.' Please note that any AI-generated material on Summations takes into account all existing content in this unit, as long as it is relevant to the prompt you provide. In the 'Topic for Question' section, you can instruct the AI to generate a question on a specific learning topic covered in this unit or any other topic you want to quiz your students on.
After the AI generates the question, you can edit the question, update the correct answer, or request the AI to regenerate it. Once you have finalized the content, click 'Add to Stack' to include the question in the material.
Once the question is added, you can take the following actions to ensure it is ready to be assigned to students:
Show/Hide Answer(s): Use this option to view the correct answer selected for the question. Indicating the correct answer is crucial for the autograding system to accurately grade student submissions. As an instructor, you can assign questions as either graded or non-graded assignments and control whether students can see the correct answer after submitting their responses.
Edit: Make changes to the question, update the correct answer, or adjust the assigned marks if needed.
Delete: Remove the question if it is not suitable for your students.
Mark: Indicate the point value assigned to the question to determine its weight in the overall quiz grade. Adjust the marks based on the question's difficulty or importance within the quiz. This feature provides flexibility in grading and ensures the quiz aligns with the learning objectives. After assigning marks, confirm that the total points for the quiz match your course grading criteria.
Assign Quiz
Once you have finished building your quiz and it is ready for students to access, click 'Assign.'
Assign as a Non-Graded or Practice Quiz/Test
To assign your quiz or test as non-graded, ensure the grading toggle switch remains turned off. Then, complete the following steps:
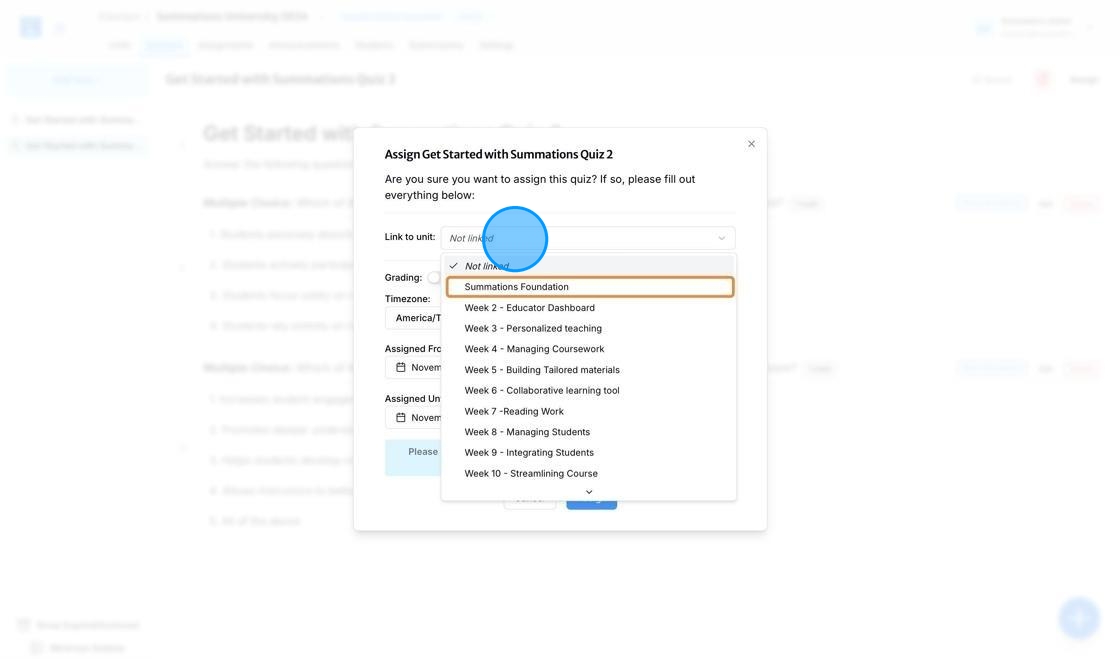
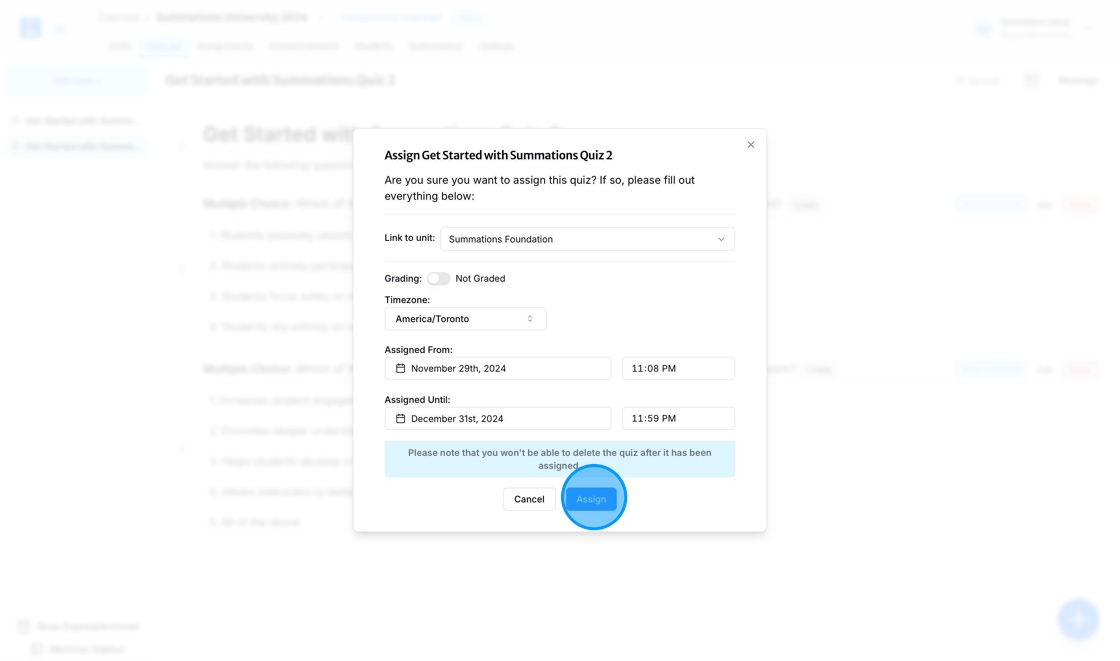
Link to Unit: If you have created the quiz under the "Quiz" tab, use the "Link to Unit" section to associate the quiz with the appropriate unit. This step ensures that the quiz is properly aligned with the corresponding unit in your course structure.
Timezone: The timezone will default to your current timezone based on your computer settings. If you and your students are in different timezones and you want the quiz to align with your students' timezone, click the timezone field and select an alternative from the list.
Assigned From: To assign the quiz immediately, leave the 'Assigned From' field unchanged, as it defaults to the current time, as shown in the demonstration. If you want to schedule the quiz for a later time, click on the date and time field, select an alternative date from the calendar, and adjust the time accordingly.
Assigned Until: Set the deadline for when the quiz will close by selecting the appropriate date and time.
Once all fields are completed, click 'Assign' to finalize the process.
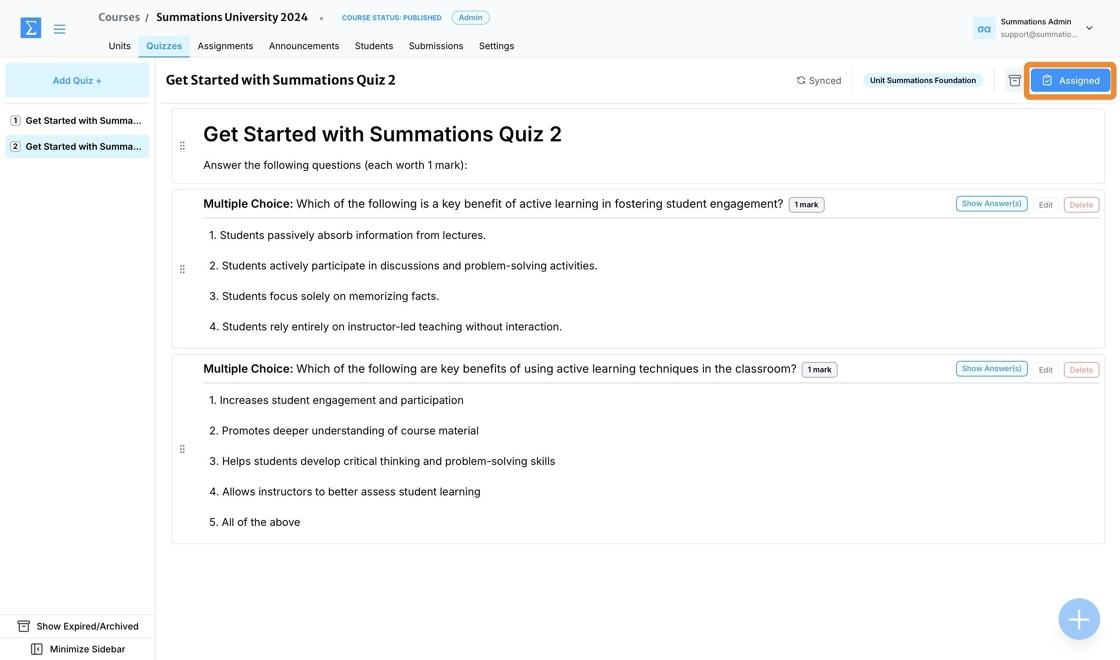
Once the quiz is assigned and becomes visible to your students, the 'Assign' button in the top-right corner of the quiz will change to 'Assigned.'
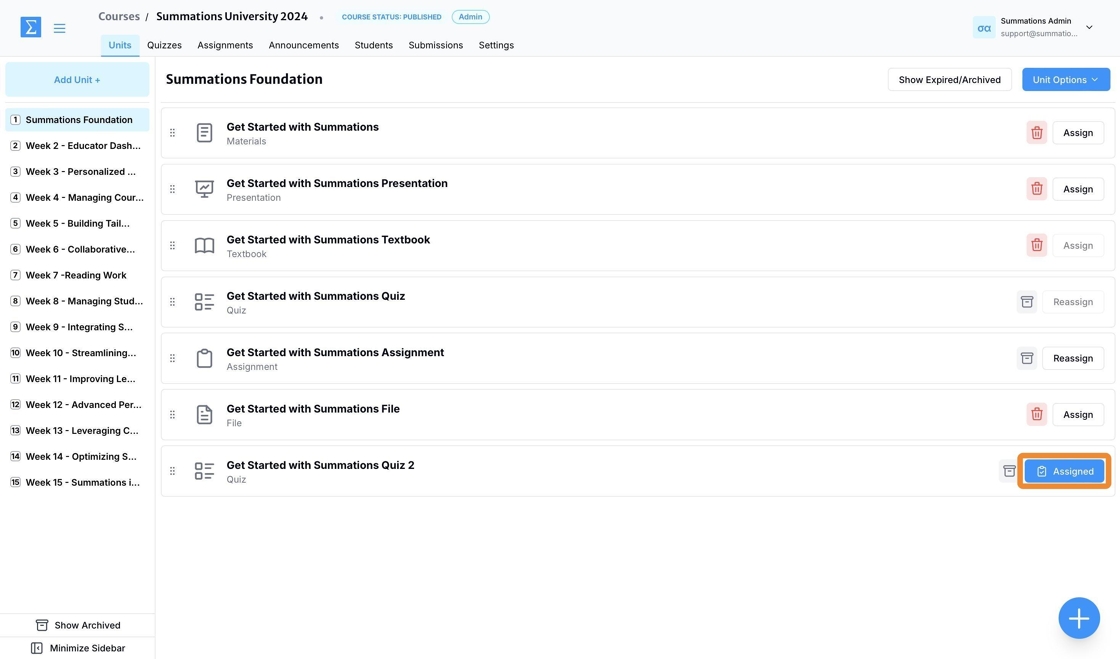
The quiz section within the unit to which this quiz is linked will update from 'Assign' to 'Assigned' to reflect the change.
To schedule the quiz for a later time, click the date and time field, select a different date from the calendar, and adjust the time as needed.
Once all fields have been updated, click 'Assign' to finalize the process.
Once the quiz is scheduled for assignment, the 'Assign' button in the top-right corner of the quiz will change to 'Scheduled.' When the 'Assigned From' time arrives, the button will automatically update to 'Assigned.'
The quiz section within the unit to which this quiz is linked will update from 'Assign' to 'Scheduled' to reflect the change. When the 'Assigned From' time arrives, the button will automatically update to 'Assigned.'
Assign as a Graded Quiz or Test
To assign your quiz or test as a graded assignment, make sure the grading toggle switch is turned on. Then, follow these steps:
Link to Unit: If you created the quiz under the "Quiz" tab and it has not yet been linked to a unit, you will see the "Link to Unit" section above the 'Grading' section. Use this section to associate the quiz with the appropriate unit. This step ensures that the quiz is properly aligned with the corresponding unit in your course structure.
Weight: Specify the weight of the quiz in relation to the overall course grade. This determines how much the quiz contributes to the final grade and ensures alignment with your course grading policy. Adjust the weight percentage as needed to reflect the quiz's importance relative to other assignments or assessments in the course.
Extra credit: Indicate whether the quiz should be assigned as extra credit. If selected, the points earned from the quiz will contribute to the student's overall grade without impacting the total possible points for the course. This option allows you to offer additional learning opportunities and incentives for students to engage with the material.
Closed Book: Turn on the Closed Book toggle switch to activate the test proctoring system. This feature locks the student’s device screen while they complete the test or quiz and provides a log of their activity during the quiz for the instructor. This ensures the integrity of the submitted assignment. For more information about the test proctoring system, please refer to this article "Using the Test Proctoring System".
Allotted Time: Specify the amount of time students are allowed to complete the quiz or test. This helps ensure consistency and fairness, particularly for timed assessments.
Accessibility Requirements: This feature allows you to provide specific students with additional time to complete the quiz or test as part of their accommodations. To use this feature, select the student's name and specify the extended time they require. For instance, if the quiz is set to 30 minutes for the entire class, but a student has an accommodation allowing twice the time, select the student's name and set their allotted time to 60 minutes.
Timezone: The timezone will default to your current timezone based on your computer settings. If you and your students are in different timezones and you want the quiz to align with your students' timezone, click the timezone field and select an alternative from the list.
Assigned From: To assign the quiz immediately, leave the 'Assigned From' field unchanged, as it defaults to the current time, as shown in the demonstration. If you want to schedule the quiz for a later time, click on the date and time field, select an alternative date from the calendar, and adjust the time accordingly.
Assigned Until: Set the deadline for when the quiz will close by selecting the appropriate date and time.
Once all fields are completed, click 'Assign' to finalize the process.
Once the quiz is assigned and becomes visible to your students, the 'Assign' button in the top-right corner of the quiz will change to 'Assigned.'
The quiz section within the unit to which this quiz is linked will update from 'Assign' to 'Assigned' to reflect the change.
To schedule the quiz for a later time, click the date and time field, select a different date from the calendar, and adjust the time as needed.
Once all fields have been updated, click 'Assign' to finalize the process.
Once the quiz is scheduled for assignment, the 'Assign' button in the top-right corner of the quiz will change to 'Scheduled.' When the 'Assigned From' time arrives, the button will automatically update to 'Assigned.'
The quiz section within the unit to which this quiz is linked will update from 'Assign' to 'Scheduled' to reflect the change. When the 'Assigned From' time arrives, the button will automatically update to 'Assigned.'
Updating Quiz Details
As an instructor, you can update specific details of a quiz, such as the deadline, grade value, or assigned availability, without needing to unassign it. These updates are reflected in real-time for students, ensuring they have access to the most accurate and up-to-date information. To make changes, navigate to the 'Assigned' or 'Scheduled' button in the top-right corner, select 'Edit,' make the necessary adjustments, and save your updates.
This flexibility allows you to adapt the quiz to evolving course requirements or accommodate individual student needs while maintaining the integrity of the assessment. For significant edits to quiz questions or structure, refer to the guide below on how to unassign and reassign the quiz to avoid any potential confusion.
Unassigning a Quiz
To unassign a quiz or test, click the 'Assigned' or 'Scheduled' button in the top-right corner and select 'Unassign.' This action revokes student access to the quiz and makes it invisible to them.
A confirmation pop-up will appear to prevent accidental unassigning of the quiz. Select 'Unassign' if you are certain you want to proceed.
Editing an Assigned Quiz
Once a quiz or test is assigned or scheduled, it cannot be edited, and questions cannot be deleted without first unassigning the quiz. This ensures the integrity of the assessment and prevents changes that could affect students who have already started or completed the quiz.
To make changes, follow these steps:
Unassign the Quiz: Navigate to the assigned or scheduled quiz, and click 'Unassign.' This action will temporarily revoke student access to the quiz.
Edit the Quiz: After unassigning, you can modify the questions, answers, or other quiz details as needed.
Reassign the Quiz: Once all edits are complete, reassign the quiz to the appropriate students or groups. Be sure to communicate any changes to your students to avoid confusion.
Note: Unassigning a quiz will not delete student progress or submissions for those who have already completed it, but it will pause access for those who have not yet started.
Reassigning a Quiz
If you have unassigned a quiz for editing and now wish to reassign it to your students, click the 'Reassign' button in the top-right corner. Review and edit all details as needed, then click 'Assign' to finalize and make the quiz available to your students.

