Using Collaborative Insights Tools - Annotations
The Collaborative Insight Tool in Summations allows you to engage more deeply with your course materials. Two tools are available: Annotations and Forums, each designed to foster collaboration and enhance learning. This article focuses on Annotations, a powerful feature that lets you interact directly with your readings by adding comments, highlights, and notes and sharing your thoughts directly on the text with your peers or instructors.
Your instructor may assign an Annotation Assignment, requiring you to highlight specific sections of the text and add your insights or respond to prompts. These assignments are designed to encourage deeper engagement with the material and foster collaboration among peers. For more information on how to complete an Annotation Assignment, please refer to this article "Submitting an Annotation Assignment".
With Annotations, you can also share your thoughts, respond to classmates' comments, and participate in meaningful discussions directly within the text. This tool helps you better understand the material by encouraging active engagement and collaboration, making learning a more dynamic and interactive experience. Use Annotations to connect with your classmates, clarify concepts, and explore ideas together!
Accessing the Annotation Feature
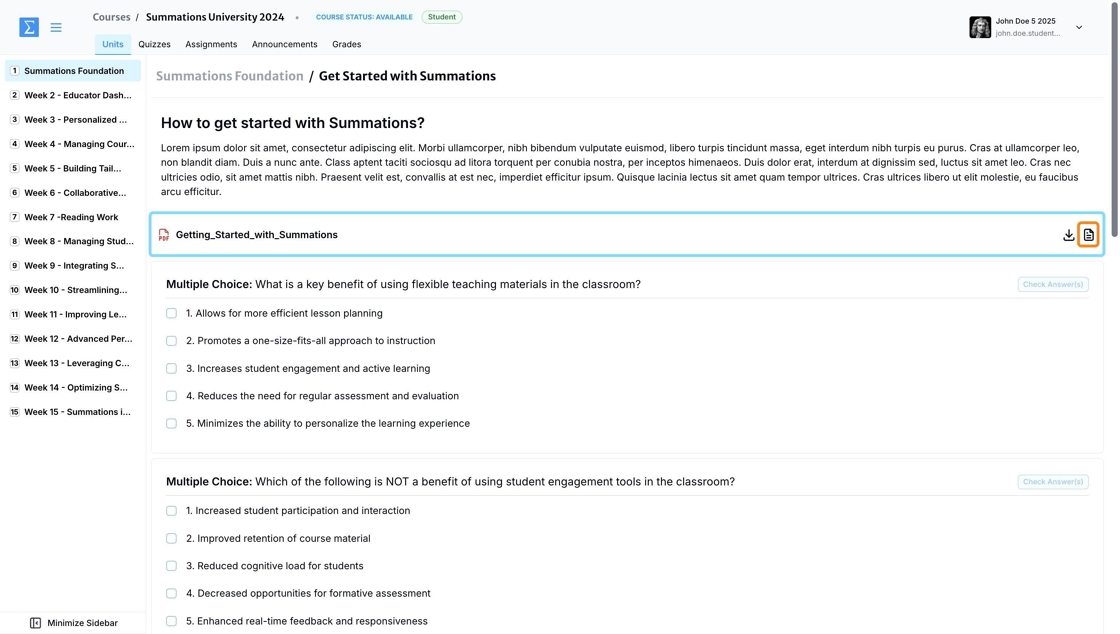
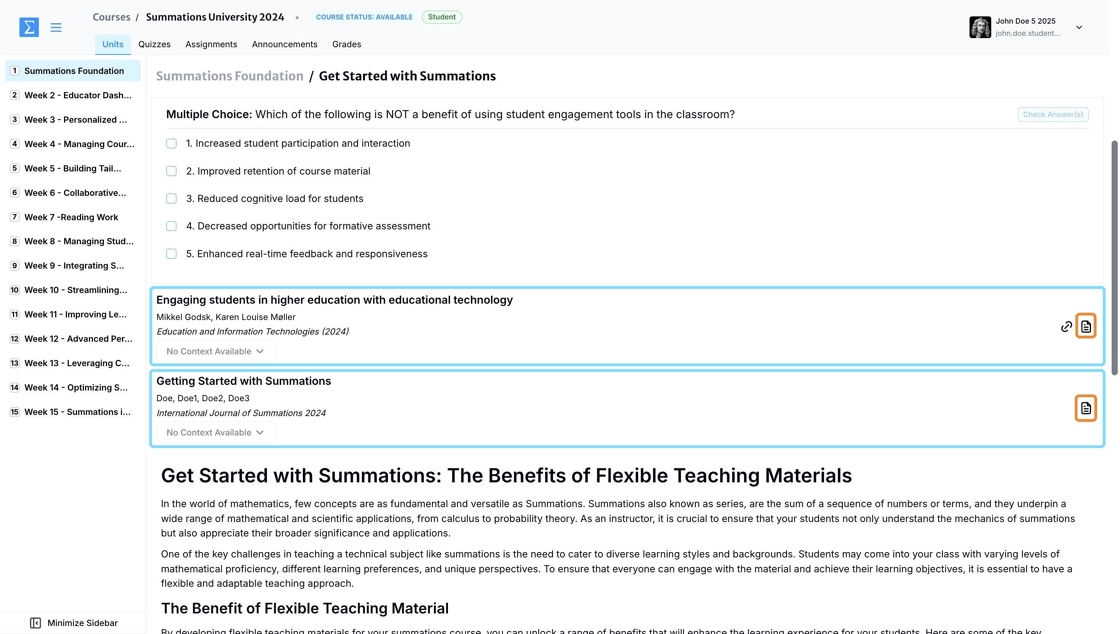
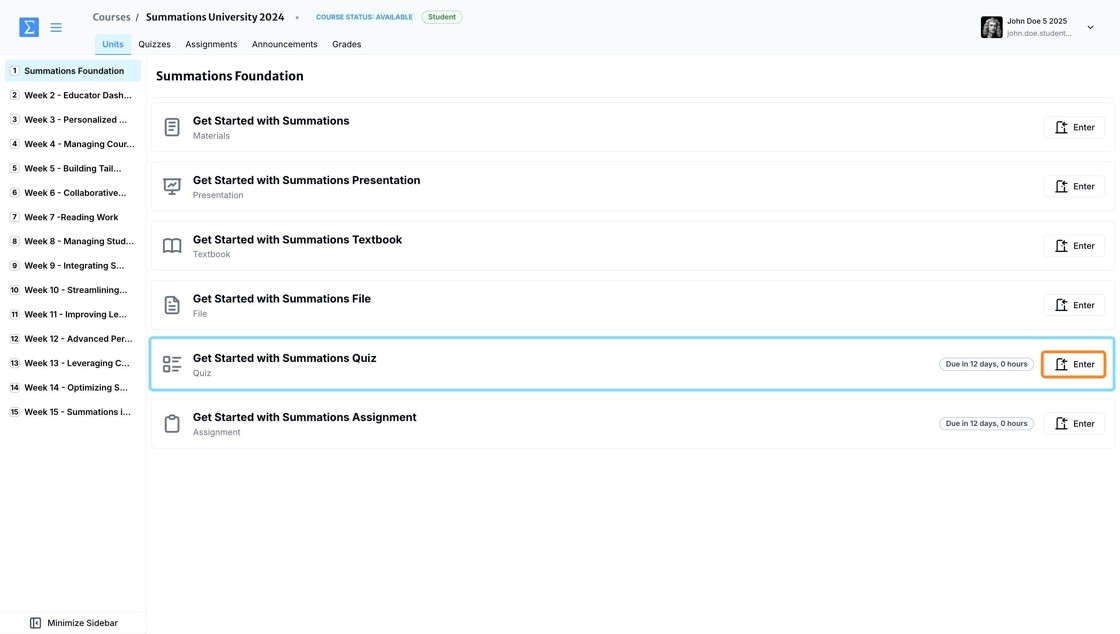
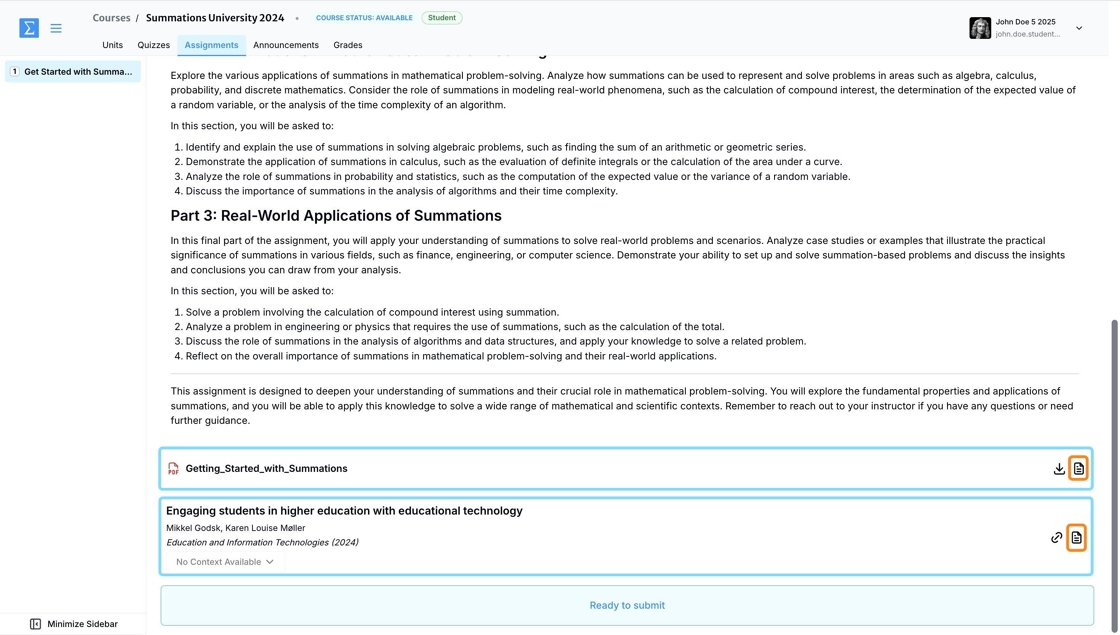
You can access the social annotation feature on any reading in your Summations student account. This feature is available under Materials, Files, or Assignments, as long as you see a page icon next to the assigned reading. Clicking on the page icon will take you to the Summations Reader, where the collaborative insight tools are hosted.
Under Materials, it will look like this:
Alternatively, it can look like this:
Under Files, it can look like this:
Under Assignment, it can look like this under Instructions:
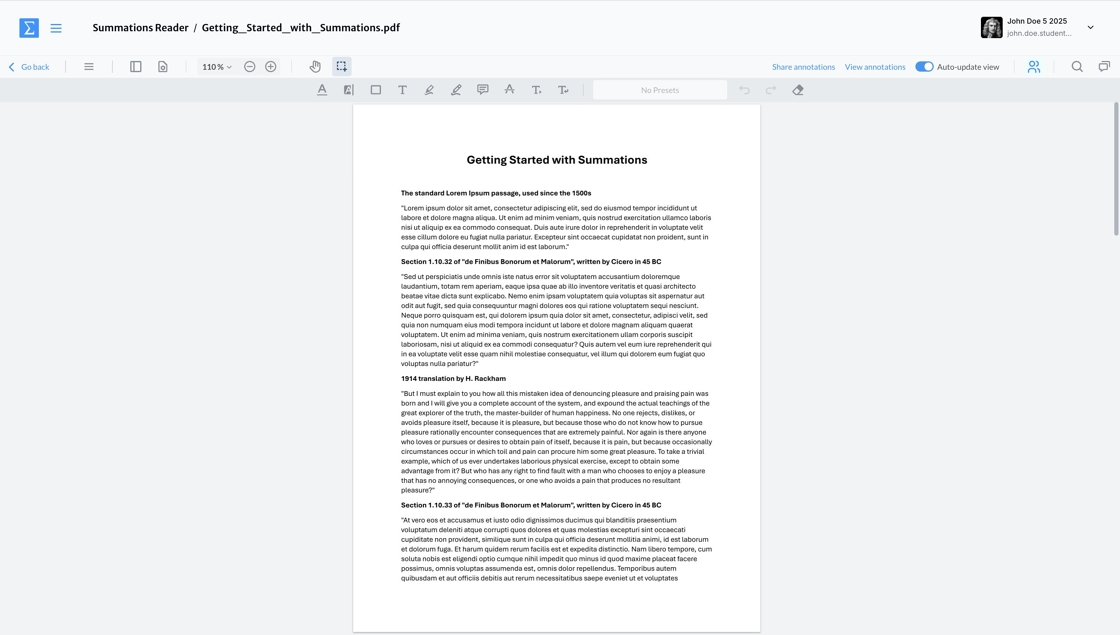
When you open the file or access the material, you will find the Summations Reader, which looks like this:
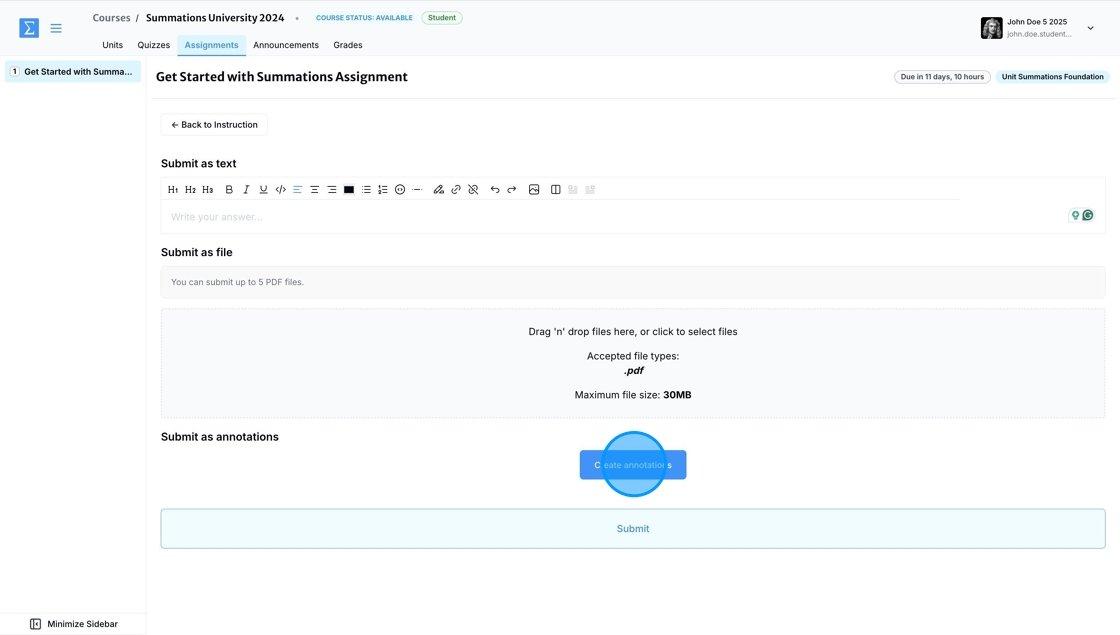
Alternatively, it can look like this under Submission:
Navigating the Summations Reader
The Summations Reader is where you’ll find a series of collaborative insight tools designed to enhance your learning experience. These tools transform course content into a dynamic and interactive environment, encouraging you to engage deeply with the material and collaborate with your peers.
In the Summations Reader, you can interact with readings through features like annotations, where you can add comments, highlight key points, and respond to insights shared by your classmates. These tools are designed to make your learning more active and collaborative.
This section provides an overview of how you can use the Summations Reader and its Collaborative Insight Tools to better engage with course materials and connect with your peers.
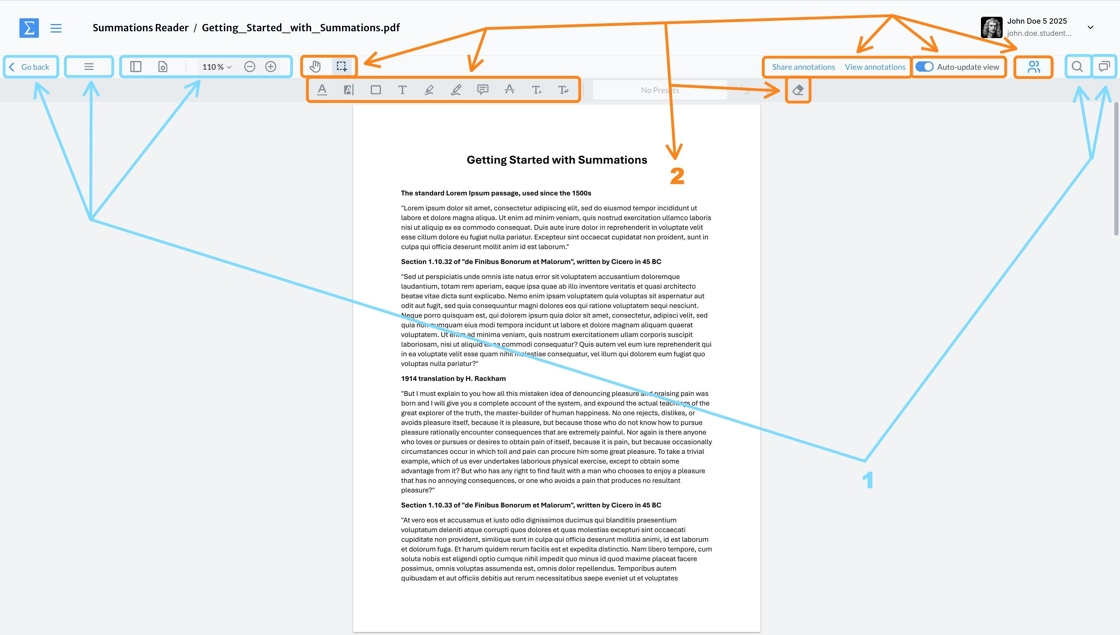
In the Summations Reader, you can view your course documents alongside a variety of tools designed to enhance your navigation and interaction with the content. These include:
Summations Reader Settings: Adjust the display to suit your preferences and make the reading experience more comfortable.
Collaborative Insight Tools: Engage with dynamic features like annotations to interact with the material and collaborate with your peers.
Below, we will guide you through the Summations Reader settings and their functionalities to help you navigate and engage with your course materials effectively. For detailed information about Collaborative Insight Tools, please refer to the Colborative Insight Tools section below.
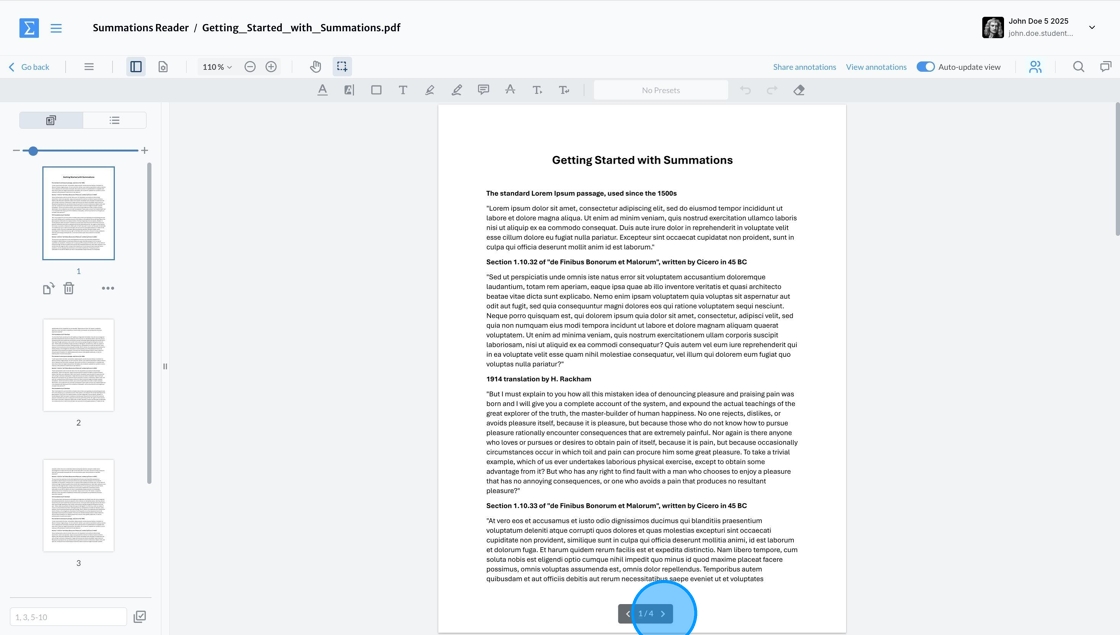
Page Number
Below the document, you can view the current page number. Use the arrow icons to navigate to the previous or next page.
Page Setting Tools
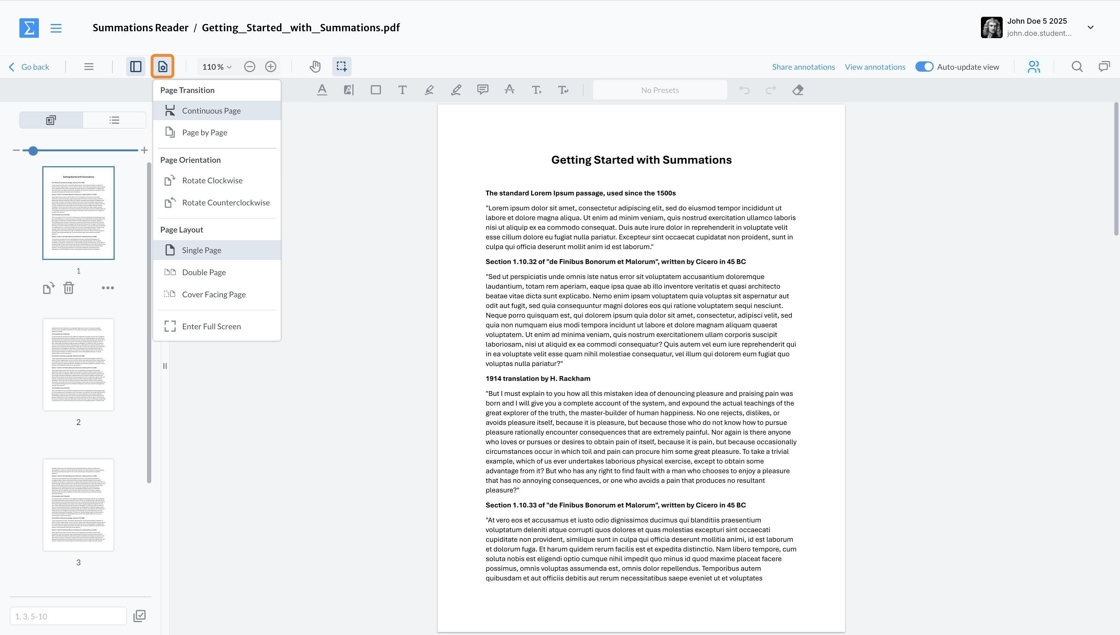
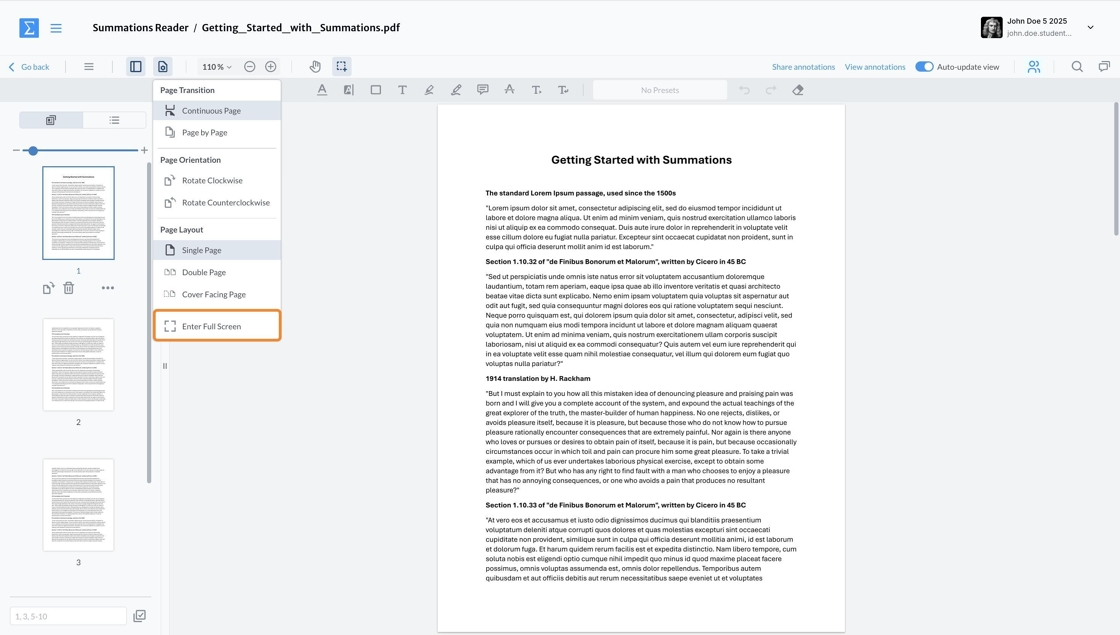
The 'Settings' icon provides access to a variety of tools designed to enhance your document viewing and navigation experience. These tools allow you to customize how you interact with the document, ensuring a more tailored and user-friendly experience. The available options include:
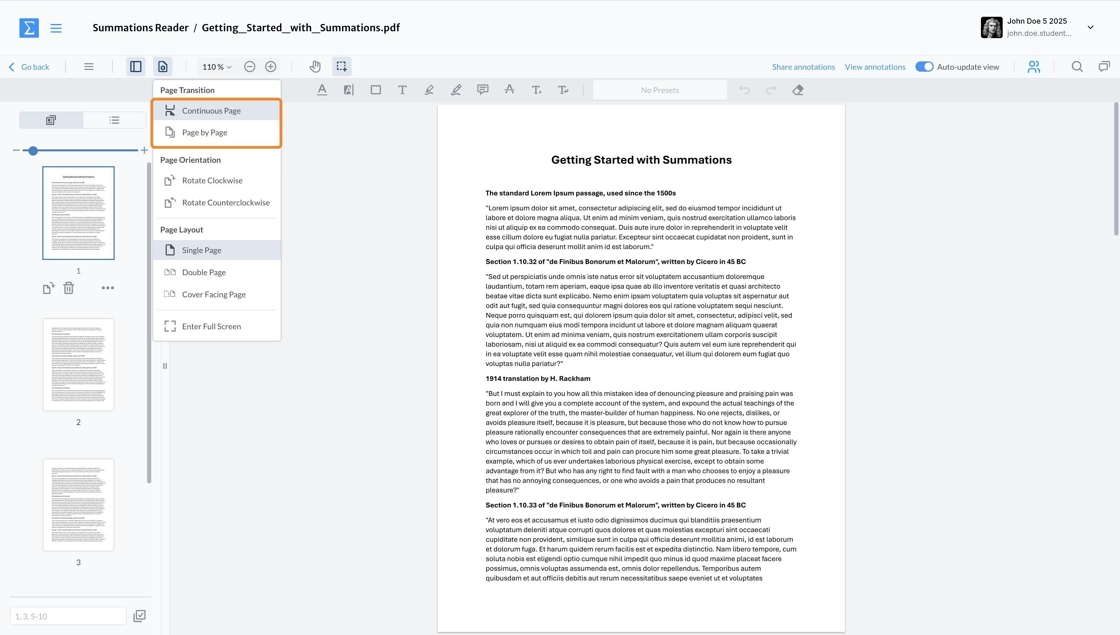
Page Transition: Choose how you navigate through the document. Options include Continuous Page, for smooth scrolling, and Page by Page, for navigating one page at a time. This tool is ideal for customizing your reading or presentation style.
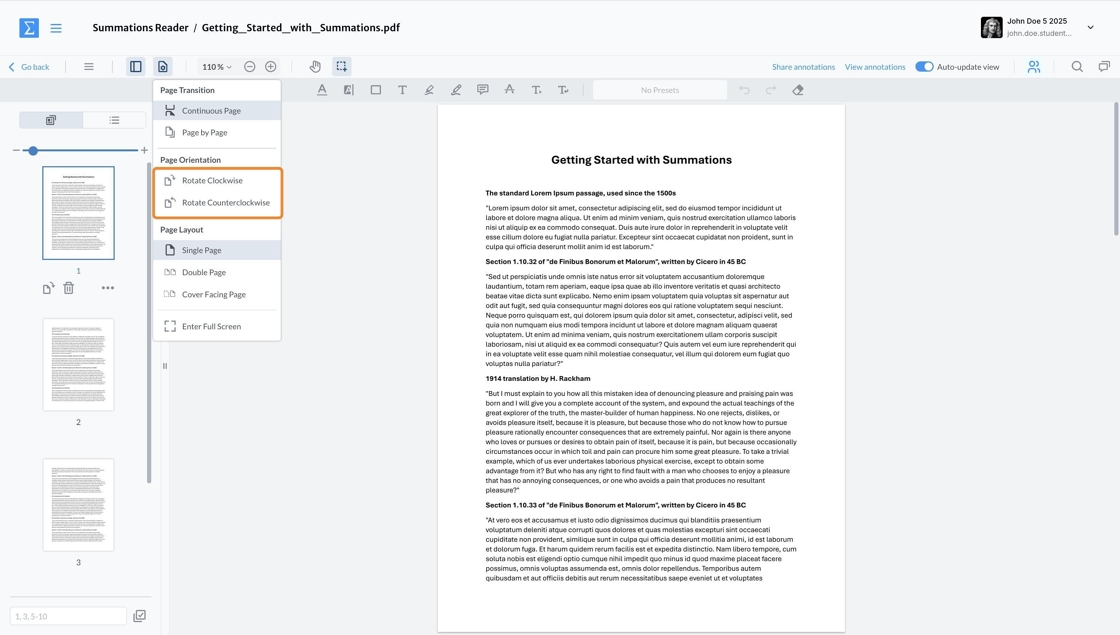
Page Orientation: Adjust the orientation of the document by rotating the page. You can select Rotate Clockwise or Rotate Counterclockwise to view the content in the angle that suits you best.
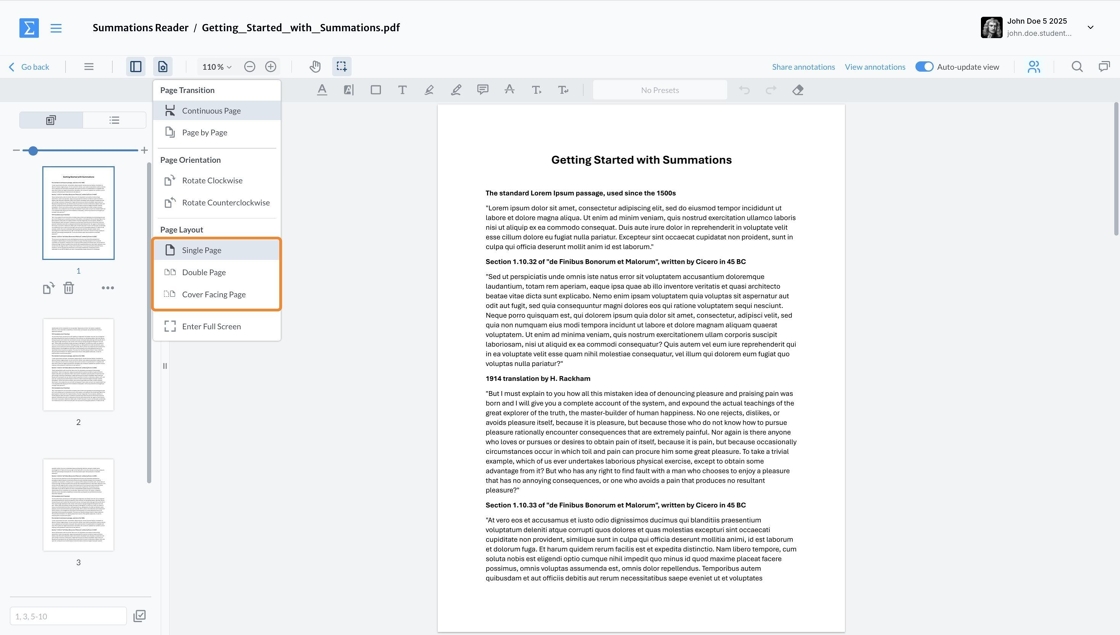
Page Layout: Modify the overall layout of the document to fit your viewing preferences. Options may include single-page or two-page spread views, enabling you to optimize the document display for different purposes, such as detailed review or quick skimming.
Full Screen: Enter full-screen mode to minimize distractions and maximize focus on the document. This setting is especially useful for presentations or when reading on smaller devices.
These tools are designed to provide a seamless and personalized experience, whether you're reading, presenting, or editing the document.
Page Transition
The Page Transition tool allows you to customize how you navigate through the document. You can select from the following options:
Continuous Page: This mode enables smooth scrolling, allowing you to view the document as a continuous flow without distinct page breaks. It's ideal for quickly browsing through content or for uninterrupted reading.
Page by Page: This mode lets you navigate one page at a time, maintaining clear page boundaries. It's especially useful for presentations or when precise referencing of page numbers is required.
You can switch between these modes based on your preference for a seamless or structured reading experience.
Page Orientation
The Page Orientation tool allows you to adjust the orientation of the document. You can choose to rotate the page in either direction:
Rotate Clockwise: Rotates the page 90 degrees to the right.
Rotate Counterclockwise: Rotates the page 90 degrees to the left.
These options enable you to customize the view for optimal readability and presentation.
Page Layout
The Page Layout tool allows you to adjust how the document is displayed. You can choose from the following layout options:
Single Page: Displays one page at a time, ideal for focused reading or when working on smaller screens.
Double Page: Shows two pages side by side, similar to an open book, perfect for comparing content or reviewing layouts.
Cover Facing Page: Displays the document with the cover page on the right, mimicking the layout of a printed publication, which is useful for reviewing professional designs.
These options enable you to customize the viewing experience to suit your specific needs.
Enter Full Screen
The Enter Full-Screen tool in the Summations Reader allows students to maximize their workspace while reviewing course content. Full-screen mode provides an enhanced, distraction-free view for easier navigation and focus. You can exit full-screen mode at any time by pressing the "Esc" key on your keyboard.
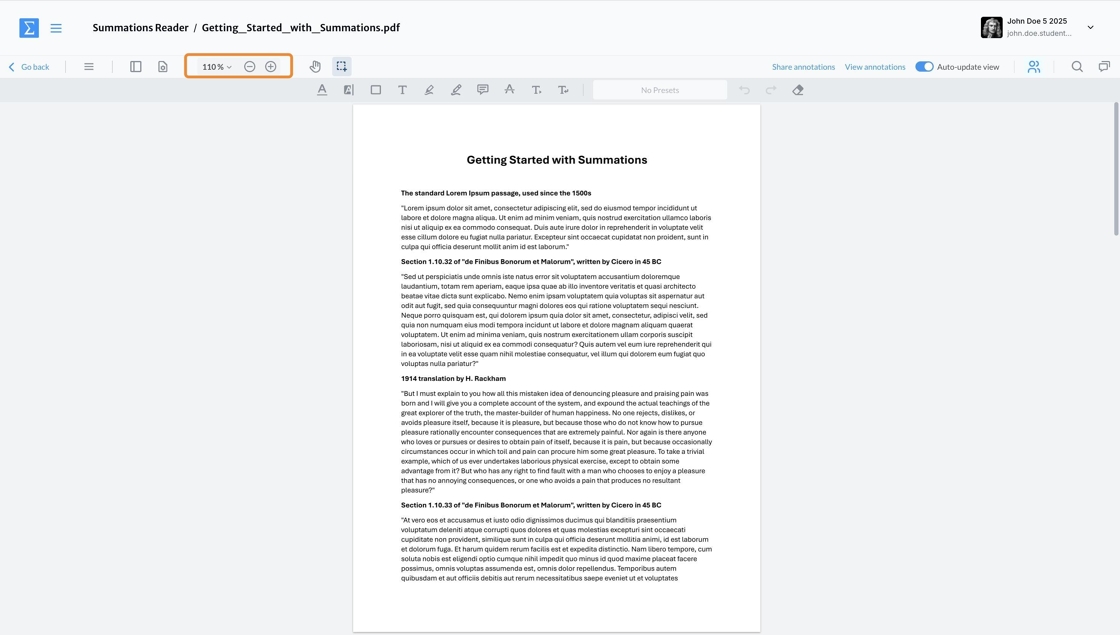
Zoom In/Out
To adjust the zoom level of the document, click the '-' button to zoom out or the '+' button to zoom in.
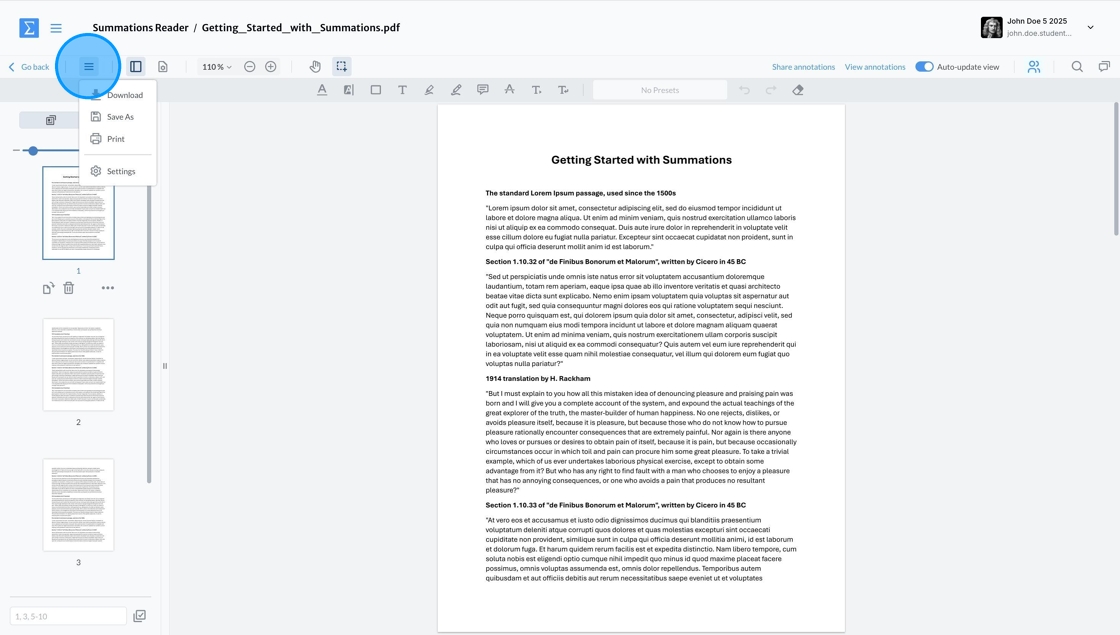
Download, Save, Print, and Advanced Settings
To download, save, print the document, or access advanced formatting settings, click the three vertical lines icon.
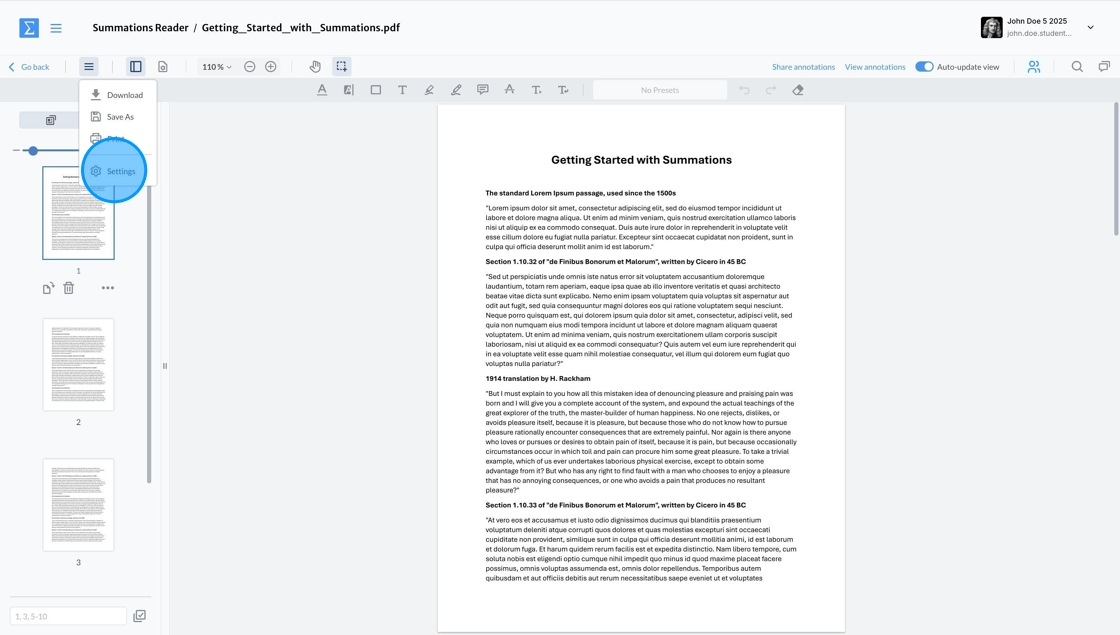
Advanced Format Settings
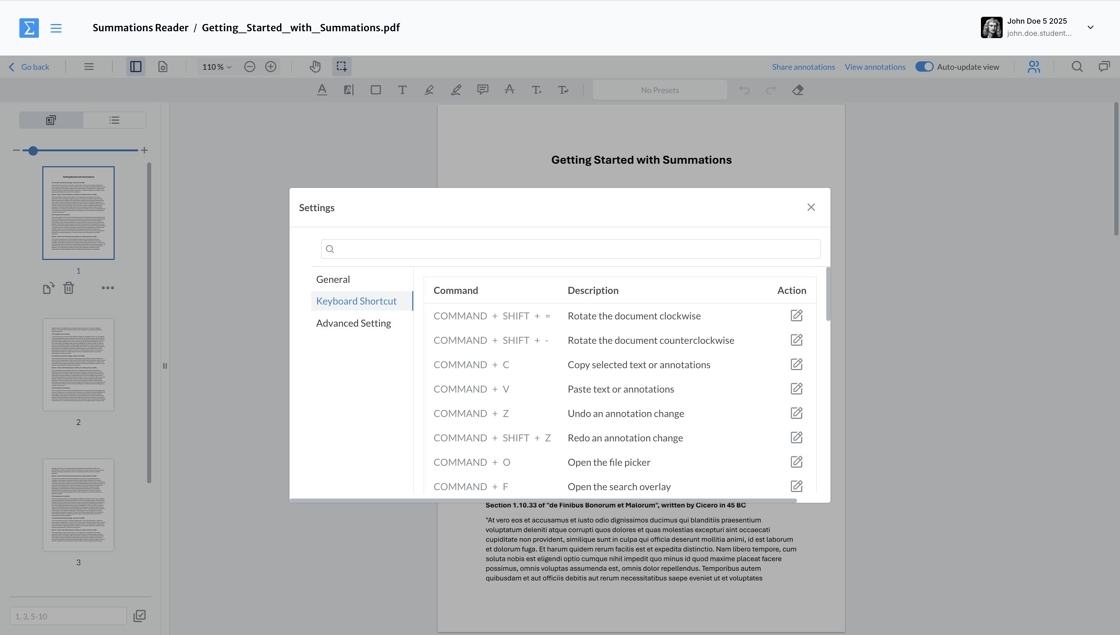
To configure advanced formatting options, click Settings.
Under the 'General' tab, you can customize your preferred language and reading theme:
Language: Click the dropdown menu to select your desired language.
Reading Theme: To adjust the background, choose Light Mode for a lighter appearance or Dark Mode for a darker, more subdued look.
In the Keyboard Shortcut tab, you will find a list of commands along with their descriptions. You can modify a command by clicking the Action icon.
In the Advanced Settings tab, you can customize additional options, including Viewing, Annotations, Notes Panel, Search, and Page Manipulation.
Search Tool
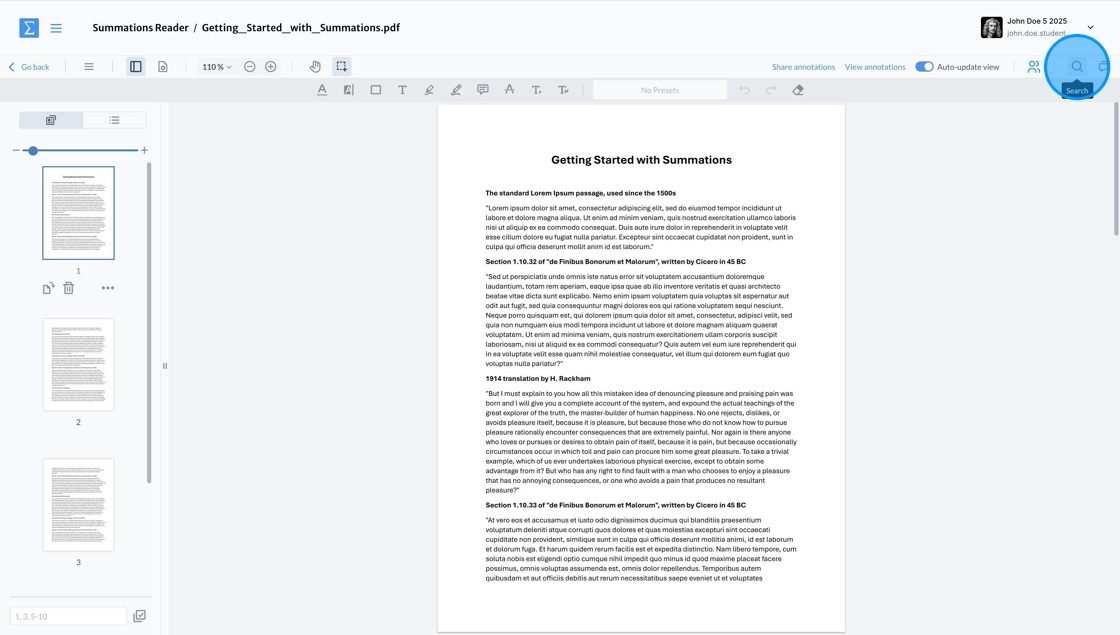
To find a specific text or phrase within the document, click the Search icon.
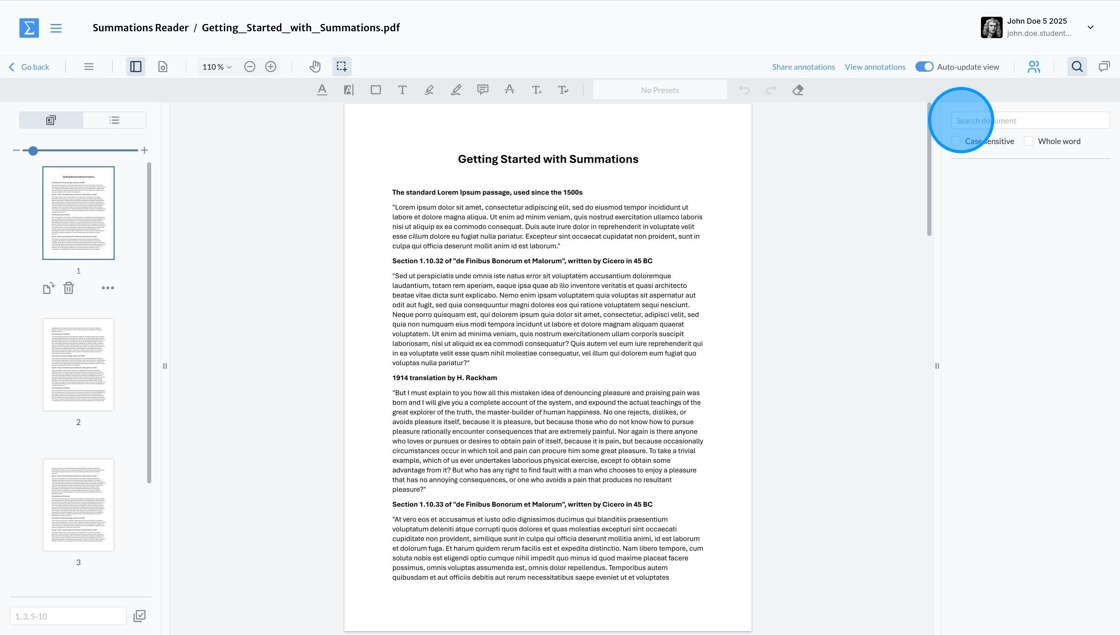
The Search Bar will appear. Click the "Search Document" field and type the word or phrase you want to find in the document.
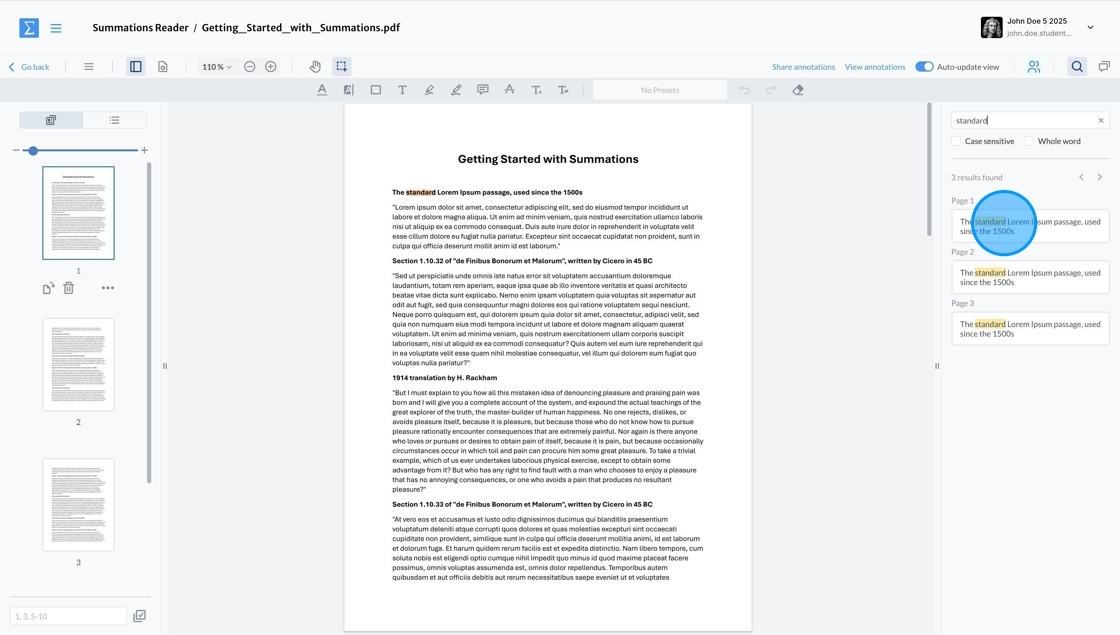
All instances of the word or phrase found in the document will then be displayed and highlighted, along with their corresponding page numbers.
You can click on each instance to quickly jump to the specific page where the keyword is located.
Now that the Summations Reader is customized and set up, refer to the section below for guidance on using the annotation tools in your learning or to complete activities or assignments. For more information on using forums, please refer to this article "Using Collaborative Insights Tools - Forums".
Using Annotations
Annotations and social annotation tools in Summations provide a unique way to engage deeply with your course materials. With annotations, you can highlight important text, add personal notes, and organize your thoughts directly within your readings. Social annotation takes this a step further by allowing you to share insights, respond to your peers' comments, and collaboratively discuss key concepts in real-time. Participating in these activities can enhance your understanding of the material, improve critical thinking, and help you see different perspectives on the same topic. Additionally, social annotation fosters a sense of community by connecting you with your classmates, creating an interactive and collaborative learning environment. These tools are especially valuable for completing assignments that require active participation and critical engagement, making your learning experience more dynamic and meaningful.
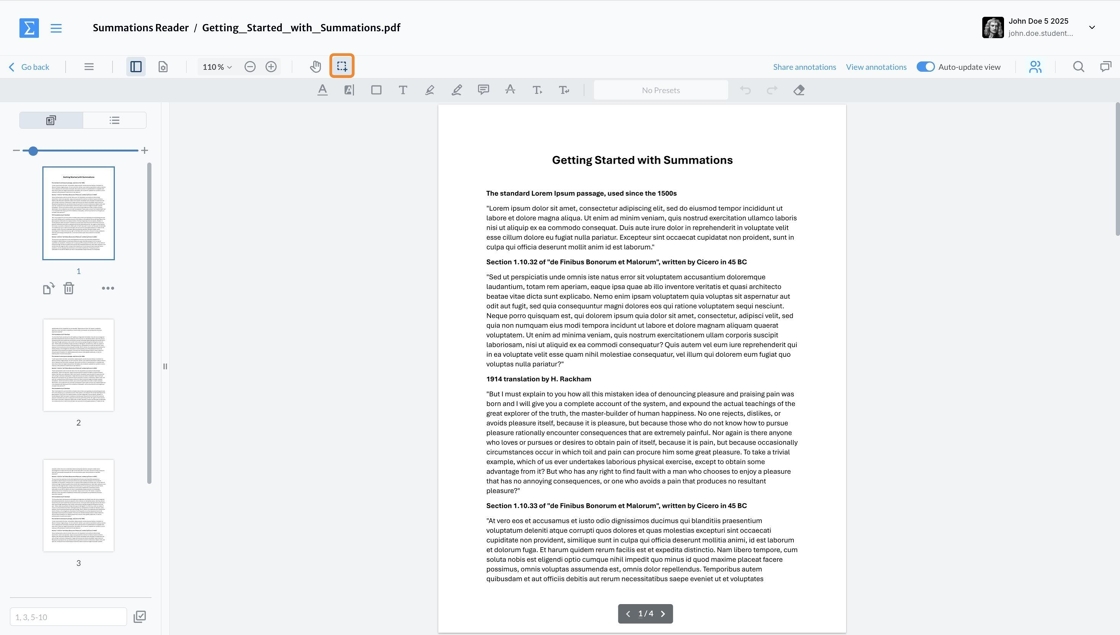
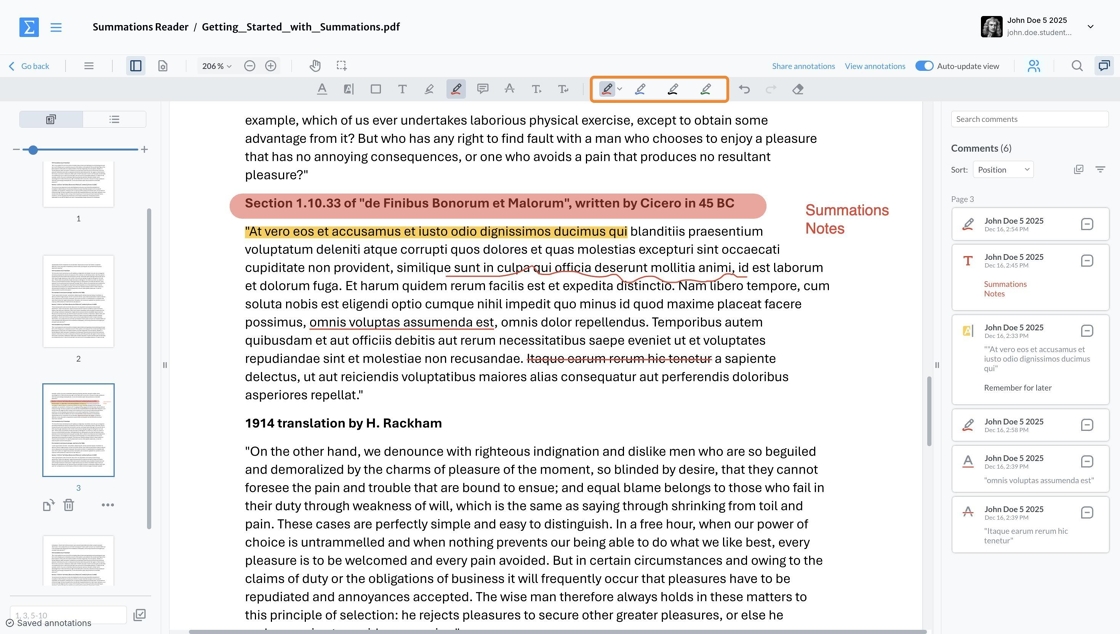
Start by clicking the 'Select' tool.
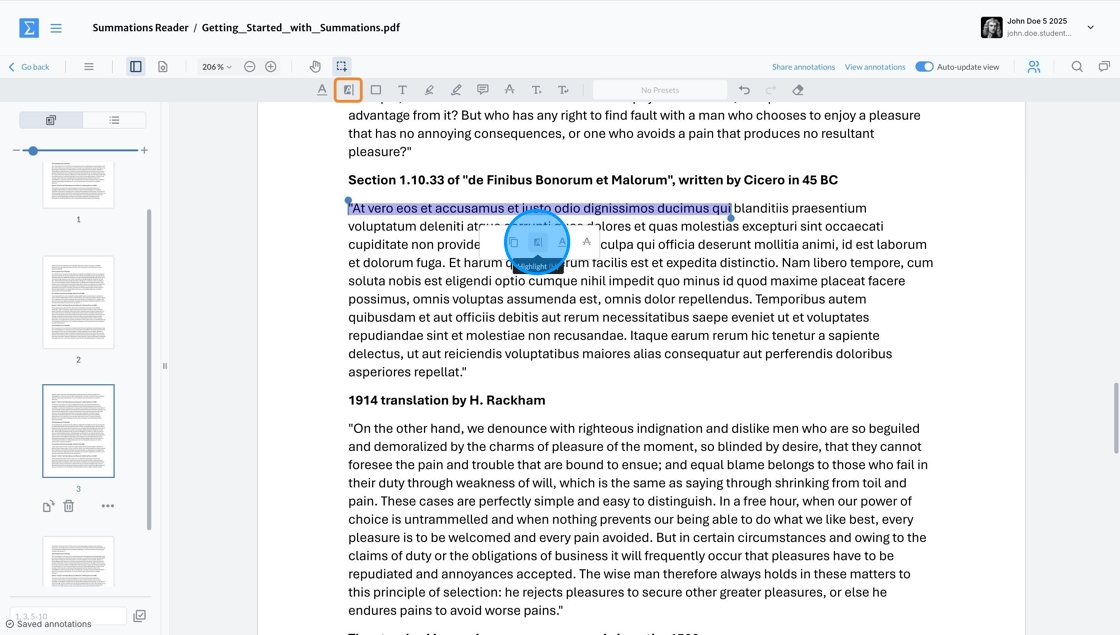
Highlight
To highlight text in the content, you can use one of the following methods:
Method 1:
Select the text you want to highlight.
Right-click with your mouse.
Click the 'Highlight' icon that appears under the selected text to apply the highlight.
Method 2:
Click the 'Highlight' icon in the toolbar above the content.
Select the text you want to highlight.
Use the highlight tool to emphasize key concepts or essential information, guiding students' focus on the most critical parts of the reading.
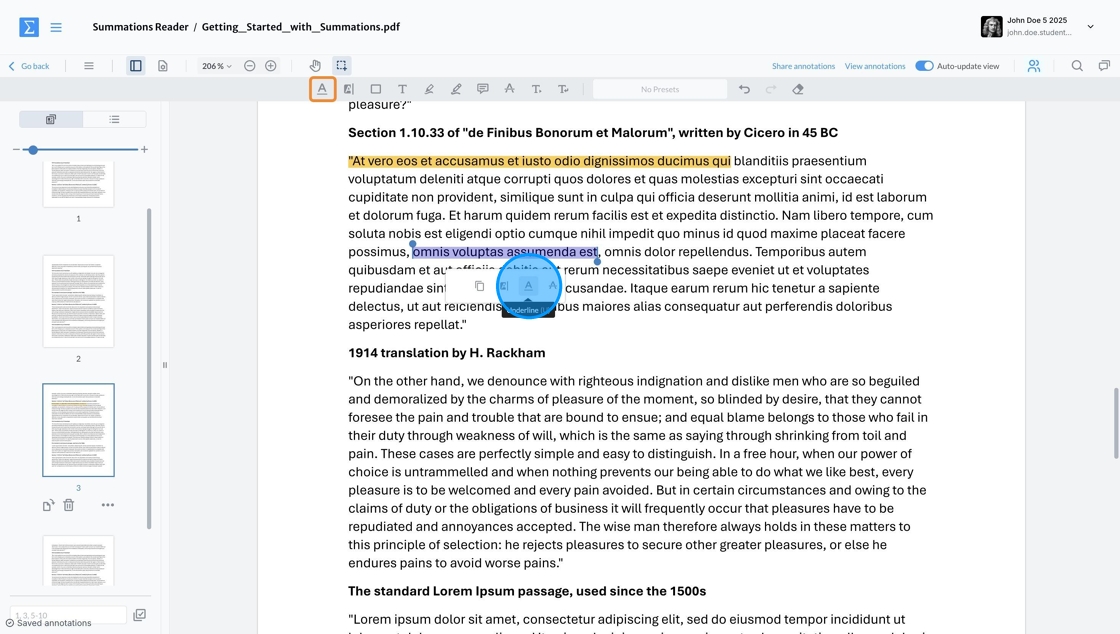
Underline
To underline text in the content, you can use one of the following methods:
Method 1:
Select the text you want to underline.
Right-click with your mouse.
Click the 'Underline' icon that appears under the selected text to apply the highlight.
Method 2:
Click the 'Underline' icon in the toolbar above the content.
Select the text you want to underline.
Use the underline tool to draw attention to supporting details or definitions, helping students connect ideas and reinforce their understanding of the material.
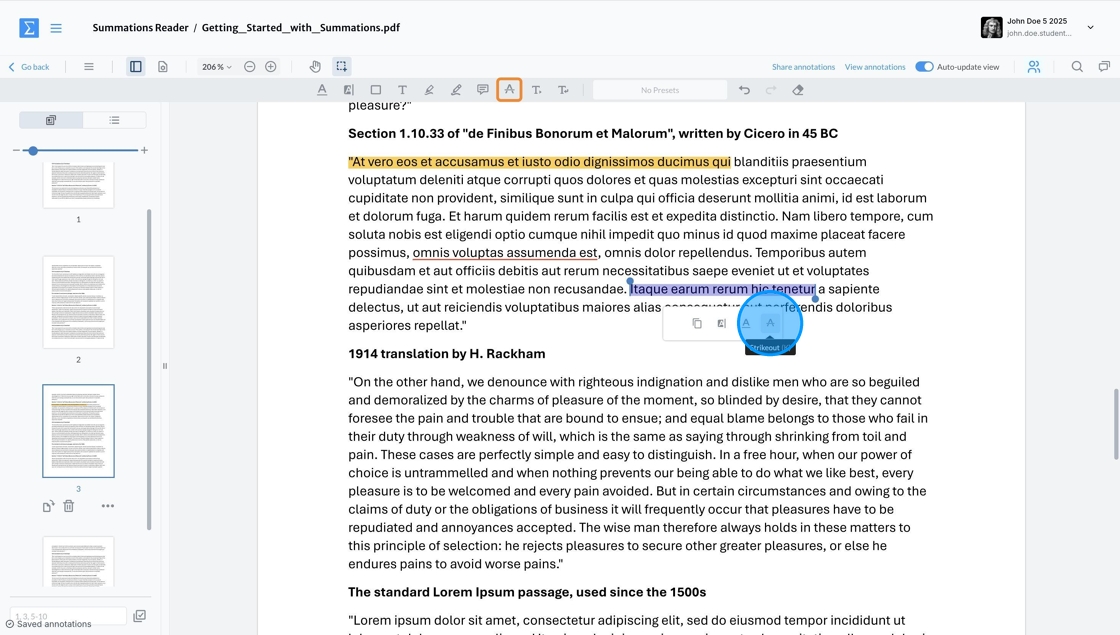
Strikeout
To strikeout text in the content, you can use one of the following methods:
Method 1:
Select the text you want to strikeout.
Right-click with your mouse.
Click the 'strikeout' icon that appears under the selected text to apply the highlight.
Method 2:
Click the 'strikeout' icon in the toolbar above the content.
Select the text you want to strikeout.
Use the strikeout tool to mark outdated or incorrect information, encouraging students to critically analyze the content and engage in discussions about its relevance or accuracy.
Comment
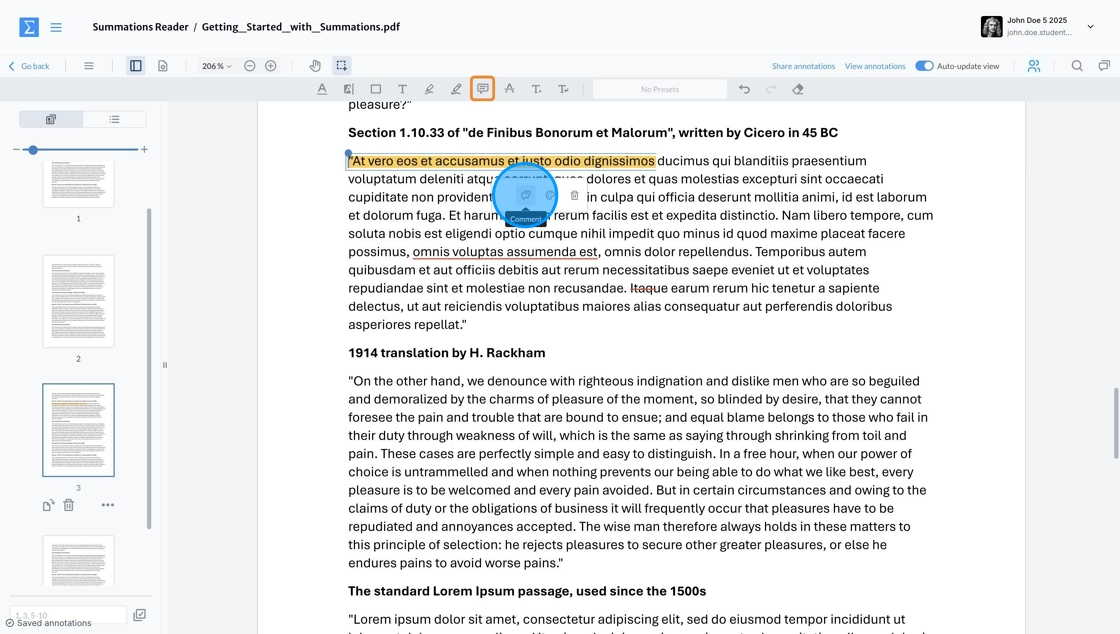
To add a comment in the content, you can use one of the following methods:
Method 1 (Comment on any part of the content):
Click the 'Comment' icon in the toolbar above the content.
Add your comment to any part of the content.
Method 2 (Add a comment directly to an annotation):
Click on the annotation you made.
In the dropdown menu under the annotation, click the 'Comment' icon to add your comment.
Use the comment tool to share insights, pose questions to students, or provide context, fostering deeper engagement and critical thinking about the course material.
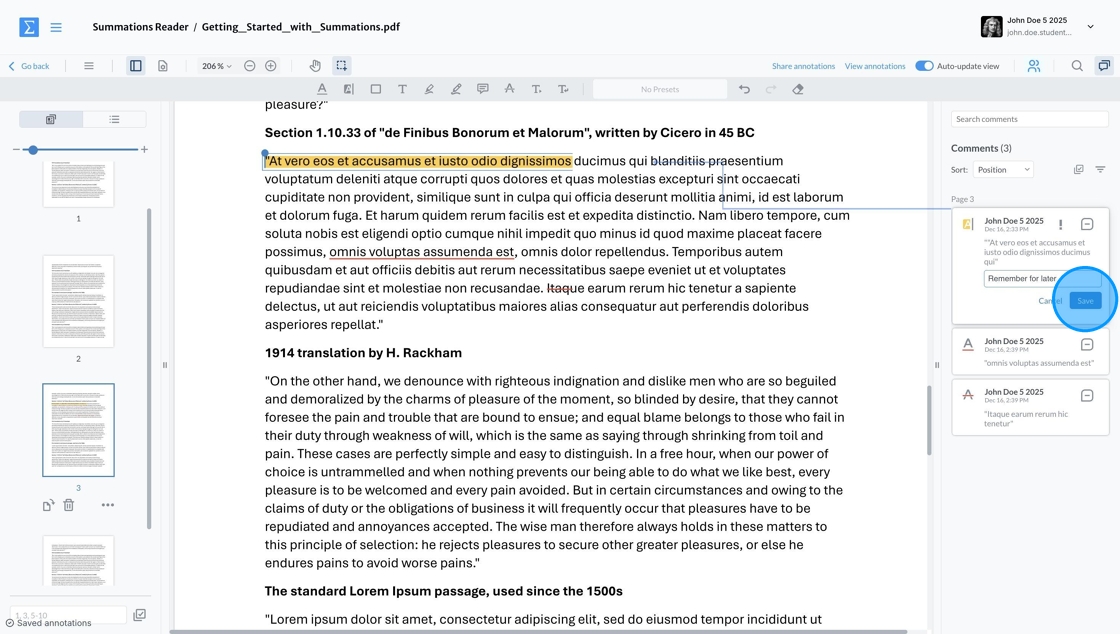
The Comment sidebar will appear. After writing your note or comment, click 'Save' to add it.
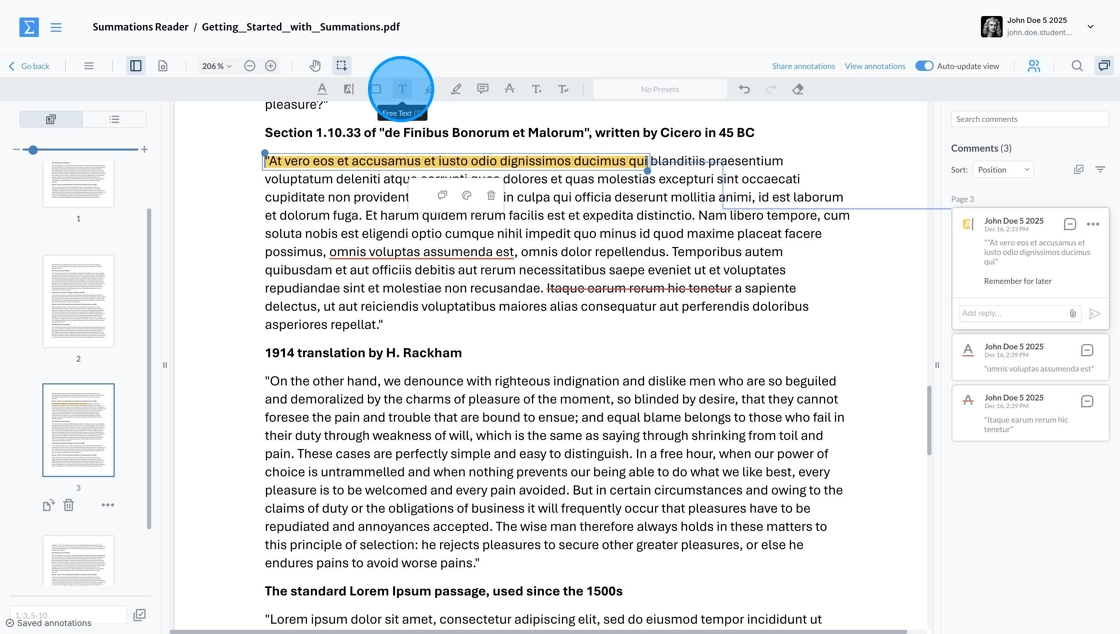
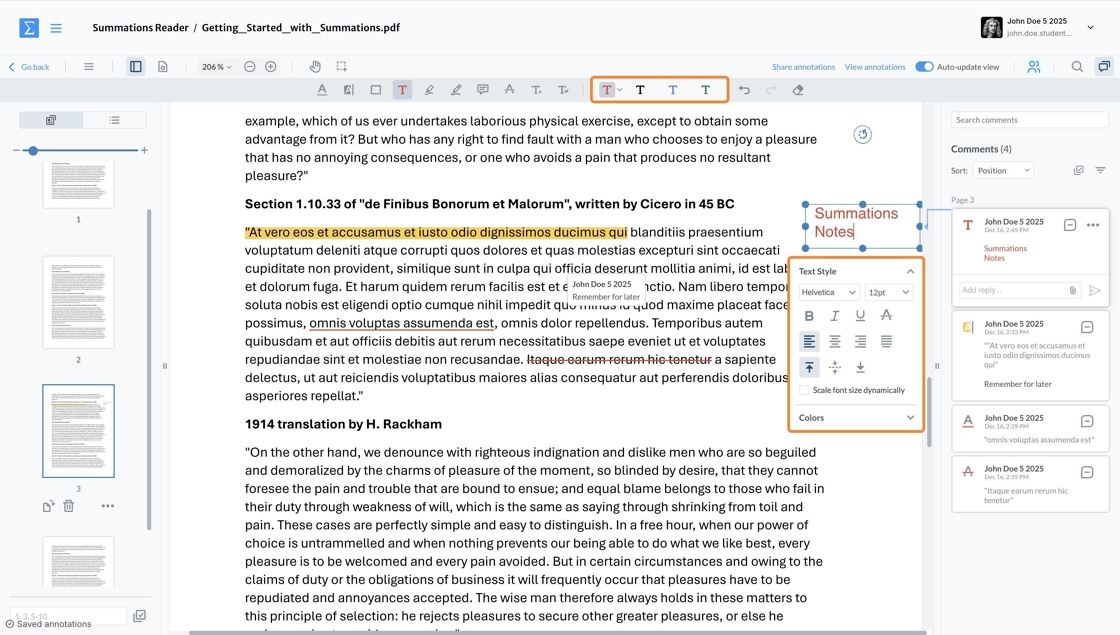
Text Box
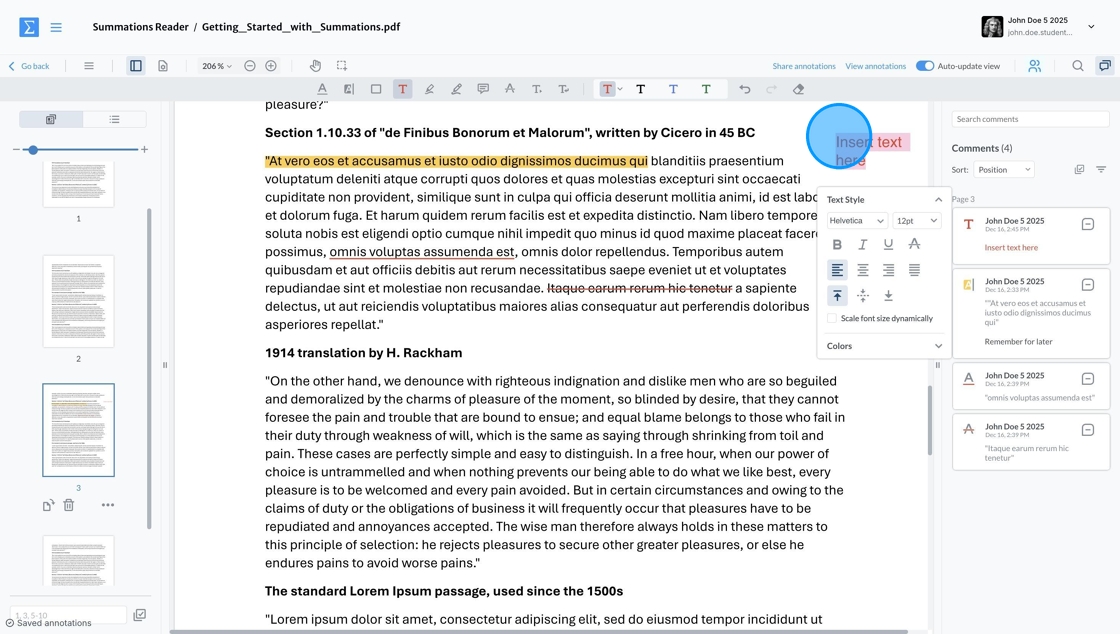
To add a text box to the content, click the Insert Text icon in the toolbar.
Click anywhere on the document where you want to insert the text.
After adding the text, you can customize its style and color using the dropdown menu below the inserted text or adjust its color in the top toolbar.
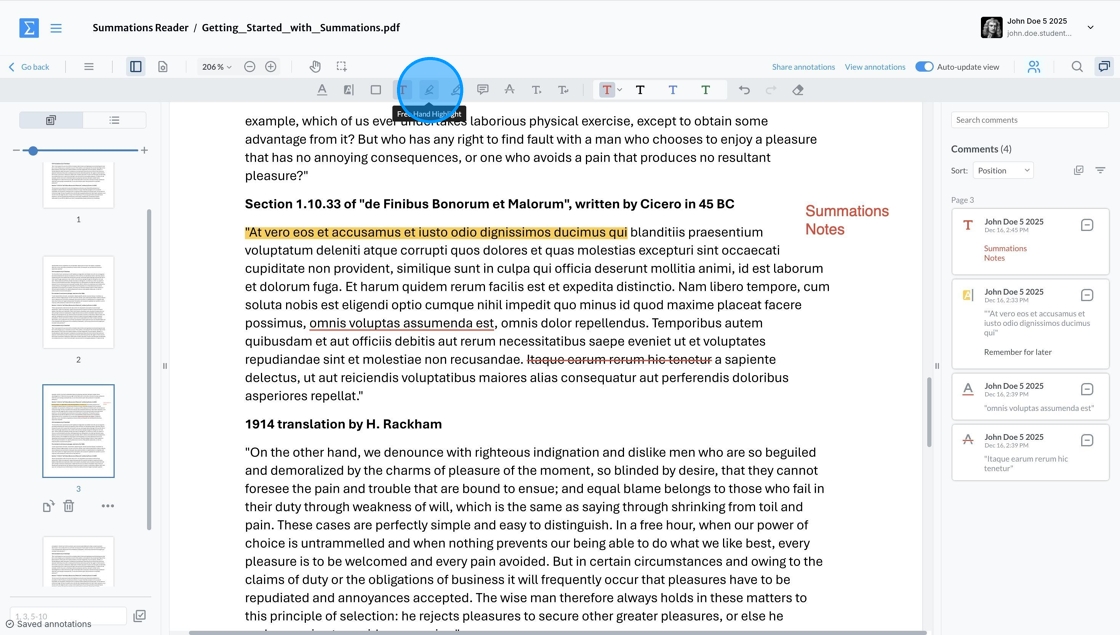
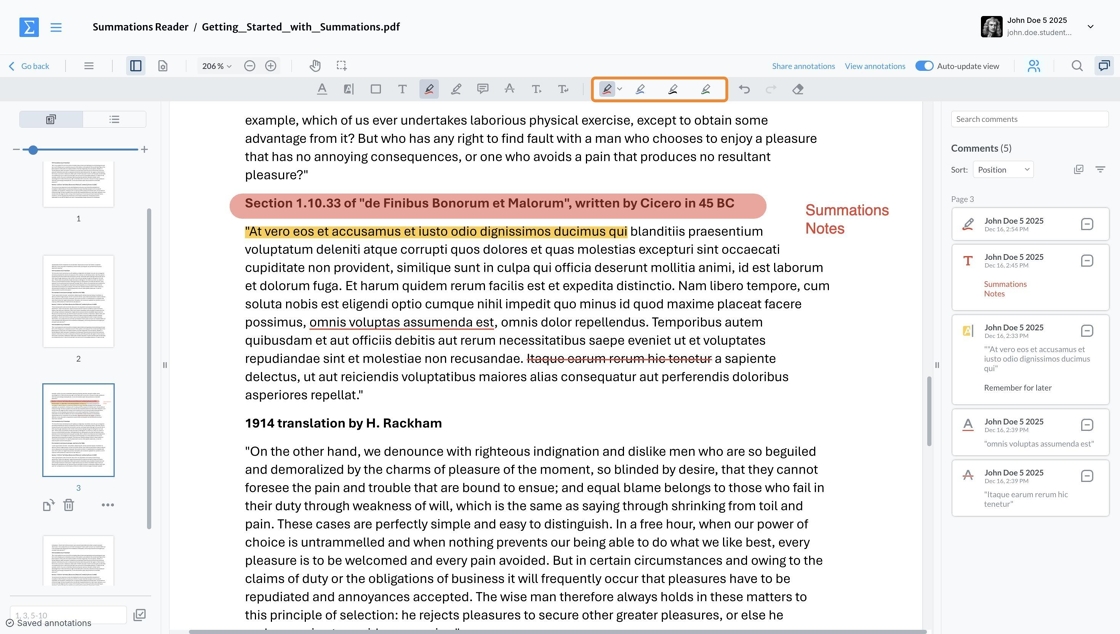
Freehand Highlighting
To highlight text freehand on the document, click the 'Freehand Highlight' icon in the toolbar.
Simply select any text on the page to have it highlighted automatically.
You can customize the highlight color using the top toolbar.
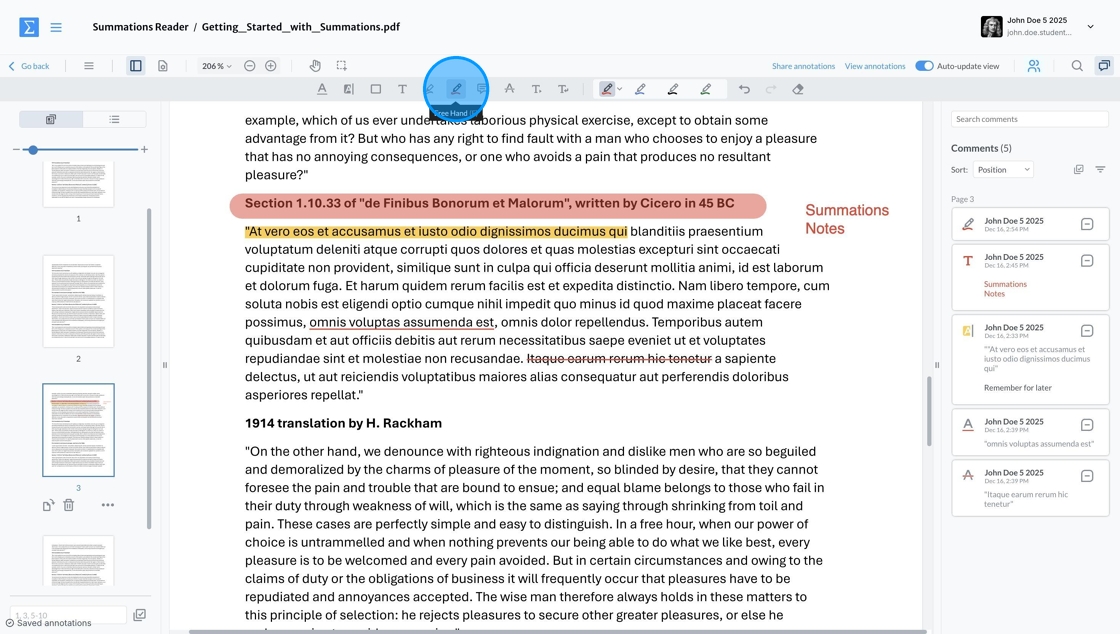
Freehand Drawing
To draw freehand on the document, click the 'Freehand' icon in the toolbar.
Click anywhere on the content to start drawing by holding down the left mouse button.
You can adjust the drawing color using the top toolbar.
Eraser
To erase any annotations made using tools on the Summations Reader, click the 'Erase' icon on the toolbar and select the annotations you want to remove.
Sharing Your Annotations
Sharing your annotations in Summations is a powerful way to enhance collaboration and deepen your understanding of course materials. By sharing your insights, highlights, and notes with your peers, you contribute to a shared learning experience where everyone benefits from diverse perspectives. Engaging with shared annotations allows you to see how others interpret the material, clarify complex concepts, and spark meaningful discussions. Your instructor may require you to share annotations as part of an in-class activity or take-home assignment, making it an integral part of your coursework.
To share annotations in the Summations Reader:
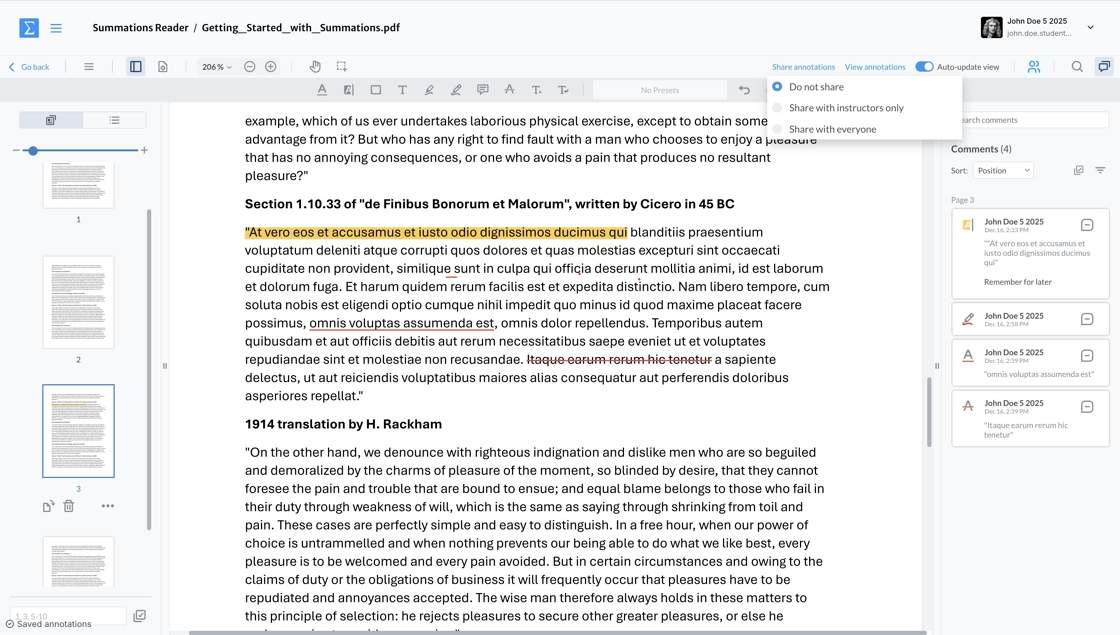
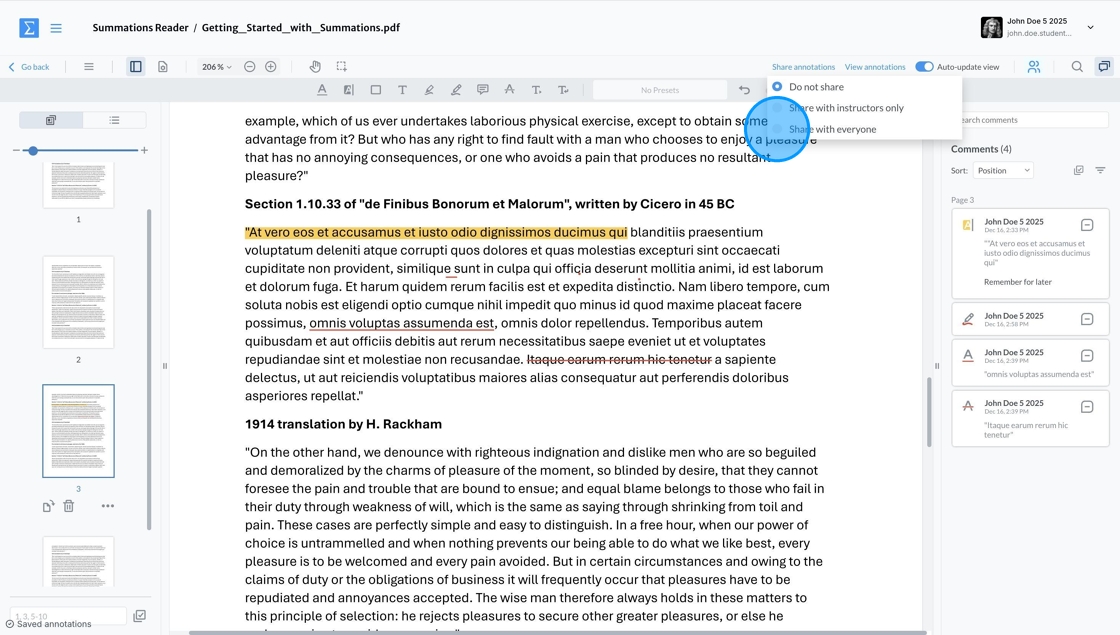
Click 'Share Annotations' located in the top toolbar.
When sharing your annotations in the Summations Reader, you’ll see three options to choose from:
Do not share – Select this option if you want to keep your annotations private for your personal study and reference.
Share with instructors only – Choose this option to share your annotations exclusively with your instructor or teaching assistants (TAs). This option is typically used if your instructor has asked you to complete an activity for participation marks, an in-class activity, homework, or a take-home assignment.
Share with everyone – Use this option to share your annotations with all participants in the course, including classmates, instructors, and TAs.
These options allow you to control how your annotations are shared, enabling you to collaborate or keep your insights private as needed.
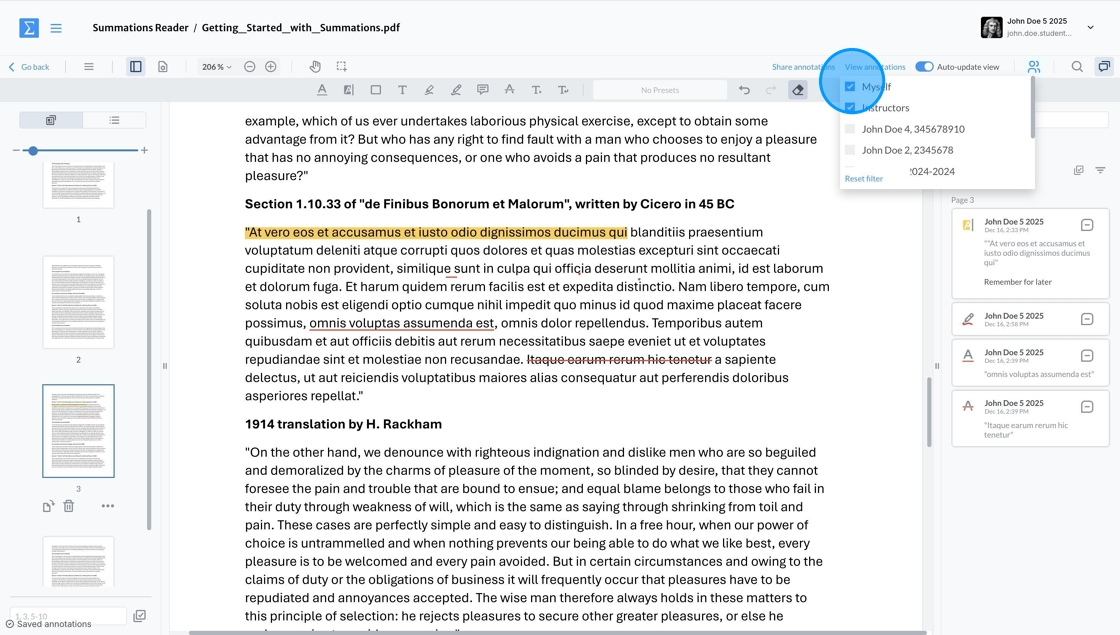
To view annotations made by your classmates or instructors, click 'View Annotations' in the Summations Reader. Then, select the checkbox next to the names of the individuals whose annotations you want to see. This feature allows you to engage with shared insights and collaborate effectively on course materials.
When you share an annotation with your instructor, they will receive an email notification. Your instructor can then view your annotation and provide feedback or insights directly within the Summations Reader. Once your instructor shares their feedback, you’ll be able to view their insights, helping you better understand the material and improve your engagement with the content.
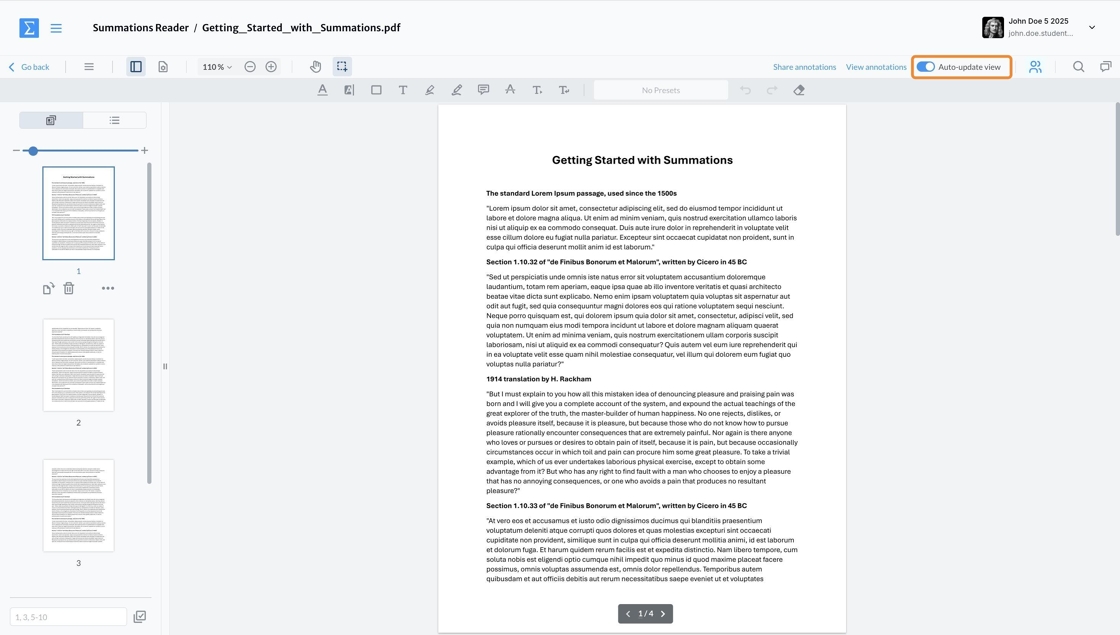
To see real-time updates to annotations shared by your peers or instructors, toggle on the 'Auto-update view'. When this feature is enabled, any changes or new insights will instantly appear on your screen, allowing you to stay up-to-date with collaborative discussions and contributions without needing to refresh the page. This makes it easier to actively engage with the material and participate in ongoing conversations.

